Security Considerations
User Authentication Integration
Resolve Actions Pro can be integrated with an existing LDAP or Active Directory server for user authentication. This enables usernames and passwords to be managed via LDAP rather than separately within Actions Pro. However, the roles, permissions associated with roles, and assignment of roles to users are still managed within Actions Pro.
When a user logs into Actions Pro, Actions Pro first attempts to validate the credentials against the LDAP server as follows:
- If the authentication is valid, access is permitted and the associated role gets assigned to the user.
- If the LDAP authentication fails, Actions Pro will attempt to validate the credentials against its own internal users. If the authentication is valid, access will be permitted and they will assume the role(s) associated with the specified user.
- Fall-back authentication can be disabled in the configuration; however, users will not be able to log in if the integrated server is unavailable.
- If the Internal authentication fails, the user will fail to log in and the login form will be displayed.
Once the user has been authenticated, if the user does not exist in Actions Pro, then a new user gets created with the same username as the LDAP username. The default roles associated with the new user account are copied from the default template account called "User".
Process Flow
The process flow for authentication integration is shown below, and is applicable regardless of the third-party tool used.

Figure 1 - Authentication Process Flow
User Attribute Synchronization
Actions Pro will automatically synchronize some LDAP or Active Directory (AD) attributes with the internal Actions Pro user. The following attributes are copied from the LDAP/AD entities:
- first name
- last name
- title
- phone
- mobile
If you choose LDAP:
- Rsview.auth.ldap.active=true
- rsview.auth.active_directory.active=false
If you choose AD:
- Rsview.auth.ldap.active=false
- rsview.auth.active_directory.active=true
Automatic Group Assignment
Actions Pro can automatically assign LDAP users to pre-defined Actions Pro groups based on existing group membership in LDAP or Active Directory. This greatly simplifies administration of user group and role permissions.
For LDAP users to be automatically assigned to Actions Pro groups, an Actions Pro group must be created with a group "description" field starting with "EXTERNAL:". If the LDAP user is a member of an LDAP/AD group that has the same name as the Actions Pro group (having "EXTERNAL:"), the Actions Pro group gets assigned to the user.
Actions Pro User Template
The default Actions Pro user "User" is used as a template for new LDAP users. The first time a user logs in and successfully authenticates against LDAP, Actions Pro automatically creates a new user definition by duplicating the "User" template and assigning properties from the user LDAP account.
The new user account gets set to:
- User id: Username (the full username entered - e.g. domain.comusername).
- First name: Username without the domain.
- Roles: Copy from the "user".
- Social Groups: The new user is automatically assigned the template user's groups and follows.
If a user logs into Actions Pro but specifies the username in different ways, then multiple accounts are created. For example, if the first time just the username is used, but the second time username@domain.com is used, then two distinct user accounts are created.
LDAP Authentication Setup
Actions Pro can be integrated with an existing LDAP server (for example, OpenLDAP) for user authentication. This enables username and passwords to be managed via LDAP rather than separately within Actions Pro, and users can login to Actions Pro using their LDAP username and password. However, the roles, role permissions, and role assignment are still managed within Actions Pro.
When a user logs in, Actions Pro first attempts to validate the credentials against the LDAP server as follows:
- If the authentication is valid, access is permitted and the associated role gets assigned to the user.
- If the LDAP authentication fails, the credentials are compared against those of internal Actions Pro users. If the authentication is valid, access is permitted and the user assumes the role(s) associated with the specified user.
- If the internal authentication fails, the user fails to log in and returns to the login screen.
New Users Auto-Creation
The first time user logs into Actions Pro and successfully authenticates against LDAP, Actions Pro checks to see if the user exists. If the user does not exist, Actions Pro automatically creates a new user definition based on the template called "user". The new user account gets set to:
- User id: LDAP Username
- First name: Username
- Roles: Copied from the template "user"
It is highly recommended to assign groups to the template "user" account instead of individual roles because it simplifies future assignments and group/role changes.
Configuration
The following Blueprint properties must be set for LDAP authentication.
Table 1 - LDAP Authentication
| Blueprint Property | Description | Example |
|---|---|---|
| rsview.auth.ldap.active | Whether LDAP Authentication is used | true |
| rsview.auth.ldap.ipaddress | LDAP server IP address | 127.0.0.1 |
| rsview.auth.ldap.port | LDAP server Port number | 389 |
| rsview.auth.ldap.ssl | Whether SSL connection to the LDAP server is needed | false |
| rsview.auth.ldap.sync | Whether to sync LDAP attributes with the Actions Pro user attributes | true |
| rsview.auth.ldap.fallback | Whether to fall back to Actions Pro local authentication of LDAP authentication fails | true |
| rsview.auth.ldap.basedn.dn.1 | BASE DN used to bind users, more than one BASE DN can be specified using .1, .2, etc. | o=resolve,c=us |
| rsview.auth.ldap.mode | Connection Mode Used, Mode types described below | BIND |
| rsview.auth.ldap.uid_attribute | User ID attribute | uid |
| rsview.auth.ldap.bind_dn | Full DN of user to bind for COMPARE mode | o=resolve,c=us |
| rsview.auth.ldap.bind_password | Password of bind_dn user for COMPARE mode | resolve |
| rsview.auth.ldap.password_attribute | Attribute field for user passwords to use in COMPARE mode | userPassword |
| rsview.auth.ldap.crypt_type | Type of encryption to use when comparing passwords in COMPARE mode (clear, crypt, or md5) | CLEAR |
| rsview.auth.ldap.crypt_prefix | Prefix string to use when comparing passwords in COMPARE mode (DEFAULT will change based on crypt type) | DEFAULT |
| rsview.auth.ldap.version | LDAP Version | 3 |
| rsview.auth.ldap.grouprequired | Whether or not an external group is required to fully authenticate | false |
These Blueprint properties, when applied, will be set in the <INSTALLDIR>/tomcat/webapps/resolve/WEB-INF/config.xml configuration file.
LDAP Authentication Modes
The Lightweight Directory Access Protocol (LDAP) is a directory service protocol that runs on a layer above the TCP/IP stack. It provides a mechanism used to connect to, search, and modify Internet directories. The LDAP directory service is based on a client-server model.
- BIND - This mode will authenticate the user by "binding" the user to the LDAP server using the username/password provided by the user. The full user name that will be bound is cn=<username>,<base_dn> (e.g. cn=john.smith,o=sgi,c=us)
- BIND_UID - This mode is like bind, but the user ID attribute (rsview.auth.ldap.uid_attribute) will be used in place of cn= when generating the full user name.
- COMPARE - This mode will authenticate the user using the following steps:
- Bind to LDAP using the BIND DN and BIND Password attributes.
- Search for the user's encrypted password in the "Password Attribute" field.
- Encrypt the password provided by the user using the Crypt Type and Crypt Prefix (rsview.auth.ldap.crypt_type and rsview.auth.ldap.crypt_prefix).
- Compare the encrypted provided password with the encrypted password from the "Password Attribute" field.
Searching for the provided user will be done using the Base DN value (rsview.auth.ldap.base_dn) as the root DN to search from.
Auto-Assigning Groups
Actions Pro groups can be auto-assigned based on the user's existing LDAP groups ("member of" attribute). To make an Actions Pro group assignable through this method, just edit the description for the group so it starts with "EXTERNAL:". Once it is marked as external, it will auto-assign based on matching the Actions Pro group name to the values in the LDAP "memberof" attribute.
If the property rsview.auth.ldap.grouprequired is true, then the user must have at least one EXTERNAL marked group in order to authenticate to Actions Pro.
LDAPS (SSL/TLS) Configuration
See the Installation Guides (in the Community site) for instructions on setting up SSL support for Actions Pro web user interface.
To configure LDAPS, perform the following steps:
- Create and export a trusted root certificate (a .der file). The certificate file is named ldap.der. Instructions for creating a certificate are outside the scope of this document. Contact your security administrator.
- Import the certificate into the keystore file that you created for the HTTPS.note
Both HTTPS and LDAPS must use the same keystore file. For example, if ldap.der is the certificate filename and keystore is the keystore filename, use the command in step 3.
- Use the following command:
/opt/resolve/jre/bin/keytool –import –file ldap.der –keystore /opt/resolve/ .keystore –alias "type=[r.name](http://r.name/)\=ldap"noteStep 3 may not be required because it may have already been set by Tomcat SSL Setup. Edit the rsview.tomcat.connector.https.keystoreFile and rsview.tomcat.connector.https.keystorePass Blueprint attributes with the keystore location and password (rsview.tomcat.https must be set to true also). This will set the following property in the <INSTALLDIR>tomcat/bin/run.sh:
-Djavax.net.ssl.trustStore=
For example:
-Djavax.net.ssl.trustStore=/opt/resolve/.keystore - Change the blueprint.properties to set LDAP SSL attribute to true and PORT to 636 as follows, then apply the Blueprint while the RSView is down:
rsview.auth.ldap.port=636rsview.auth.ldap.ssl=true
Active Directory Authentication
Actions Pro can be set up to authenticate users who use Microsoft Active Directory. These users get validated against Active Directory first, and if that fails, then the credentials get validated against the internal users within Actions Pro. To validate Active Directory users, login by using a username and password. The following formats are supported:
- username (requires the DEFAULT_DOMAIN configuration to be defined)
- domain.comusername
- username@domain.com
If the login fails, the credentials are compared against the internal Actions Pro users.
New User Auto-Creation
The first time the user logs into Actions Pro and successfully authenticates against Active Directory, Actions Pro checks to see if the user exists; if the user does not exist, Actions Pro automatically creates a new user definition based on the template called "user". The new user account gets set to:
- User id: Username (the full username entered - e.g. domain.comusername).
- First name: Username without the domain.
- Roles: Copy from the "user".
If the user logs into Actions Pro but specifies the username in different ways (for example, the first time using domain.comusername and the second time using username@domain.com), this creates two distinct user accounts.
Configuration
The following Blueprint properties must be set for Active Directory authentication:
Table 2 – Blueprint Properties
| Blueprint Property | Description | Example |
|---|---|---|
| rsview.auth.active_directory.active | Whether Active Directory Authentication is used | true |
| rsview.auth.active_directory.ipaddress | Active Directory server IP address | 127.0.0.1 |
| rsview.auth.active_directory.port | Active Directory server Port number | 389 (default) or 636 (SSL) |
| rsview.auth.active_directory.ssl | Whether SSL connection to the Active Directory server is needed | false |
| rsview.auth.active_directory.sync | Whether to sync Active Directory attributes with the Actions Pro user attributes | true |
| rsview.auth.active_directory.fallback | Whether to fall back to Actions Pro local authentication of Active Directory authentication fails | true |
| rsview.auth.active_directory.default_domain | Domain used to bind users during authentication, so users can leave out domain when logging in | |
| rsview.auth.active_directory.basedn.dn.1 | BASE DN used to search for user attributes, more than one BASE DN can be specified using .1, .2, etc. | dc=resolve, dc=com |
| rsview.auth.active_directory.mode | Connection Mode Used, Mode types described below | BIND |
| rsview.auth.active_directory.uid_attribute | User ID attribute | uid |
| rsview.auth.active_directory.bind_dn | Account used to search for user attributes when authenticating with Windows SSO | |
| rsview.auth.active_directory.bind_password | Password for the account used to search for user attributes when authenticating with Windows SSO | |
| rsview.auth.active_directory.version | Active Directory Version | 3 |
| rsview.auth.active_directory.grouprequired | Whether or not an external group is required to fully authenticate | false |
Active Directory Authentication Modes
BIND - This mode will authenticate the user by "binding" the user to the Active Directory server using the username/password provided by the user. The full user name that will be bound is <username>@<default_domain> (e.g. john.smith@sgi.us).
Searching for the provided user will be done using the Base DN values (rsview.auth.active_directory.basedn.dn.1, etc.) as the root DN to search from.
Auto-Assigning Groups
Actions Pro groups can be auto-assigned based on the user's existing Active Directory groups ("memberof" attribute). To make Actions Pro group assignable through this method, just edit the description for the group so it starts with "EXTERNAL:". Once it is marked as external, it will auto-assign based on matching Actions Pro group name to the values in the Active Directory "memberof" attribute.
If the property rsview.auth.active_directory.grouprequired is true, then the user must have at least one EXTERNAL marked group in order to authenticate to Actions Pro.
Applying the Active Directory Configuration
To configure Active Directory, perform the following steps:
- Stop Tomcat
- Edit the rsview.auth.active_directory section of the blueprint.properties file
- Apply the blueprint changes using the config.sh/bat script
- Re-start Tomcat
Securing the Active Directory Connection
To configure SSL Active Directory, perform the following steps:
Create and export a trusted root certificate (a .der file). The certificate file is named ad.der. Instructions for creating a certificate are outside the scope of this document. Contact your security administrator.
Import the certificate into the keystore file that you created for the HTTPS.
noteBoth HTTPS and SSL Active Directory must use the same keystore file. For example, if ad.der is the certificate filename and keystore is the keystore filename, use the following command:
/opt/resolve/jre/bin/keytool –import –file ad.der –keystore /opt/ resolve/.keystore –alias "type=[r.name](http://r.name/)\=ad"noteThis step may not be required because it may have already been set by Tomcat SSL Setup. Edit the rsview.tomcat.connector.https.keystoreFile and rsview.tomcat.connector.https.keystorePass blueprint attributes with the keystore location and password (rsview.tomcat.https must be set to true also). This will set the following property in the <INSTALLDIR>tomcat/bin/run.sh):
-Djavax.net.ssl.trustStore=For example:
-Djavax.net.ssl.trustStore=/opt/resolve/.keystoreChange the blueprint.properties to set Active Directory SSL attribute to true and PORT to 636 as follows, then apply the blueprint while the RSView is down:
rsview.auth.active_directory.port=636
rsview.auth.active_directory.ssl=true
Actions Pro and Windows Single-Sign-On Authentication
Actions Pro can be configured to allow SSO based on the user's Windows credentials. The authentication is accomplished in two parts.
- The SPNEGO and/or BASIC protocol is used to validate the user's current Windows credentials, and
- The user's Active Directory attributes are looked up to sync with their Actions Pro user attributes. If either of these steps fails, then the user will have to fall back to normal Active Directory or Actions Pro authentication.
You must use Active Directory, not LDAP.
To configure Actions Pro for Windows Single-Sign-On (SSO) authentication, perform pre-configuration as well as regular configuration changes.
Pre-Configuration Setup
To configure Actions Pro for Windows Single-Sign-On (SSO) authentication, first perform the following:
- Create an Active Directory domain account for the Actions Pro application. This account will be used in the Active Directory and SSO.
- Configure Active Directory authentication to active in the Blueprint, make sure that rsview.auth.active_directory.bind_dn and rsview.auth.active_directory.bind_password are configured with the account created in step 1.
- Get the Windows Domain and Realm names. Sometimes the Domain and Realm names are the same values. Realm names are often capitalized. These values will be used in the krb5 part of the SSO configuration.
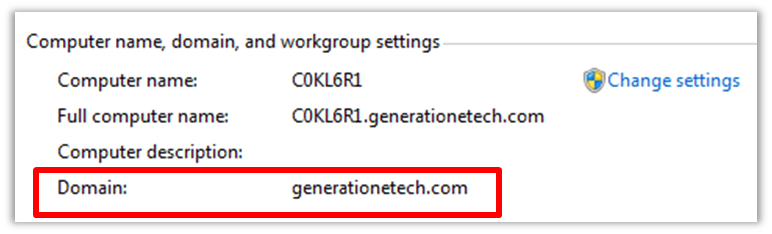
Figure 2 - Domain Name in Windows System Properties - Get the Address of the Key Distribution Center (KDC). The KDC is usually the same as the primary domain controller or active directory. One way to determine the IP address is to ping the Domain. Use the fully qualified domain name (FQDN) for the address of the KDC instead of an IP address.
- Register any Service Principal Names (SPN) needed. The SPN list should contain ALL possible aliases for your service, for example, HTTP/myhost.domain.com and HTTP/myhost. A system or network administrator should be able to help with this step. To register the SPNs, you must have domain admin privileges to run the following commands:
setspn.exe –A HTTP/myhost.domain.com mydomainacct
setspn.exe –A HTTP/myhost mydomainacct
Do not register an SPN to more than one username. A username can have more than one SPN registered, but an SPN can only have one username.
Configuration
In addition to the Active Directory configuration, the following settings will need to be configured in the Blueprint.
Table 3 – Active Directory Configuration
| Blueprint Property | Description | Example |
|---|---|---|
| rsview.auth.windows.active | Whether or not to allow SSO | false |
| rsview.auth.windows.domainuser | Domain User used by BASIC Auth mechanism for establishing a Login Context | |
| rsview.auth.windows.domainpass | Password of Domain User used by BASIC Auth mechanism for establishing a Login Context | |
| rsview.auth.windows.allow_basic | Whether BASIC Authentication is allowed | true |
| rsview.auth.windows.allow_unsecure | Whether unsecure BASIC authentication is supported | true |
| rsview.auth.windows.allow_delegation | Whether credential delegation is allowed | true |
| rsview.auth.windows.allow_localhost | Whether to allow localhost to be used in authentication | true |
| rsview.auth.windows.prompt_ntlm | Whether to prompt the user if authentication is an NTLM request | true |
| rsview.auth.windows.use_keytab | Whether to use keytab in the authentication | false |
| rsview.auth.windows.servermodulename | Server module name used in the Login Context | spnego-server |
| rsview.auth.windows.clientmodulename | Client module name used in the BASIC Authentiction Login Context | spnego-clien |
Browser Configuration
Configure the browser for Windows SPNEGO and Kerberos authentication. See HTTP-Based Cross-Platform Authentication by Using the Negotiate Protocol for additional information.
Internet Explorer Local Intranet and Authentication Configuration
Because this solution assumes that the intranet environment is not exposed to the public internet, configure Internet Explorer to work with the SSO solution after you configure the local intranet properties. To configure the local intranet properties, perform the following steps:
- In Internet Explorer, go to the Tools menu and select Internet Options. Click the Security tab.
- Select "Local intranet" and click "Sites".
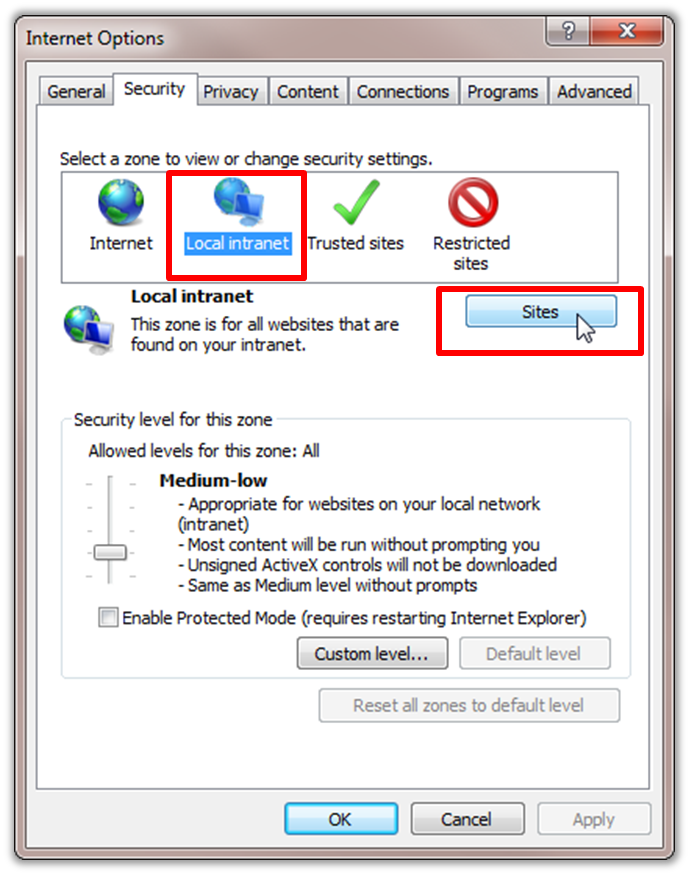
Figure 3 - IE Internet Options Security Tab - Ensure that the box to "Include all sites that bypass the proxy server" is checked, then click "Advanced".
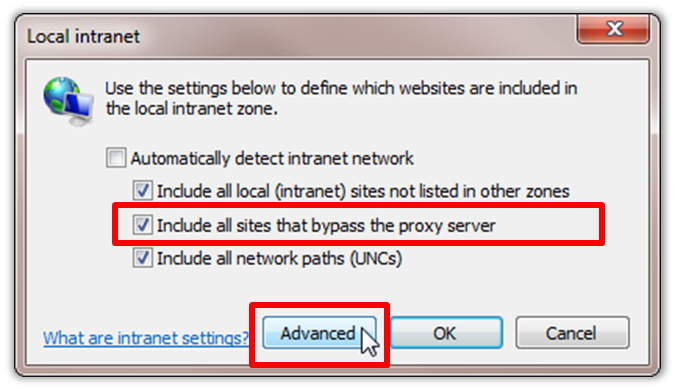
Figure 4 - Local Intranet Advanced Dialog - Enter all relative domain names that get used on the intranet, for example
.proseware.com, in the Local intranet (Advanced) dialog box. - Click "Close" and "OK" to close the dialog boxes.
To configure intranet authentication, perform the following steps:
- Return to Internet Options and click the Security tab.
- Select "Local intranet" and click "Custom Level".
- Scroll down to the end for the "User Authentication" section of the list in the Security Settings - Local Intranet Zone dialog box. Select "Automatic logon only in Intranet zone". This setting prevents users from saving to re-enter logon credentials, a key piece of the solution.
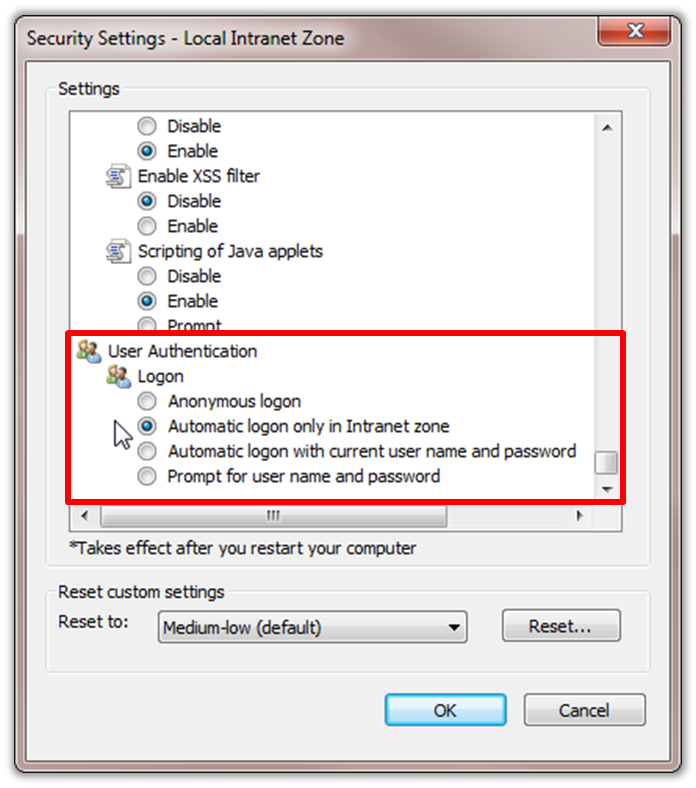
Figure 5 - IE Security Settings - Click "OK" to close the dialog box.
Internet Explorer Advanced Configuration
In addition to the local intranet settings, one additional may be required for IE:
- Return to the Tools menu and select Internet Options.
- Click the Advanced tab.
- Scroll down to the "Security" section.
- Ensure that the "Enable Integrated Windows Authentication" box is checked, and then click "OK".
If this box was not checked, restart the computer for it to take effect.
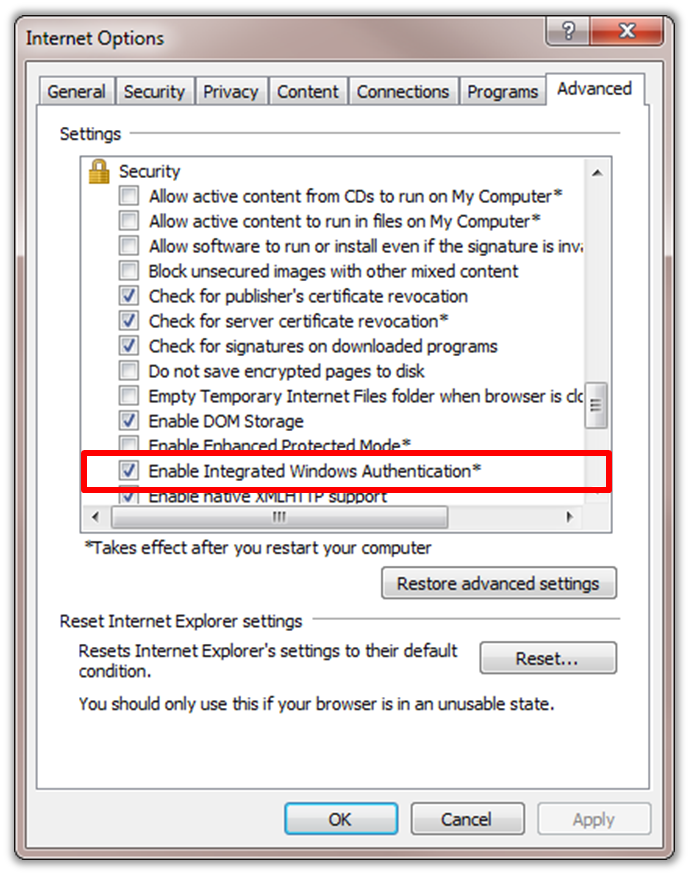
Figure 6 - IE Advanced Security Settings
Firefox Authentication Configuration
Use the following steps to configure Firefox to allow SSO:
- Go to about:config using the address bar.
- Filter on "network.automatic" in the "Search:" bar.
- Modify the "network.automatic-ntlm-auth.trusted-uris" preference and set it to the SPNs registered in the Pre-Configuration steps (comma-delimited).

Figure 7 - Firefox Trusted URIs Settings
Troubleshooting
If there are any issues with the SSO through IE, try checking the following:
- Make sure Microsoft Internet Explorer is configured with the server in the "Trusted sites" or "Local intranet" zone.
- Make sure Microsoft Internet Explorer is configured for Integrated Windows Authentication.
- Make sure the client workstation is logged into the Active Directory domain configured in Actions Pro, and not a member of different an Active Directory domain (Kerberos realms).
- Make sure the client workstation is specifying the correct host name to access the Actions Pro server. Ensure that the host name correctly matches the registered SPN value.
- Make sure both the RSView Windows authentication and the Active Directory authentication are turned on. Check if you are able to use the Active Directory username and password to sign in the login form.
Related Information
The following links are available for additional data:
- Integrated Windows Authentication and Authorization in Java
- HTTP-Based Cross-Platform Authentication by Using the Negotiate Protocol
LDAP/AD Authentication through RSRemote
RSRemote LDAP or Active Directory integration is necessary when integrating with multiple LDAP and AD servers, or when integrating with an LDAP/AD server that is not on the same network as the RSView components. In this usecase, RSRemotes are designated (via the Blueprint configuration) as responsible for connecting to LDAP or AD. LDAP or AD connection profiles are then configured via the GUI.
When a user attempts to log in, the RSRemote attempts to authenticate him by connecting to LDAP/AD. If this fails, authentication falls back to RSView (if enabled).
This configuration allows an RSRemote to be placed behind a firewall where it can connect to an LDAP/AD server (also behind the firewall), without exposing that server.
LDAP Configuration Management
Actions Pro LDAP information management involves creating, editing, and deleting LDAP configurations. You can:
- Search for LDAP configurations
- Create new LDAP configurations
- Modify existing LDAP configurations
- Delete user LDAP configurations
Configuring RSRemote
Before configuring LDAP through the GUI, at least one RSRemote in the cluster must be configured to allow for LDAP connections. To enable LDAP connections from an RSRemote, set the following blueprint settings:
rsremote.receive.ldap.active=true
rsremote.receive.ldap.queue=LDAP
# if userauth=true this gateway may be used for Actions Pro
# user authentication
rsremote.receive.ldap.userauth=true
Creating LDAP Configuration
To create a wiki configuration, perform the following steps:
- In the User Administration menu, select the LDAP Configuration item.
- Click New.
- Fill in all the LDAP configuration fields as shown in the table below and finally, click Save & Exit.
| LDAP Fields | Description |
|---|---|
| Domain | LDAP domain. Example: example.com |
| Organization | Name of the organization to which this domain belongs |
| Gateway | Gateway needed to connect to LDAP server. Example: AD125 |
| IP Address | IP address of the LDAP server. Example: 10.0.0.1 |
| SSL | Check box for enable SSL |
| Fallback | Fallback to internal authentication from the database |
| Mode | Mode of the LDAP. |
| Version | Version of LDAP. Example: 3 |
| Bind DN | Bind Domain Name |
| Bind Password | Bind Password |
| User ID Attribute | User ID attribute. Example: sAMAccountName |
| Password Attribute | Password Attribute |
| Crypt Type | Cryptographical Type |
| Crypt Prefix | Cryptographical Prefix |
| Base DN List | Base Domain List. Example: OU=Example,DC=resolve,DC=com |
| Properties | Properties for LDAP |
Modifying or Deleting LDAP Configurations
To modify a LDAP configuration, perform the following steps:
- Return to the User Administration main menu to select LDAP Configuration. All existing LDAP configurations are displayed.
- Find the desired LDAP configurations. Multiple rows can be selected for deletion.
- To edit a configuration, click the "More Information" icon to bring up the account information. Change the fields as required.
- To delete, click Delete in the toolbar. The LDAP configurations get permanently removed. Ensure that you are deleting the correct LDAP configurations beforehand.
Active Directory Configuration Management
Actions Pro Active Directory information management involves creating, editing, and deleting Active Directory configurations. You can:
- Search for Active Directory configurations
- Create new Active Directory configurations
- Modify existing Active Directory configurations
- Delete user Active Directory configurations
Configuring RSRemote
Before configuring Active Directory through the GUI, at least one RSRemote in the cluster must be configured to allow for Active Directory connections. To enable Active Directory connections from an RSRemote, set the following Blueprint settings:
rsremote.receive.ad.active=true
rsremote.receive.ad.queue=AD
# if userauth=true this gateway may be used for Actions Pro
# user authentication
rsremote.receive.ad.userauth=true
Creating Active Directory Configuration
To create a wiki configuration, perform the following steps:
- Go to the User Administration main menu, and click on the Active Directory Configuration menu item.
- Click New.
- Fill in all the Active Directory configuration fields as shown. When finished, click Save & Exit.
The following table lists the Active Directory configuration fields.
| Active Directory Fields | Descriptions |
|---|---|
| Domain | LDAP domain |
| Organization | Name of the organization to which this domain belongs |
| Gateway | Gateway needed to connect to Active Directory server |
| IP Address | IP address of the Active Directory server |
| SSL | Check box for enable SSL |
| Fallback | Fallback to internal authentication from the database |
| Mode | Mode of Active Directory |
| Version | Version of Active Directory |
| Bind DN | Bind Domain Name |
| Bind Password | Bind Password |
| User ID Attribute | User ID attribute |
| Base DN List | Base Domain List |
| Properties | Properties for Active Directory |
Modifying or Deleting Active Directory Configurations
To modify an Active Directory configuration, perform the following steps:
- Return to the User Administration main menu to select Active Directory Configuration. All existing Active Directory configurations are displayed.
- Find the desired Active Directory configurations. Multiple rows can be selected for deletion.
- To edit a configuration, click the "More Information" icon to bring up the account information. Change the fields as required.
- To delete, click Delete in the toolbar. The Active Directory configurations get permanently removed. Ensure that you are deleting the correct Active Directory configurations beforehand.
Configuring HTTPS/SSL for RSView
Before your Actions Pro installation can support secure connections, you must install an SSL certificate and configure encryption keys. If you do not install an SSL certificate, your Actions Pro instance can still function properly, but then you are not able to connect to Actions Pro user interface using a secure (https) connection. All connections to the user interface are via unsecured (http) connections.
The SSL certificate may also be needed for LDAP/S configuration.
To install an SSL certificate on your system, follow the keystore instructions at Apache Tomcat 6.0 - SSL Configuration HOW-TO
The tomcat configuration gets handled by the following Blueprint properties:
- rsview.tomcat.http
- rsview.tomcat.https
- rsview.tomcat.connector.https.port
- rsview.tomcat.connector.https.keystoreFile
- rsview.tomcat.connector.https.keystorePass
To ensure that unsecured connections are not allowed, rsview.tomcat.http should be set to false. Set rsview.tomcat.https to true, keystoreFile to the created keystore, and keystorePass to the password set on the keystore. The port can be 8443, unless another connection port for the user interface is required.
Unsecured HTTP connections can also be set up to auto-forward to HTTPS by setting the rsview.web.httpsForward property to true.
By default, all the JVM messages are SSL-encrypted via 4004 comunication.
When setting up the keystore, the password for any certs in the keystore must match the password for the keystore itself.
Network Ports
Following is a list of ports organized by Actions Pro components that must be open on the host system or network firewall for the Actions Pro application to function. All other ports should be closed. You can configure the ports with other values if required.
RSView
| Name | Component(s) | Transport | Port(s) | Comments |
|---|---|---|---|---|
| Tomcat | RSView | TCP | 8080 (http), 443 or 8443 (https) | Web browsers use to connect to the web application |
| RSMQ Client | RSView | TCP | 4004 | Used for RSView to communicate with RSMQ server |
| Database | RSView | TCP | 1521 or 3306 | Used for RSView to communicate with database server |
| RSSearch | RSView | TCP | 9300 | Used for RSView to communicate with RSSearch server |
| LDAP | RSView | TCP | 389 or 636 | If RSView is authenticated against LDAP or AD, 389/636 should be open |
RSControl
| Name | Component(s) | Transport | Port(s) | Comments |
|---|---|---|---|---|
| RSMQ Client | RSControl | TCP | 4004 | Used for RSControl to communicate with RSMQ server |
| Database | RSControl | TCP | 1521 or 3306 | Used for RSControl to communicate with database server |
| RSSearch | RSView | TCP | 9300 | Used for RSControl to communicate with RSSearch server |
RSSearch
| Name | Component(s) | Transport | Port(s) | Comments |
|---|---|---|---|---|
| Elasticsearch | RSSearch | TCP | 9300 | Port for Elasticsearch node-to-node communication |
| Elasticsearch http | RSSearch | TCP | 9200 | Port for Elasticsearch http traffic. Should only be opened to RSView, RSControl, RSSearch hosts |
| Elasticsearch Cluster Discovery | RSSearch | multicast | 54328 | Elasticsearch cluster discovery |
RSMQ
| Name | Component(s) | Transport | Port(s) | Comments |
|---|---|---|---|---|
| RSMQ Communication Port | RSMQ | TCP | 4004 | Used to send JMS messages, it is SSL by default |
| Server Management Port | RSMQ | TCP | 15672 | RSMQ Server management port |
| epmd Port | RSMQ | TCP | 4369 | The default epmd port for RSMQ |
| Erlang Distribution | RSMQ | TCP | 35197 | RSMQ cluster port |
RSMgmt
| Name | Component(s) | Transport | Port(s) | Comments |
|---|---|---|---|---|
| Database | RSMgmt | TCP | 1521 or 3306 | Used to communicate with the database server |
| MCP | RSMgmt | TCP | 8082 | Used for Actions Pro Master Controller |
RSRemote
| Name | Component(s) | Transport | Port(s) | Comments |
|---|---|---|---|---|
| RMQ | RSRemote | TCP | 4004 | Used to communicate with the RSMQ server |
| Gateway | RSRemote | TCP | any | any port that is required by different type of gateway |
| LDAP | RSRemote | TCP | 389 or 636 | If RSRemote is used to authenticate against LDAP or AD, 389/636 should be open |
SQL Database Ports
| Name | Component(s) | Transport | Port(s) | Comments |
|---|---|---|---|---|
| Oracle | Database | TCP | 1521 | SQL data store |
| MySQL | Database | TCP | 3306 | SQL data store |
Changing the Super User Password
The "resolve.maint user" is a super-user for the Actions Pro UI. Strong passwords are highly recommended. The "resolve.maint password" can be changed from the RSConsole using the following steps:
- Log into RSConsole.
- Connect to a RSView queue (optional). A specific RSView can be targeted with its unique GUID found in <INSTALLDIR>/tomcat/webapps/resolve/WEB-INF/config.xml.
- Change to the config directory.
- Run _SetMaintPassword.
- Provide the correct current password and the new password to use. A message should return from each RSView indicating whether the change was successful. Additional logs on the password change can be found in each "rsview.log". If no connection was established in Step 2, the script automatically uses the RSView topic to broadcast the password change to all connected RSView components.
RSConsole [Version 3.4.2]

RSConsole [Version 3.4.2]
(C) Copyright 2010 Resolve Enterprises, LLC

Username: admin
Password: ********

RSCONSOLE started ...
#/>cd config
#/config> _SetMaintPassword
Old Password: <maint password>
New Password: <new password>
14
Connecting with secure network...

Connect session: RSVIEWS

RSVIEWS#/config>

[0179892EDBE7C303293FA6E206B53535#localhost.rsview]
resolve.maint password updated
Unlike all other users, the resolve.maint user is configured on the file system. If any new RSView components are added to the cluster, this procedure must be repeated to change the resolve.maint password for the new RSView components.
Setting or Changing the RSMQ User and Password
For further secure Actions Pro messaging beyond system firewalls, the RSMQ component communicates through an SSL connection with its own password protection. To change the default RSMQ username and password, do the following steps:
- Edit the "rsmq.username" and "rsmq.password" in all the servers.
- Run config while all components are down.
- Start just the RSMQ components.
- Run the relevant "setup_user" script (depending on OS):
- rabbitmq/linux64/rabbitmq/sbin/setup_user.sh
- rabbitmq/solaris/rabbitmq/sbin/setup_user.sh
- rabbitmq/windows/rabbitmq/sbin/setup_user.bat
- Start all other components.
Groovy APIs Sandboxing Mechanism
Actions Pro uses a mechanism to restrict the Actions Pro APIs being used by the groovy scripts. That is achieved by using Static Type Checking introduced in Groovy 2.0 and specifically during groovy code compile phase.
Actions Pro performs a check each time an Action Task is executed. If potentially harmful API is called or there is a syntax error in the groovy code, Actions Pro adds it to the “blacklist” of APIs. Validation occurs during groovy code compilation and if the groovy API is present in the “blacklist” Actions Pro breaks the script compilation with exception before the Action Task is executed. Instead, it throws an error in the Worksheets Results log.
The sandboxing mechanism can be enabled per Actions Pro component and is enabled/disabled through a property in the blueprint.properties file. It is disabled by default. In order to enforce the groovy sandboxing follow the detailed instructions below.
Configuring Groovy API White and Black List
The sandboxing filtering mechanism uses both black and white lists to filter out the APIs. The black list takes precedence over the white list in case there are duplicate entries in both lists. This means that if an API call is in present in the black list, an error will be printed out during code compilation even if the same API call is present in the white list. The black and white list files can be found in: /opt/resolve/rsmgmt/config
- groovy_blacklist.properties - list of all restricted class/methods that cannot be used by groovy script.
- groovy_whitelist.properties - list of all allowed class/methods to be used by groovy scripts. Actions Pro comes with a default list of enabled groovy methods which are used by Actions Pro content.
- There is a third list called groovy_sandbox_bindings.properties which contains all bindings with types that Actions Pro exposes to the groovy scripts. The purpose of the properties list is to classify the objects because Actions Pro has no information about the objects and the Static Type Checking at compile time. If a variable expression is marked as "unresolved" by the groovy compiler, Actions Pro verifies in the properties list and if such variable exists in it, it marks it as resolved.
Enabling and Configuring the Sandboxing Mechanism
- Navigate to /opt/resolve/rsmgmt/config
- Open blueprint.properties file and search for "/groovy"
- The sandboxing can be enabled per Actions Pro component:
###############################################################
# Groovy Sandbox parameters
###############################################################
rscontrol.groovy.sandbox.enable=false
rscontrol.groovy.sandbox.location=${DIST}/rscontrol/config
rsremote.groovy.sandbox.enable=false
rsremote.groovy.sandbox.location=${DIST}/rsremote/config
rsview.groovy.sandbox.enable=false
rsview.groovy.sandbox.location=${DIST}/tomcat/webapps/resolve/WEB-INF
rsconsole.groovy.sandbox.enable=false
rsconsole.groovy.sandbox.location=${DIST}/rsconsole/config
rsmgmt.groovy.sandbox.enable=false
rsmgmt.groovy.sandbox.location=${DIST}/rsmgmt/config
rssync.groovy.sandbox.enable=false
rssync.groovy.sandbox.location=${DIST}/rssync/config
rsarchive.groovy.sandbox.enable=false
rsarchive.groovy.sandbox.location=${DIST}/rsarchive/config - To enable any of the components set
{module}.groovy.sandbox.enable=true - The
{module}.groovy.sandbox.locationproperty sets the directory where thegroovy_blacklist.properties,groovy_whitelist.properties, andgroovy_sandbox_bindings.propertiessandboxing properties files are located.
If the default location of the three property files is changed you need to reflect that in{module}.groovy.sandbox.location. - In order for the configuration to take effect first you have to stop the Actions Pro service for that module or all Actions Pro services:
/opt/resolve/bin/_stop.sh {module} - The changes applied in the blueprint.properties file in
/opt/resolve/rsmgmt/confighave to be enforced with:/opt/resolve/bin/config.sh - Start the services, so that the groovy properties can take effect:
/opt/resolve/bin/run.sh {module}
How to Verify if the Groovy Sandboxing is Enabled Successfully
Each Actions Pro component (rsarchive, rsconsole, rscontrol, rsmgmt, rsremote, rssync. rsview) has a configuration XML file, located at /opt/resolve/{module}/config which depends on the global blueprint.properties file and reflects the changes there.
For convenience all three groovy sandboxing property files are enabled from a single directory - <Actions Pro home> /opt/resolve/rsmgmt/config and after enforcing the changes and restarting the services, those are updated in the XML file for each Actions Pro component. Follow the steps below to verify the properties are enforced correctly:
- Open
/opt/resolve/{module}/config - Open the
config.xml<GROOVY>
<SANDBOX ENABLE="true" LOCATION="/opt/resolve/{module}/config"/>
</GROOVY>
The SANDBOX LOCATION must point to the location of the three property files:
groovy_blacklist.properties
groovy_whitelist.properties
groovy_sandbox_bindings.properties
The default location of the files is /opt/resolve/{module}/config. Make sure ENABLE =true
List of all properties connected to the groovy sandboxing mechanism can be found in Blueprint Configuration. The format of the sandboxing blueprint property is:
{module}.groovy.sandbox.enable.
The default value of all properties is false.
Rate Limit
Actions Pro 7.1 introduces a mechanism of limiting the number of requests a user can make to an endpoint over a given period of time. The restriction is made at the IP level if the user is not logged in, otherwise the username is used. Each user is assigned with a list of endpoints respectively with their limits.
If an endpoint has a restriction, its value is decreased by one after hitting it. The number of remaining allowed hits for exact API is returned as a value in the response header under the Remaining-Rate-Limit variable.
If for the given period of time the rate limit for endpoint is reached, “HttpStatus.TOO_MANY_REQUESTS” response error is returned to the frontend. In this case, the request cannot be passed to the backend. When the rate limit interval expires, the counter is restored to its original value and the API is re-enabled.
There is a relationship between endpoint and restriction. The number of items in each list must be the same, because the pairs of endpoint with the corresponding counter are grouped by positions (indexes)
A list of new blueprint properties are added to the blueprint.properties file and the system properties which allow customization and control over the arte limiting functionality. Refer to the “Rate limit blueprint properties“ and “Rate limit system properties“ tables for details.
Rate Limit Blueprint Properties
| Property | Description |
|---|---|
| rsview.general.rateLimit.isRateLimitEnabled | Indicates whether rate limiting is enabled. Its default value is true, which means that the limit is on. |
| rsview.general.rateLimit.rateLimitInterval | Indicates the interval at which counters of the endpoints will be restarted. The value of this property is number showing interval in minutes. The default value is 1 minute which is the minimum value that is supported. |
| rsview.general.rateLimit.excludeEndpoint | Specific endpoints that shouldn’t have rate limit. Exclusion of the endpoints take precedence over the other constraints. Even if the rate limit is enabled and there is a wildcard for some endpoint, if it is present in this property, all restrictions will expire for that exact endpoint. By default, this list is empty. There are currently no specific APIs to explicitly remove from the rate limiting. |
| rsview.general.rateLimit.hitCounter | Shows how many consecutive times a user can reach their rate limit before an alarm is triggered, in order to notify the administrator of a potential problem/attack. The default value is 5 times in a row and the minimum value that is supported is 1, which shows that at least once the quota for certain rate limit needs to be surpassed before sending a notification. Each user has a list of endpoints respectively with their rate limit hit counters.A counter is restarted in two cases: - When a hit quota for some rate limit is reached – in this case, alert mechanism is triggered before the restart of the counter. - When the mechanism for restarting the rate limit over some time interval is activated – in this case, the counter is restarted only if in the currently elapsed interval the corresponding user has not reached a certain endpoint limit. This shows that there are no consistent exhaustions of the rate limit quotas. |
| rsview.general.rateLimit.endpoint | List of all endpoints that have restrictions. Wildcards are allowed. The default value of this property is / **, / **/ login / **. (If on the arrival of a request, the corresponding endpoint satisfies several different APIs, then the number of all is reduced by one. The remaining number of allowed API calls is taken to be the lowest remaining value.)The patterns that are supported are: - /** - each endpoint satisfies this pattern- ... /** ... - the endpoint must start and end with exact paths but can have everything in the middle (example: /x/y/**/m/n = /x/y/a/b/m/n)- /** ... - the endpoint must end with exact path (example: /**/x/y = /a/b/x/y)- ... /** - the endpoint must start with exact path (example: /x/y/** = /x/y/a/b)- /**/.../** - the endpoint must contain exact path (example: /**/x/y/z/** = /a/b/x/y/z/c/d)Explicit endpoint without wildcard shows that the path needs to be exactly the same. |
| rsview.general.rateLimit.restriction | List of numbers that show the number of hits allowed for each endpoint. The default value of this property is "2000, 20". Important: There is a relationship between endpoint and restriction. The number of items in each list must be the same, because the pairs of endpoint with the corresponding counter are grouped by positions (indexes). If an endpoint has a restriction, its value is decreased by one after hitting it. The number of remaining allowed hits for exact API is returned as a value in the response header under the Remaining-Rate-Limit variable. If for the given period of time the rate limit for endpoint is reached, a 429 Too Many Requests response error is returned. In this case, the request can’t continue to the server. When the rate limit interval expires, the counter is restored to its original value and the API is re-enabled. |
Rate Limit System Properties
| property | description |
|---|---|
| global.ratelimit.ratio | Ratio used for controlling the request throttling mechanism used in Actions Produring runtime. It is a simple multiplier that is applied to the default ratelimit values (rounding to the next largest integer[1]). By default global.ratelimit.ratio has a value of 1. global.ratelimit.ratio expects a double value bigger than 0. However, system properties do not ask for a valid value. When the property has an invalid value(whether null or not a number bigger than 0), it defaults to 1.[2] Examples (ratelimit in blueprint.properties for an endpoint is 1000), global.ratelimit.ratio = - 1 => ratelimit = 1000 1 = 1000 - 0.5 => ratelimit = 1000 0.5 = 500 - 0.3333 => ratelimit = 1000 0.3333 ≈ 334 (see [1]) - 0 => ratelimit = 1000 1 = 1000 (see [2]) - 3 => ratelimit = 1000 1 = 1000 (see [2]) - 1ab = > ratelimit = 1000 1 = 1000 (see [2]) - null => ratelimit = 1000 * 1 = 1000 (see [2]) note global.ratelimit.ratio is applied the next time counters are reset (see rsview.general.rateLimit.rateLimitInterval). |