Gateway Builder
Overview
Gateway Builder is a pull-type gateway that allows you to integrate with any external system for which Resolve Actions Pro does not provide a dedicated gateway type.
Using Groovy code, you can implement exactly the kind of logic required by your integration. It could, for example, query an external service management system and scan for relevant events, tickets, or alarms at fixed intervals.
Items retrieved from the integration can then be transformed and processed using Actions Pro Automations or by harnessing Groovy code directly in the gateway filter, including updating the integration system with the results.
Is offers the following features:
- Runs at intervals defined by the gateway filter and executes custom logic written in Groovy to query external systems for alerts/tickets.
- Provides the option to pass custom name/value parameters as input to the Groovy script. These are available to allow users to parameterize their scripts to work with different sets of connection and authentication parameters.
- Provides the option to encrypt the values for parameters containing sensitive information.
- Provides the ability to persist and later retrieve attributes of the last ticket or event, fetched from the external system, allowing users to build queries that only fetch new events and tickets.
- Provides the ability to write to the Actions Pro log using Groovy.
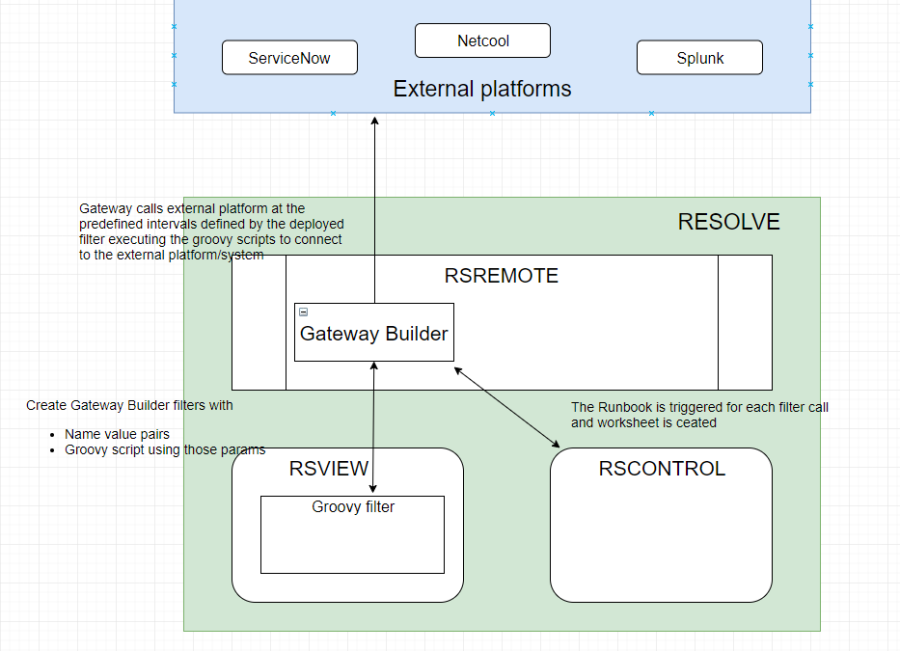
Integration Architecture
The Groovy gateway works in conjunction with RSRemote. The diagram below describes how Gateway Builder collaborates with the rest of the Actions Pro components.
Prerequisites
Ensure that you have the following in place before starting configuring the Gateway Builder:
- Connection and authentication parameters for the external service that the Gateway Builder will scan for events or tickets.
For example, if you plan to fetch events from a REST API exposed by a third-party system, you need the URL of the service and the authentication tokens that the service accepts. In addition, if you use a secure service, you need the SSL root certificates of the service available in the Java truststore. The Gateway Builder runs on JDK and only trusts CA authorities that the JDK trusts by default. - Access to the Actions Pro Web UI with admin role or any equivalent role with privileges to access Gateway Administration screen.
Configuring Gateway Builder
Use the blueprint.properties file to configure the Gateway Builder, then distribute the configuration across all your RSRemote instances if you have more than one.
Complete these steps on each node running RSRemote:
- Stop all Actions Pro services:
- Linux:
# stop all services
<actions-pro-home>/bin/stop.sh all
# verify all services are stopped
<actions-pro-home>/bin/status.sh all - Windows:
- Open the Windows Services servlet.
- Stop the following services:
- RSRemote
- RSMgmt
- Linux:
- Set the configuration properties:
- On nodes where RSRemote is installed next to other core components, edit
<actions-pro-home>/rsmgmt/config/blueprint.properties. - On standalone RSRemote installations, edit the following file:
- Windows:
C:\Program Files\Resolve Systems\rsmgmt\config\blueprint.properties
Substitute your actual installation path forC:\Program Files\Resolve Systems. - Linux:
/opt/resolve/rsmgmt/config/blueprint.propertiesSubstitute your installation path for/opt/resolve.
- Windows:
- On nodes where RSRemote is installed next to other core components, edit
- Apply the configuration changes:
- Linux:
<actions-pro-home>/bin/config.sh - Windows:
<actions-pro-home>\bin\config.bat
- Linux:
- Restart the services:
- Linux:
<actions-pro-home>/bin/run.sh all - Windows:
- Open the Windows Services servlet.
- Start the following services:
- RSRemote
- RSMgmt
- Linux:
After performing the gateway's initial setup, you are ready to create gateway filters.
Alternatively, you can set up the same properties through the UI, as follows:
- Navigate to Remote Administration > Gateway Administration.
- Select BUILDER.
- Click Actions > Gateway Configuration.
- In the Gateway Configuration screen, click Edit.
- Make your changes and finally click Save Changes.
After doing the initial configuration, you can continue setting up filters and authentication methods in the Actions Pro Web UI.
List of Gateway Builder Properties
The Gateway Builder default configuration properties are sufficient to get started. However, if you like to use any of the advanced features like high availability or a custom queue name, you need to modify the defaults.
| Property | Description |
|---|---|
| rsremote.receive.builder.type | Must always be set to PULL for Gateway Builder. |
| rsremote.receive.builder.primary | This property designates the RSRemote as primary. It is either true to or false. It could be false when you have more than one RSRemote and another RSRemote is primary. Default: true. |
| rsremote.receive.builder.secondary | This property designates the RSRemote as secondary. It is either true or false. It is usually false, but could be true when you have more than one RSRemote and another RSRemote is primary. Default: false. |
| rsremote.receive.builder.worker | This property designates that this RSRemote will process messages sent to the Gateway queue defined in rsremote.receive.builder.queue. It is either true or false. It is usually true but when set to false this RSRemote will not process messages sent to that particular queue. However, if secondary or primary is set to true, it can still poll for external events and send publish them on the queue for other RSRemote(s) to process. Default: true. |
| rsremote.receive.builder.mock | Internal Use Only. Do NOT change. Default: false. |
| rsremote.receive.builder.failover | In Seconds. This property designates the amount of time a secondary RSRemote node will wait for primary node to respond with a hearbeat before taking over primary node responsibility. Default: 20. |
| rsremote.receive.builder.heartbeat | In Seconds. This property designates the frequency with which the primary RSRemote node will send a signal to secondary RSRemote(s) to notify that the primary RSRemote is alive. Default: 20. |
| rsremote.receive.builder.interval | Interval used by the filters to poll for events. This value will be defaulted to whatever is set in the blueprint for every new filter created. Default: 10. |
| rsremote.receive.builder.active | This property designates if the gateway queue is active on the RSRemote. It can take true/false only. If false the gateway would not show up on the Menu. Default: true. |
| rsremote.receive.builder.queue | This is the designed Queue Name used for communicating between RSRemote with RSControl and RSView. Default: BUILDER. |
| rsremote.receive.builder.uppercase | This property designates if the keys received from Zenoss will be all converted to uppercase or stay in the same case as received. It can be true or false. Default: true. |
| rsremote.receive.builder.menutitle | The "Menu title". Default: Gateway Builder. |
| rsremote.receive.groovy.implprefix | The type of gateway Do NOT change. (Used by RSRemote). Default: Builder. |
| rsremote.receive.builder.package | The SDK gateway package Do NOT change. (Used by RSRemote). Default: com.resolve.gateway.pull.builder. |
The sdkfield<N> properties are not required by Gateway Builder. You can add input key-value pairs dynamically when setting up a gateway filter.
Configuring a Gateway Filter
The gateway filter is where all the gateway's logic lives, as well as most of its settings.
You can create as many gateway filters as you like. You might want to do that when dealing with a complex integration that requires multiple checks in various databases, with differing processing steps.
A single gateway filter workflow includes the following steps:
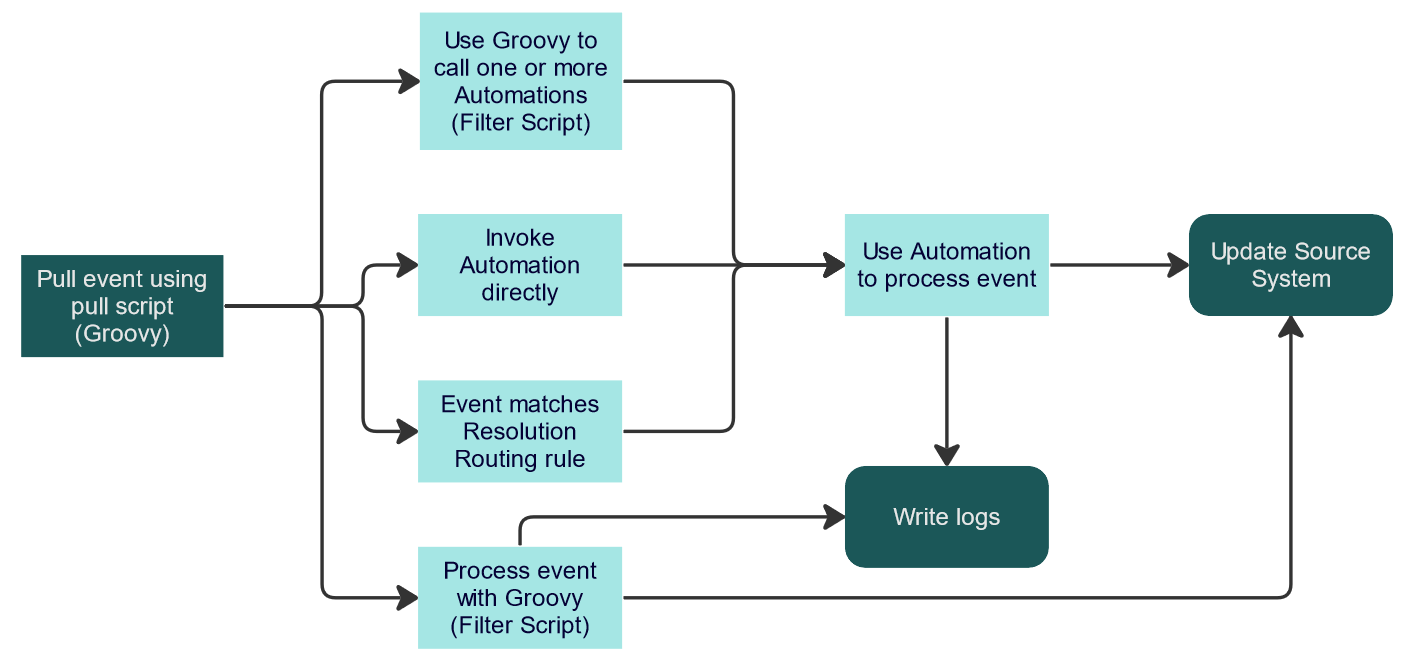
The event workflows starts at the pull script. In it, you write Groovy code to connect to your integration and retrieve events, alerts, or any kind of data or simply update the system that you are integrating with.
After pulling the data using the pull script, you will need to process it and probably update the integration system. You can choose from several options to do that:
- Use the filter script to do direct manipulations: This option is suitable for simpler scenarios with a lower number of event types and low-code remediation actions.
- Use the filter script to invoke one or more pre-built Automations that will do the manipulations: This option gives you the opportunity to process the event data before sending it to RSControl (which executes the Automation) or even skip sending conditionally. You can even do branching depending on the even data, invoking different Automations, similarly to the Resolution Routing option.
- Use Resolution Routing rules that match the event: This option is useful when you have built remediation Automations that match events from the gateway. In case multiple rules are matched, the Resolution Routing engine selects the rule it deems the most refined.
- Invoke an Automation directly (see the Runbook field): This option is mostly useful when you are looking for speed of execution (for example, when you want to respond to an HTTP REST call as quickly as possible). In this case, all event data processing logic will be contained inside a single Automation.
Implementing two or more of those options at the same time is possible if your use case requires it. See Processing Results for more details and things to pay attention to.
Depending on the processing method you choose, you have a couple of options for dealing with the processing result:
- If relying on an Automation to do the processing, you can use its code to update the source system (if needed) and log data to a worksheet. You can combine this with logging to the RSRemote log from any of the filter script.
- If relying on the filter script to do the processing, you can use its code to update the source system (if needed) and log data to the RSRemote log.
Creating a Gateway Filter
Perform the following steps to create a Gateway Builder filter:
- Log in to the Actions Pro web portal.
- From the Main Menu, go to Remote Administration > Gateway Filter Administration.
- At the top of the page, do the following:
- In Gateway Type, ensure that you have BUILDER selected.
- In Gateway (Queue), select your preferred queue or leave the default BUILDER selected.
- Click Create New and provide the following details:
- Name—Give the filter a name.
- Runbook—Name of the Automation to run for each result of the pull script.
- Interval—Server polling interval in seconds. The default value is what you set using
rsremote.receive.builder.interval. - Order—Order in which the filter is executed if you have multiple filters executing at the same time. Lower number means earlier execution. In case of multiple filters have the same order number, execution will be in arbitrary order.
- Active—Checkbox indicating if this filter is currently in active state. Inactive filters are not executed.
- Resolve Event ID—An arbitrary string value to sent to a possible Automation waiting for events when the filter is processed.
- On the Parameters tab, input any parameters that you want to make available to the Groovy script at runtime. Click the plus sign to add a new parameter.
- Key—Enter a variable name exactly the way you want to use it in Groovy. Example:
dbUsername. See Accessing Parameters in Groovy for more information. - Value—Enter the value to assign to the variable.
- AT Property Selection—Alternatively, select an ActionTask property to be used as a key-value pair.note
Only properties that have the Builder Gateway Available option checked are available for selection.
- Description—Use free text to document the parameter for other filter users: purpose, possible values, default value.
- Encrypt—Check this box to immediately encrypt the value. It will then be unencrypted just before the Groovy code needs to use the value. Suitable for password fields.
- Key—Enter a variable name exactly the way you want to use it in Groovy. Example:
- On the Pull Script tab, write your pull script.
- Optionally, on the Filter Script tab, write your filter script.
- Save the filter.
- Deploy the filter.
The filter logic starts executing as soon as you deploy the filter.
Writing a Pull Script
The pull script allows you to connect to a system that you are integrating with and retrieve events, alerts, or any kind of data or simply update the system.
Use Groovy to write the pull script.
The pull script executes on a customizable interval (see Creating a Gateway Filter).
It must return a List of Maps. Each map is expected to represent a single data structure that you are pulling (event, alert, or something else). This is important as it is used as a connection mechanism between the pull script and the filter script or Automation that will do the data processing.
In the Groovy code, you can import any Resolve or third-party Java library available on the RSRemote server. You can also access external Java libraries. To use one, first copy it to <actions-pro-home>/gatewaylibs on the RSRemote server and then import it.
Writing a Filter Script
The filter script executes once per every map returned by the pull script. It allows you to process, either directly or by calling an Automation, or log the data to the RSRemote log.
Use Groovy to write the filter script.
The connection between the pull script and the filter script happens through the List returned by the pull script. The filter script will automatically execute for each map of the list. Each of the map's elements appears as an input parameter on the INPUTS map:
def db_url      = INPUTS['dbURL']
def db_pass     = INPUTS['dbPassword']
def db_user     = INPUTS['dbUsername']
def db_driver   = INPUTS['dbDriver']
def db_query    = INPUTS['dbQuery']
In the Groovy code, you can import any Resolve or third-party Java library available on the RSRemote server, or you can copy other Java libraries to the server and import them.
Accessing Input Parameters
Both the push script and the filter script can access the input parameters defined on the filter's Parameters tab through the INPUTS map. In addition, the filter script can access the results of the push script through INPUTS.
For example, the following code accesses parameters define as follows:
- Key:
dbURL; Value:jdbc:mysql://127.0.0.1/sample_event_db - Key:
dbDriver; Value:org.mariadb.jdbc.Driver - Key:
dbQuery; Value:SELECT * from event_table where event_processed=0 - Key:
dbUsername; Value:sample_user - Key:
dbPassword; Value:<your-password>.
def db_url      = INPUTS['dbURL']
def db_pass     = INPUTS['dbPassword']
def db_user     = INPUTS['dbUsername']
def db_driver   = INPUTS['dbDriver']
def db_query    = INPUTS['dbQuery']
Persisting Data
Gateway Builder provides a macro-like ability to persist important attributes of the last event fetched from the integration system. The data is persisted in the DB, which allows sharing it between RSRemote instances and filter script executions.
The following variables, part of the INPUTS map, are available to you to use as you see fit. Their original purposes, however, are as follows:
RS_LAST_ID—To store the unique ID of the last event fetched from the integration.RS_LAST_VALUE—To store another unique value of the last event other than the ID.RS_LAST_TIMESTAMP—To store the timestamp of the last event fetched from the integration in long format.
def results = [];

/* Read last value and last id from INPUTS map.
 *This contains attributes of the last event fetched from external system
 */

def last_value      = INPUTS["RS_LAST_VALUE"];
def last_id         = INPUTS["RS_LAST_ID"];
def last_time       = INPUTS["RS_LAST_TIMESTAMP"];

if(last_value)      LOG.info("DocumentationTest: last_value is " + last_value);
if(last_id)         LOG.info("DocumentationTest: last_id is " + last_id);
if(last_time)       LOG.info("DocumentationTest: last_time is " + last_time);

def retrieved_event = call_external_service(last_value,last_id,last_time);

/*Store last value and last id
 *This contains attributes of the last event fetched from external system
 */
    retrieved_event.put('RS_LAST_VALUE', retrieved_event.get('value'));
    retrieved_event.put('RS_LAST_TIMESTAMP', retrieved_event.get('createdon'));
    retrieved_event.put('RS_LAST_ID', retrieved_event.get('id'));

    results.add(retrieved_event);

return results;

def call_external_service(def last_value, def last_id,  def last_time){

   /*
    *Make a call based on last_value, last_id, last_time or any combination of them
    */
}
The LAST_VALUE, LAST_TIMESTAMP, and LAST_ID are cleared when you undeploy and then redeploy the filter.
Logging from the Scripts
Regardless of whether it is the push script or the filter script, you can log information from it to the RSRemote log.
//rsremote log
LOG.debug("HTTP Response:" + http_response);
The following Levels of verbosity are available:
- debug
- error
- warn
- info
- trace
To access the log, connect to the machine running the RSRemote instance and open the following file: <installation-path>/rsremote/log/rsremote.log.
Processing Results
As explained as part of the gateway filter workflow, your result processing options include:
- Use the filter script to do direct manipulations.
- Use the filter script to invoke one or more pre-built Automations that will do the manipulations.
- Use Resolution Routing rules that match the event.
- Invoke an Automation directly.
You are free to combine those any way you see fit. If you do, mind the Automation execution precedence:
- The gateway first checks if an Automation invocation is present in the filter script.
- If not, the gateway checks if the event data matches a Resolution Routing rule.
- If not, the gateway invokes the default Automation.
Default Automation
You can select a default Automation in the Runbook field when creating or editing a gateway filter. The purpose of this Automation is to allow you to take remediation action on receiving specific events from system you integrate with. It will be executed once for every map returned by the pull script.
The default Automation is a last-resort measure. It will only be executed when none of the following two conditions are met:
- The filter script contains an Automation invocation
- A Resolution Routing rule matched the event (as represented by the map data)
Test Running the Pull Script
You can test your filter's pull script in Gateway Builder on a selected RSRemote queue before deploying the filter. This allows you to connect to a system and see what kind of data it returns. If your pull script retrieves and returns events, then the UI will display those events with the new values of context variables like last retrieved event ID or timestamp as a result of the test execution. If the script fails, the log generated during the script execution is available in the LOG binding variable. Use this log to try and debug the issue.
Take these steps to test-run your pull script:
- Go to Main Menu > Remote Administration > Gateway Filter Administration and either open an existing filter or create a new one.
- Go to the Pull Script tab.
- Ensure that your script is complete.
- Click Run Test.
- Fill in the following details and finally click Run Test:
- Last Id—Optionally, provide a default value for the
RS_LAST_IDvariable.
The value will be prepopulated if you have previously stored it in the DB. - Last Value—Optionally, provide a default value for the
RS_LAST_VALUEvariable.
The value will be prepopulated if you have previously stored it in the DB. - Queue—Select or enter the RSRemote queue name to run the filter on. note
If testing on the queue where the filter is currently deployed on, your filter will miss any events received during the test.
- Last Time Stamp—Optionally, provide a default value for the
RS_LAST_TIMESTAMPvariable.
The value will be prepopulated if you have previously stored it in the DB.
- Last Id—Optionally, provide a default value for the
After running the script, the run results appear in the Execution Results dialog box. It contains these tabs:
- Pull Script Result—Shows a list of events that were retrieved by the script. It also shows the queue name the test was run against and the final value of the
RS_LAST_ID(Last ID),RS_LAST_TIMESTAMP(Last Value) andRS_LAST_VALUE(Last Timestamp) variables. - Pull Script Console Log—Shows any log statements that were output during script execution using the
LOGgroovy binding. - Post Execution—Shows the
INPUTSthat are passed to Automations after the post-processing filter script has been executed for each event, including any resolution routing matches.
Best Practices for Writing Groovy Scripts
We provide the following guidelines for writing the groovy scripts:
- The custom nature of the Gateway Builder means that the responsibility for pulling events without failure largely lays with your scripts' quality. Include proper error handling and logging in the code to troubleshoot run-time issues.
- Avoid logging sensitive information like passwords and always use the encryption option for the input parameters that store such information.
- Note that even thought the List returned by the push script is an ordered data structure, there is no guarantee that its elements will be processed in any particular order.
- If high performance is a factor, then the best practice is to deploy multiple filters (at least 10) with similar logic. This will maximize the thread pool resource utilization.
Sample Use Case: Retrieve, Update, and Track Events from MySQL
Monitoring for event rows in a database is a common use case encountered in the IT ecosystem. In this example, we are going to create a Gateway Builder filter that implements this sort of monitoring, in two steps:
- Retrieve and update events
- Track and persist last event processed
Setting Up MySQL
For this step, we assume you already have a running MySQL server. With the following steps, we create a new database for testing purposes and add a few rows in it to mimic actual event records.
Connect to your MySQL instance with admin privileges.
Run the following SQL code to create a database called
sample_event_db:CREATE DATABASE `sample_event_db`;Create a DB user
sample_userwith a password and verify that you can connect tosample_event_dbwith it:GRANT ALL PRIVILEGES ON *.* TO 'sample_user'@'%' IDENTIFIED BY 'your_password';
`FLUSH PRIVILEGES;`Create a sample event table using the following SQL command:
CREATE TABLE event_table (

    event_id            VARCHAR(255),
    event_name          VARCHAR(255),
    event_created_on    INT(11),
    event_processed     BOOL
);
Insert sample data into the table:
INSERT INTO event_table VALUES (UUID(), 'first event', UNIX_TIMESTAMP(),0);
INSERT INTO event_table VALUES (UUID(), 'second event', UNIX_TIMESTAMP(),0);
INSERT INTO event_table VALUES (UUID(), 'third event', UNIX_TIMESTAMP(),0);
INSERT INTO event_table VALUES (UUID(), 'fourth event', UNIX_TIMESTAMP(),0);
INSERT INTO event_table VALUES (UUID(), 'fifth event', UNIX_TIMESTAMP(),0);
INSERT INTO event_table VALUES (UUID(), 'sixth event', UNIX_TIMESTAMP(),0);
INSERT INTO event_table VALUES (UUID(), 'seven event', UNIX_TIMESTAMP(),0);
Creating the Gateway Filter
After setting up a sample DB, we'll create a gateway filter for the Gateway Builder gateway. The filter is where the code to interact with the DB lives.
- Log in to the Actions Pro web portal.
- From the Main Menu, go to Remote Administration > Gateway Filter Administration.
- At the top of the page, do the following:
- In Gateway Type, ensure that you have BUILDER selected.
- In Gateway (Queue), select your preferred queue or leave the default BUILDER selected.
- Click Create New and provide the following details:
- In Name, give the filter a name like
sample_monitor_events. - Runbook: leave blank
- Interval: 10
- Order: 1
- Active: checked
- Resolve Event ID: leave blank
- In Name, give the filter a name like
- On the Parameters tab, input the following DB connection parameters. Click the plus sign to add a new parameter.
- Key:
dbURL; Value:jdbc:mysql://127.0.0.1/sample_event_db - Key:
dbDriver; Value:org.mariadb.jdbc.Driver - Key:
dbQuery; Value:SELECT * from event_table where event_processed=0 - Key:
dbUsername; Value:sample_user - Key:
dbPassword; Value:<your-password>. Remember to check the Encrypt box to the right of the field to prevent your password from showing.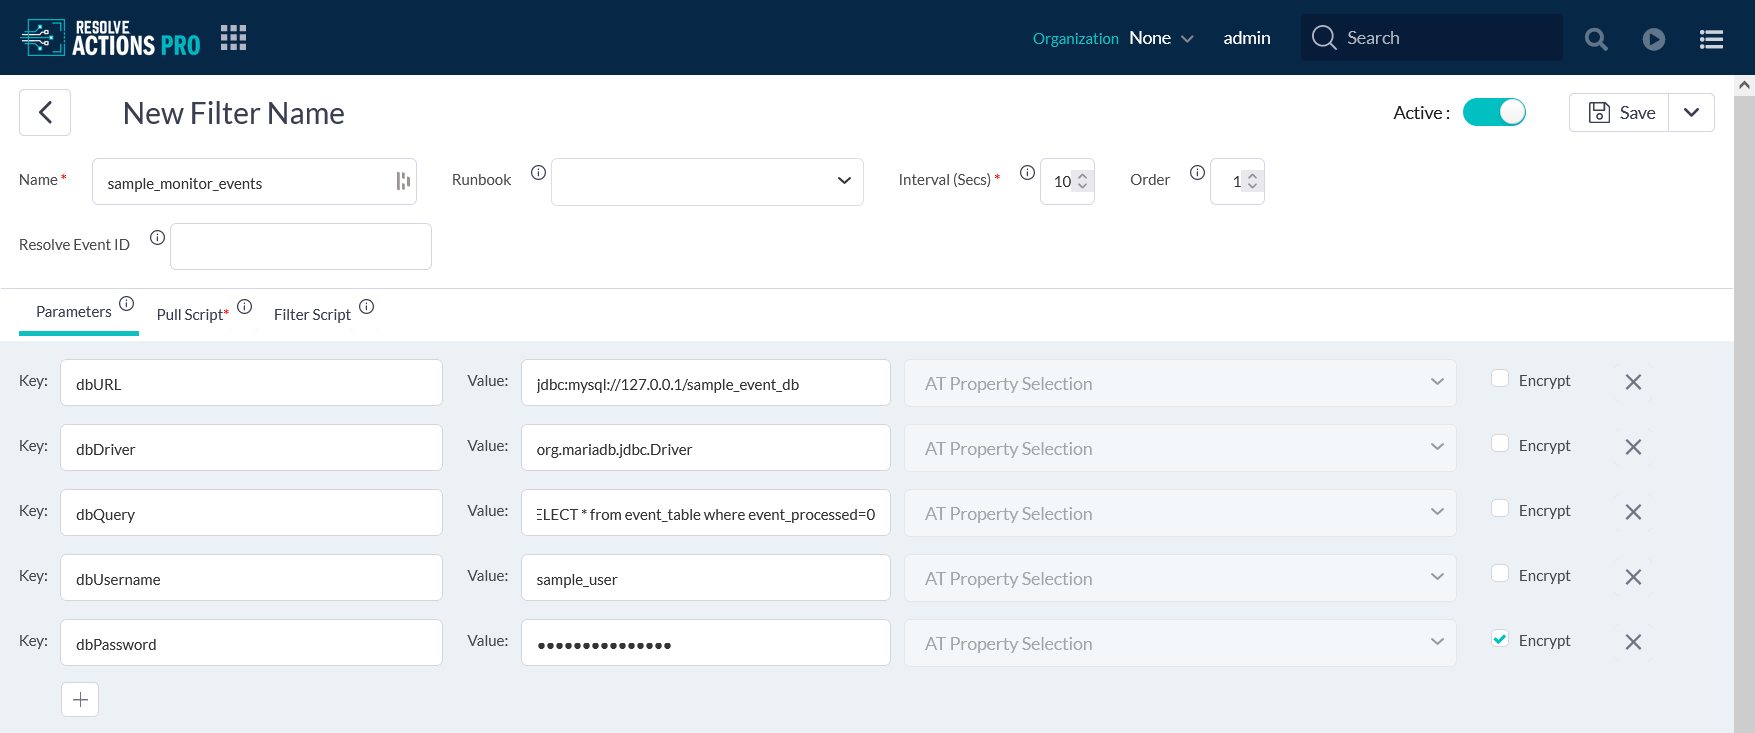
- Key:
- On the Pull Script tab, copy and paste the pull script.
- On the Filter Script tab, copy and paste the filter script.
- Save the filter.
- Deploy the filter.
The filter logic starts executing as soon as you deploy the filter.
Implementing the Filter Logic
The final step is to write the logic that reads and processes events. It is split into a couple of script: the pull script and the filter script:
- The gateway runs the pull script every 10 seconds (configurable). It opens a connection to the DB and executes the
SELECTquery we defined as a filter parameter. In its first run, the query fetches all 7 events that we added to theevent_tabletable. On consecutive runs, it will only read any new events because theirevent_processedfield will be set to0. - For every event row fetched from
event_table, the gateway runs the filter script. The filter script opens a connection to the DB and executes anUPDATEquery that marks all 7 events as processed by changing theevent_processedflag from 0 to 1 and prevents the events from being processed again.
The scripts start running after deploying the gateway filter.
Writing the Pull Script
On the Pull Script tab, add the Groovy code shown below.
//Import libraries for working with SQL
import groovy.sql.Sql
import java.sql.*
import java.sql.DriverManager

//Initialize a list to store events from the DB
def events       = []

//Initialize a variable for the sql instance
def sql

//Initialize variabled for the connection parameters you defined on the Parameters tab (accessible though the INPUTS array)
def db_url      = INPUTS['dbURL']
def db_pass     = INPUTS['dbPassword']
def db_user     = INPUTS['dbUsername']
def db_driver   = INPUTS['dbDriver']
def db_query    = INPUTS['dbQuery']

//Do some logging
LOG.debug("Sample Use Case Log: DB Url= "       +      db_url)
LOG.debug("Sample Use Case Log: DB Driver="     +   db_driver)
LOG.debug("Sample Use Case Log: DB Username="   +     db_user)
LOG.debug("Sample Use Case Log: DB Query="      +    db_query)

try{
    //Initialize the sql instance
    sql = Sql.newInstance(db_url, db_user, db_pass, db_driver)

    //Make a query to read all events from the DB and store them in the events array
    sql.query(db_query) { resultSet ->

        while(resultSet.next()) {

            //Initialize an empty map that will store the event's data
            def event = [:]

            def event_id         = resultSet.getString('event_id')
            def event_name       = resultSet.getString('event_name')
            def event_created_on = resultSet.getString('event_created_on')
            def event_processed  = resultSet.getString('event_processed')

            if(event_id)            event.put('event_id',                event_id)
            if(event_name)          event.put('event_name',            event_name)
            if(event_created_on)    event.put('event_created_on',event_created_on)
            if(event_processed)     event.put('event_processed',  event_processed)

            event.put('dbURL',         db_url)
            event.put('dbUsername',   db_user)
            event.put('dbDriver',   db_driver)
            event.put('dbQuery',     db_query)
            event.put('dbPassword',   db_pass)

            //Add the map to the events list
            events.add(event)

            LOG.debug("Sample Use Case Log:Received event " + event_id)
        }
    }

    LOG.debug("Sample Use Case Log:Total events received " + events.size())

}catch(Exception e){

       LOG.debug("Sample Use Case Log: Error -> " + e.getMessage())

}finally{
    //Close the connection to sql
    if(sql) sql.close()
    //Return a list if maps, each describing a single event
    return events
}
Writing the Filter Script
On the Filter Script tab, add the Groovy code shown below. This script will be called once for every element of the list returned by the pull script - in other words, for every event.
//Import libraries for working with SQL
import groovy.sql.Sql
import java.sql.*
import java.sql.DriverManager

//Initialize a variable for the sql instance
def sql

//Initialize variabled for the connection parameters you defined on the Parameters tab (accessible though the INPUTS array)
def db_url      = INPUTS['dbURL']
def db_pass     = INPUTS['dbPassword']
def db_user     = INPUTS['dbUsername']
def db_driver   = INPUTS['dbDriver']
def db_query    = INPUTS['dbQuery']

//Read the event ID of each DB record, making use of the fact that the results of the pull script are automatically added as inputs to the filter script, one map at a time
def event_id    = INPUTS['event_id']

//Do some logging
LOG.debug("Gateway Script Log: DB Url= "        +      db_url)
LOG.debug("Gateway Script Log: DB Driver="      +   db_driver)
LOG.debug("Gateway Script Log: DB Username="    +     db_user)
LOG.debug("Gateway Script Log: DB Query="       +    db_query)

try{
    //Initialize the sql instance
    sql = Sql.newInstance(db_url, db_user, db_pass, db_driver)
    //Make a query to mark the event as processed
    sql.execute "UPDATE event_table SET event_processed=1 where event_id= ${event_id}"
    LOG.debug("Gateway Script Log:Update event " + event_id)

}catch(Exception e){

       LOG.debug("Sample Use Case Log: Error  " + e.getMessage())

}finally{
    //Close the connection to sql
    if(sql) sql.close()
}
Monitoring the Filter Execution
Finally, you can do the following to verify the gateway works as expected:
- Monitor the RSremote log.
To open it, connect to the machine running the RSRemote instance and open the following file:
<installation-path>/rsremote/log/rsremote.log. - Verify that you have events in
event_tablethat have theevent_processedcolumn set to0.