Single Sign-on
Introduction
To enable Single Sign-On (SSO), Resolve Actions Pro supports the Security Assertion Markup Language (SAML) protocol as well as the Symantec SiteMinder SSO solution.
Through SAML, Actions Pro can integrate with third-party Identity Providers (IdPs) like Microsoft (AD FS), Ping Identity, Okta, and so on. Actions Pro plays the Service Provider (SP) role in the SAML workflow and supports both IdP-initiated SSO (AD FS and others) and SP-initiated SSO (Azure, OKTA, Ping Identity, and others). The protocol version that Actions Pro supports is SAML 2.0.
AD FS on Windows Server
In a domain controlled by Windows Server, Active Directory Federation Services (AD FS) allows your users to reuse their Active Directory (AD) domain credentials to log in to Actions Pro. Actions Pro supports only AD FS version 2.0.
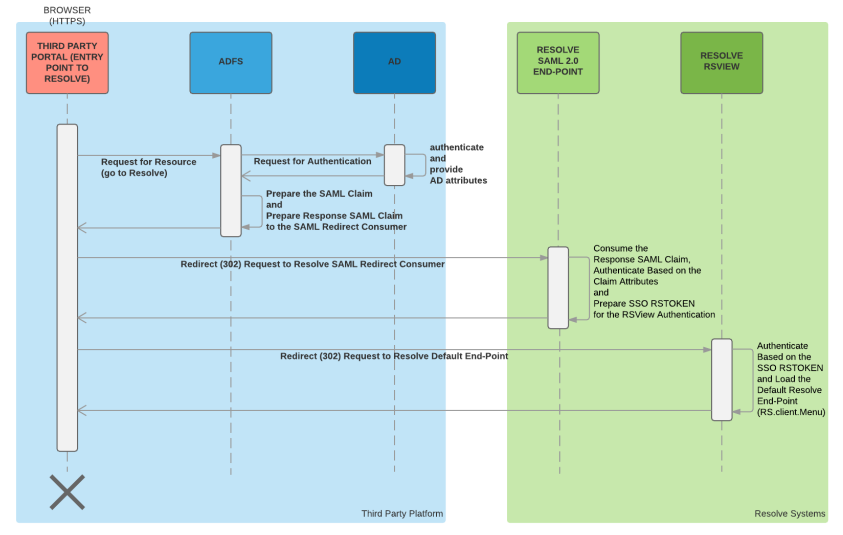
AD FS implements an IdP-initiated SSO flow, meaning your users have to first point their web browser to a web portal instead to the Actions Pro login page. This portal serves as an entry point to Actions Pro.
AD FS SSO Flow
The following diagram shows the end-to-end SSO process using AD FS. On the diagram, AD represents the Windows domain controller and ADFS represent the AD FS service. AD FS may or may not be running on the same machine as the domain controller.
Setting Up AD FS on Windows Server
When configuring AD FS, you can enter all Actions Pro details manually or you can upload a SAML Metadata file to configure them automatically.
Configuring AD FS Automatically Using SAML Metadata
Prerequisites
Ensure the following is in place before setting up Actions Pro to reuse your users' Windows logins.
- Install AD FS 2.0 on a Windows Server machine:
- Install a new Windows Server machine or use an existing machine.
- Add the Windows Sever machine to your domain controller.
- Install and set up AD FS 2.0: Official Microsoft documentation
- Create an AD group for all AD users who will have access to Actions Pro through AD FS SSO and add users to it.
Take note of the exact group name as you will need it when configuring Actions Pro.
Example:Actions Pro AD FS Users - Generate a SAML Metadata file for your Actions Pro deployment:
- See IdP Configuration through SAML Metadata for detailed steps.
- Copy the file to the Windows Server machine where you installed AD FS.
Procedure
Take these steps to configure AD FS to provide SSO for Actions Pro:
- Open the Start menu and type AD FS Management.
- In the tree on the left, click Relying Party Trusts.
- In the Actions panel on the right, click Add Relying Party Trust…
The Add Relying Party Trust Wizard opens. - On the Welcome screen, select Claims aware and click Start.
- On the Select Data Source screen, select Import data about the relying party from a file.
- Next to Federation metadata file location, click Browse and select the SAML Metadata file that you generated for your Actions Pro deployment.
- Click Next.
- On the Specify Display Name screen, enter a descriptive name for the relying party trust, such as
Actions Pro, and click Next. - On the Choose Access Control Policy screen, select who can log in to Actions Pro through AD FS and then click Next.
Regardless of who you allow here, only members of the Actions Pro AD group that you created will be allowed to log in to Actions Pro. - On the Ready to Add Trust screen, click Next.
- On the Finish screen, check Configure claims issuance policy for this application and click Close.
The wizard closes and the Edit Claim Issuance Policy for <relying party trust name> window opens. - Click Add Rule….
The Add Transform Claim Rule Wizard window opens. - On the Choose Rule Type screen, select Send LDAP Attributes as Claims and click Next.
- On the Configure Claim Rule screen, do the following:
- In Claim rule name, enter a descriptive name such as
Actions Pro Claims. - In Attribute store, select the Active Directory that you will be using to authenticate users against.
- In Mapping of LDAP attributes to outgoing claim types, map the following AD attributes as follows (LDAP Attribute to Outgoing Claim Type):
  * `E-Mail-Addresses` to `E-Mail Address`
  * `SAM-Account-Name` to `Name`
* `Token-Groups - Unqualified Names` to `Group` - Click Finish.
- In Claim rule name, enter a descriptive name such as
- Click OK to close the Edit Claim Issuance Policy for <relying party trust name> window.
Configuring AD FS Manually
Prerequisites
Ensure the following is in place before setting up Actions Pro to reuse your users' Windows logins.
- Install and set up AD FS 2.0:
- Install a new Windows Server machine or use an existing machine.
- Add the Windows Sever machine to your domain controller.
- Install and set up AD FS 2.0: Official Microsoft documentation
- Create an AD group for all AD users who will have access to Actions Pro through AD FS SSO and add users to it.
Procedure
Take these steps to configure AD FS to provide SSO for Actions Pro:
- Open the Start menu and type AD FS management.
- In the tree on the left, click Relying Party Trusts.
- In the Actions panel on the right, click Add Relying Party Trust…
The Add Relying Party Trust Wizard opens. - On the Welcome screen, select Claims aware and click Start.
- On the Select Data Source screen, select Enter data about the relying party manually and click Next.
- On the Specify Display Name screen, enter a descriptive name for the relying party trust, such as
Actions Pro, and click Next. - (Optional) On the Configure Certificate screen, click Browse and select a file containing an TLS certificate and then click Next.
The TLS certificate is used for encrypting claims sent to the relying party. - On the Configure URL screen, do the following:
- Click the Enable support for the SAML 2.0 WebSSO protocol check box.
- In Relying party SAML 2.0 SSO service URL, enter the service URL of your Actions Pro deployment in the following format:
https://<Actions Pro address>:8443/resolve/saml/redirect/consume
where Actions Pro address is the hostname or IP address of the Actions Pro machine (standalone deployments) or the load balancer (clustered deployments).
- On the Configure Identifiers screen, do the following:
- In Relying party trust identifier, enter the identifier URL of your Actions Pro deployment in the following format:
https://<Actions Pro address>:8443/resolve
where Actions Pro address is the hostname or IP address of the Actions Pro machine (standalone deployments) or the load balancer (clustered deployments). - Click Add and then Next.
- In Relying party trust identifier, enter the identifier URL of your Actions Pro deployment in the following format:
- On the Choose Access Control Policy screen, select who can log in to Actions Pro through AD FS and then click Next.
Regardless of who you allow here, only members of the Actions Pro AD group that you created will be allowed to log in to Actions Pro. - On the Ready to Add Trust screen, click Next.
- On the Finish screen, check Configure claims issuance policy for this application and click Close.
The wizard closes and the Edit Claim Issuance Policy for <relying party trust name> window opens. - Click Add Rule….
The Add Transform Claim Rule Wizard window opens. - On the Choose Rule Type screen, select Send LDAP Attributes as Claims and click Next.
- On the Configure Claim Rule screen, do the following:
- In Claim rule name, enter a descriptive name such as
Actions Pro Claims. - In Attribute store, select the Active Directory that you will be using to authenticate users against.
- In Mapping of LDAP attributes to outgoing claim types, map the following AD attributes as follows (LDAP Attribute to Outgoing Claim Type):
E-Mail-AddressestoE-Mail AddressSAM-Account-NametoNameToken-Groups - Unqualified NamestoGroup
- Click Finish.
- In Claim rule name, enter a descriptive name such as
- Click OK to close the Edit Claim Issuance Policy for <relying party trust name> window.
Setting Up AD FS in Actions Pro
Setting up Actions Pro to support SSO through AD FS involves these steps:
- Optional Creating an AD FS SSO group
- Configuring system properties
- Configuring blueprint.properties
Creating AD FS SSO Groups
For more granular access control to various Actions Pro resources, you may want to assign Actions Pro groups to AD users who are allowed to log in to Actions Pro. Group assignment is automatic and happens on the fly based on AD group membership, provided that the group meets the following conditions:
- The AD group is assigned to AD users as required
- The Actions Pro group has the same name as the AD group
- The Actions Pro groups is marked as Linked to external group.
The rsview.auth.active_directory.grouprequired Blueprint property controls whether group membership is required for a user. If true, the parameter will prevent AD users from logging in if they are not members of at least one AD group mapped to an Actions Pro group. If the parameter is false, Actions Pro will still assign Actions Pro groups to users if all mappings are in place, but other AD users will be able to log in as well. See Configuring Blueprint Properties for details.
Take the following steps to create a group for AD FS SSO. Repeat the steps for each group that you want to use.
- From the Actions Pro main menu, click User Administration > Groups.
- Click New.
- Fill in the following details:
- Name—Enter the exact name of the AD group that contains the AD users who will have access to Actions Pro through AD FS SSO.
Example:Actions Pro AD FS Users - Link to external group—Ensure that the box is checked.
- Roles—Ensure that
resolve_useris added. - Users—Do not add any users.
- Name—Enter the exact name of the AD group that contains the AD users who will have access to Actions Pro through AD FS SSO.
- At the top of the screen, click Save.
- Consider setting the
rsview.auth.active_directory.grouprequiredBlueprint property if you want to let only group members log in to Actions Pro.
Configuring System Properties
Part of setting up Actions Pro is setting various System Properties. From the Actions Pro main menu, click System Administration > System Properties and set the following properties:
| System Property Name | Description |
|---|---|
sso.saml.trustedADFSIssuerHostnames | A whitelist of AD FS hostnames. Set it to the hostname of the Windows Server machine running the AD FS service. Example: dc02.example.com |
sso.saml.genericSAML.username.attributeName | The attribute name in the SAML Response with which the username is associated. Example: http://schemas.xmlsoap.org/ws/2005/05/identity/claims/name |
sso.saml.genericSAML.groups.attributeName | The attribute name in the SAML Response with which the user's groups are associated. Example: http://schemas.xmlsoap.org/claims/Group |
Configuring Blueprint Properties
Use properties in the blueprint.properties file to provide AD connection details as well as other options.
- Log in to the Actions Pro machine as the resolve user that you created during Actions Pro installation.
- Open
/<actions-pro-home>/bin/blueprint.propertiesfor editing. - Set the properties listed in the table below and save the file.
- Apply the configuration changes:
<actions-pro-home>/bin/config.sh - Restart RSView:
<actions-pro-home>/bin/restart.sh rsview
| Property | Description |
|---|---|
| rsview.auth.active_directory.active | Set to true to enable AD FS SSO. |
| rsview.auth.active_directory.ipaddress | Set to the IP address of your AD FS machine. |
| rsview.auth.active_directory.port | AD LDAP port for user authentication. Must be 389 (unencrypted) or 636 (TLS). |
| rsview.auth.active_directory.ssl | Set to true if you have configured a TLS certificate in AD FS. Otherwise set to false. |
| rsview.auth.active_directory.sync | Whether to sync AD attributes with Actions Pro user attributes. Possible values: true, false. |
| rsview.auth.active_directory.fallback | Whether to try to log in the user as a local Actions Pro user if AD authentication fails. Possible values: true, false. |
| rsview.auth.active_directory.default_domain | Optional Default domain name to add to usernames that do not include one. Example: example.com. |
| rsview.auth.active_directory.basedn.dn.1 | The Base DN of your AD domain which serves as a root for AD user searches.You can specify multiple Base DNs by multiplicating the property with a different index: rsview.auth.active_directory.basedn.dn.2, rsview.auth.active_directory.basedn.dn.3, and so on. Example: dc=example,dc=com |
| rsview.auth.active_directory.mode | LDAP mode to use. Must be BIND. |
| rsview.auth.active_directory.uid_attribute | LDAP attribute to read the user ID from. Default: sAMAccountName. |
| rsview.auth.active_directory.bind_dn | Optional AD account used to search for users when AD FS SSO requires authenticating. Example: cn=admin,cn=Users,dc=example,dc=com |
| rsview.auth.active_directory.bind_password | Optional Password for the account specified using rsview.auth.active_directory.bind_dn. |
| rsview.auth.active_directory.version | AD version. Default: 3. |
| rsview.auth.active_directory.grouprequired | Whether the user is required to be a member of at least one AD group mapped to an Actions Pro group. Possible values: true, false. See Creating AD FS SSO Groups to learn how to configure groups. |
IdP Configuration through SAML Metadata
Many IdPs, such as Azure and Ping Identity, allow you to configure SAML SSO by uploading a configuration file called SAML Metadata. It is an XML file that contains specifics about your Actions Pro deployment and provides a quicker and more robust way of integrating your SAML IdP with Actions Pro as an SP.
Actions Pro can generate static SAML Metadata. You must manually regenerate it and reupload it to the IdP every time your deployment details change, including when you change your SP public and private keys.
How you upload the generated SAML Metadata varies from IdP to IdP. Find detailed steps for popular IdPs in Configuring IdP for SP-initiated SSO.
Generating SAML Metadata
You can generate SAML Metadata for your Actions Pro deployment in two ways:
- Though RSConsole.
- Though an API call.
In both cases, ensure that you configure SP private and public keys if you want the SAML Metadata to be signed.
Generating SAML Metadata from RSConsole
You can use a command-line utility provided with Actions Pro to generate the XML file containing the SAML Metadata.
Procedure
- Log in to the Actions Pro machine as the Actions Pro user that you created during installation.
- Start RSConsole and log in as
admin:<actions-pro-home>/rsconsole/bin/run.sh -u admin -p <your password> - Change folder to
config:cd config - Start the
GenerateSPMetadata.groovygeneration script:- Start the script without options to use the default settings.
See the option descriptions below for default values. - Start the script with options to override the default settings.
See the option descriptions below for details.
- Start the script without options to use the default settings.
- Use the generated file to set up your IdP.
Options of the GenerateSPMetadata.groovy script
-hShows help and usage information.-prSelect the protocol over which the IdP will communicate with Actions Pro:httporhttps. Default value:https.-hoEnter the Actions Pro hostname. Default value: the hostname will be autodetected if not entered.-poEnter the Actions Pro port number. Default value: the port number will be autodetected if not entered.-paEnter a local path where the SAML Metadata file will be created. Default value:<actions-pro-home>/rsconsole/file.
Examples of running GenerateSPMetadata.groovy
The following example starts the generation with default values.
GenerateSPMetadata
The following example specifies protocol, hostname, port number, and output location.
GenerateSPMetadata -pr https -ho ap.example.com -po 8443 -pa /opt/resolve/tmp
The following example only changes the output location.
GenerateSPMetadata -pa /opt/resolve/tmp
Generating SAML Metadata through API Call
You can make a RESTful call to Actions Pro to generate the XML file containing the SAML Metadata.
Endpoint: <Actions-Pro-deployment-URL>/resolve/service/saml/generateSPMetadata
Method: GET
Request Parameters:
Pass the following options as query string parameters.
protocol: (Optional) String representing the protocol over which the IdP will communicate with Actions Pro:httporhttps. Default value:https.host: (Optional) String representing the Actions Pro hostname. Default value: the hostname will be autodetected if not entered.port: (Optional) String representing the Actions Pro port number. Default value: the port number will be autodetected if not entered.
Response:
The response contains the XML data in plain/text encoding.
You can find log information (errors or exceptions) under <actions-pro-home>/tomcat/logs/rsview.log.
Signing the SAML Metadata
The SAML Metadata generated by Actions Pro can be signed for improved security. The IdP side can then use the signature to make sure that the XML data is not tampered with.
To ensure signing, take these steps:
- Log in to Actions Pro as
admin. - From the Main Menu, go to System Administration > System Properties.
- Set an SP public and private key in the respective property:
sso.saml.sp.publickey.attributeNamesso.saml.sp.privatekey.attributeName
SP-Initiated SSO
With SP-initiated SSO, Actions Pro makes a SAML request to a configured IdP endpoint. An IdP-provided login page is shown where the user enters their credentials. Some IdPs only support SP-initiated SSO.
The benefit of using SP-initiated SSO is that your Actions Pro users can log in straight from the Actions Pro login screen instead of initially going to an IdP-provided router page to choose what service to log in to.
To use SP-initiated SSO, you need to configure both Actions Pro and the IdP.
Configuring Actions Pro for SP-initiated SSO
To configure Actions Pro for SP-initiated SSO, take these steps:
- Log in to Actions Pro as
admin. - From the Main Menu, go to System Administration > System Properties.
- Set SSO-related system properties as described in System Properties for SP-initiated SSO.
- Create an Actions Pro group and link it to an IdP group.
System Properties for SP-initiated SSO
Take the following steps to set each of the system properties listed in the table below.
- From the Actions Pro main menu, click System Administration > System Properties.
- Find the system property and set its value as described in the table.
Set the following properties:
| System Property | Description |
|---|---|
| sso.adfs.enabled | Set to true to enable a Single Sign-On button on the Actions Pro login page. |
| sso.adfs.endpoint | Enter the SSO URL of the IdP. Examples: On Okta, the field is called Identity Provider Single Sign-On URL and is presented after you complete the New Application Integration wizard. On Azure, the field is called Identity Provider Single Sign-On URL and is presented after you complete the Create Your Own Application > Set Up Single Sign On wizard. |
| sso.saml.trustedIssuerHostnamesValidator | Set to ALL.This property relates to the default SAML Authenticator of Actions Pro. |
| sso.saml.genericSAML.trustedIssuerHostnames | Comma-separated list of trusted IdP hostnames from which Actions Pro will expect a SAML response. This property relates to the default SAML Authenticator of Actions Pro. Examples: Okta: okta.comAzure: microsoftonline.com |
| sso.saml.genericSAML.username.attributeName | Set to the name of the SAML assertion attribute where the user name is stored. This is a user defined value. Okta: Ensure to use the same value as the one you set as Attribute Statements: Name. Azure: Ensure to use the same value as the claim’s Name property. |
| sso.saml.genericSAML.groups.attributeName | Set to the name of the SAML assertion attribute where the user groups are stored. This is a user defined value. Okta: Ensure to use the same value as the one you set as Group Attribute Statements: Name. Azure: Ensure to use the same value as the group claim’s Name property. |
| sso.saml.keyauth.enabled.attributeName | Set to true to try to decrypt the encrypted SAML assertion. Set to false to ignore it. |
| sso.saml.sp.publickey.attributeName | Optional. The SP’s (Actions Pro) public key. You can specify the key directly or enter a path to a file containing the key. Learn how to generate one in Generating SP Security Keys. |
| sso.saml.sp.privatekey.attributeName | Optional. The SP’s (Actions Pro) private key. You can specify the key directly or enter a path to a file containing the key. Learn how to generate one in Generating SP Security Keys. |
| sso.saml.idp.publickey.attributeName | The IdP’s public key which is used to encrypt the SAML assertion. You can specify the key directly or enter a path to a file containing the key. |
| sso.idp.icon.url | Optional. Set to the URL of an image file representing the IdP logo. The image is shown on the Actions Pro login screen’s Single Sign-On button enabled through the sso.adfs.enabled property. The supported image file formats depend on the user agent.Provide either a publicly available HTTP(S) URL where the image is served or a local file. In the latter case, copy the file to <actions-pro-home>/tomcat/webapps/resolve/sir/ and then set the attribute to the file name (without path). |
| sso.app.entity.id | Do not set manually This property is set when Actions Pro starts. It is updated automatically when you generate SP SAML Metadata. The value is used in AuthnRequest as Issuer.If you are configuring the SP manually on the IdP, ensure the Identifier (Entity ID) of the registered app matches the value of this property. |
Generating SP Security Keys
It is recommended to use a security certificate issued by a Certification Authority (CA) which comes with a pair of public and private keys. If, however, you want to use a self-signed certificate, you can use the following Linux command to generate the SP public and private keys:
openssl req -new -x509 -days 365 -nodes -sha256 -out saml.crt -keyout saml.pem
The command prompts for data like Country, State, Fully Qualified Host Name, and so on to attach to the certificate. The pair of files it outputs in the current folder contain the following:
saml.crt—The public key.
Copy the content (without the-----BEGIN CERTIFICATE-----and-----END CERTIFICATE-----lines) and set it as thesso.saml.sp.publickey.attributeNamesystem property.saml.pem—The private key.
Copy the content (without the-----BEGIN CERTIFICATE-----and-----END CERTIFICATE-----lines) and set it as thesso.saml.sp.privatekey.attributeNamesystem property.
Linking Groups
Before you can start using SSO, you need to link the IdP group that your users are members of to an Actions Pro group and configure it.
Take these steps to link the IdP group to the Actions Pro group:
- From the Actions Pro main menu, select User Administration > Groups.
- In Name, type the ID of the IdP group that your users are members of:
- For Azure, use the group’s Object Id found on the group's details page.
- For Okta, use the group name.
- Ensure that Link to external group is selected.
- Assign roles as you see fit.
- Click Save.
Configuring IdP for SP-initiated SSO
The steps for configuring the IdP to work with Actions Pro as an SP vary from IdP to IdP. The following sections contain configuration steps for popular IdPs.
Configuring Okta as an IdP
Follow these steps to configure Okta to work with Actions Pro as an SP:
- From the side navigation, select Applications > Application.
- Click Add Application.
- Click Create New App.
- Select SAML 2.0 and then click Create.
- On the General Settings screen, do the following:
- In App name, give the application a meaningful name like “Actions Pro”.
- Set the rest of the options at your discretion.
- Click Next.
- On the SAML Settings screen, do the following:
- In Single sign on URL, type the Actions Pro assertion consumer URL:where
https://<IP-Address>[:<Port-Number>]/resolve/saml/redirect/consume<IP-Address>is the IPv4 address of your Actions Pro deployment and the optional<Port-Number>is the Actions Pro port number if you have changed the default port. - In Audience URI (SP Entity ID) provide the Actions Pro home URL. It must match the value of the
sso.app.entity.idsystem property.wherehttps://<IP-Address>[:<Port-Number>]/resolve<IP-Address>is the IPv4 address of your Actions Pro deployment and the optional<Port-Number>is the Actions Pro port number if you have changed the default port. - Under Attribute Statements (optional), add an attribute as follows:
- Name—Set to match the value of the Actions Pro
sso.saml.genericSAML.username.attributeNamesystem property. Example:okta_user. - Name format—Set to Unspecified.
- Value—Set to
user.login.
- Name—Set to match the value of the Actions Pro
- Under Group Attribute Statements (optional), add an attribute as follows:
- Name—Set to match the value of the Actions Pro
sso.saml.genericSAML.groups.attributeNamesystem property. Example:okta_groups. - Name format—Set to Unspecified.
- Filter—Use the filter controls to capture one or more Okta group names. One of the group names must match the group created in Actions Pro.
- Name—Set to match the value of the Actions Pro
- Click Next.
- In Single sign on URL, type the Actions Pro assertion consumer URL:
- On the Feedback screen, set the options at your own discretion and click Finish.
- Back in the application that you created, ensure that you are viewing the Sign On tab.
- Click the View Setup Instructions button and then do the following:
- Copy Identity Provider Single Sign-On URL and set it as a value to the
sso.adfs.endpointsystem property in Actions Pro. - Copy X.509 Certificate (without the
-----BEGIN CERTIFICATE-----and-----END CERTIFICATE-----lines) and set it as a value to thesso.saml.idp.publickey.attributeNamesystem property in Actions Pro.
- Copy Identity Provider Single Sign-On URL and set it as a value to the
- Configure your Okta groups:
- From the side navigation, select Directory > Groups.
- Select a group or create a new group.
- Click Manage People and ensure all users who need SSO access are part of the group.
- Click Manage Apps and click Assign next to the application that you created for Actions Pro.
Configuring Azure as an IdP
Follow these steps to configure Azure to work with Actions Pro as an SP:
- In the Microsoft Azure portal, select Azure Active Directory.
The Overview page appears. - Create a group for your SSO users:
- From the left navigation, click Groups and then click the New group button.
- Fill in the user information ensuring that:
- Group type is set to Security.
- Membership type is set to Assigned.
- Click Create.
- Back on the All groups page, click to edit the group that you just created.
- On the Overview tab, take note of the Object Id to use as a group name in Actions Pro.
- On the Members tab, click the Add members button.
- Add all users that will need to log in to Actions Pro.
- Create an application:
- Go back to the tenant’s Overview page.
- On the left, click Enterprise applications and then click the New application button.
- Click Create your own application.
- Fill in the form, ensuring that:
- What are you looking to do with your application? is set to Integrate any other application you don't find in the gallery (Non-gallery).
- Click Create.
- Assign users and groups to the application:
- On the application Overview page, click Assign users and groups.
- Assign the group that you created earlier.
Optionally, assign other users and groups that you want to give access to the application.
- Configure Single Sign-On.
- On the application Overview page, click Single sign-on.
- Click the SAML tile.
- Generate SP Metadata for Actions Pro.
- Click Upload metadata file and provide the SP Metadata file that you generated in the previous step.
Logging in Using SP-Initiated SSO
After you configure SP-Initiated SSO, a Single Sign-On button appears on the Actions Pro login screen. Depending on your configuration, the button might or might not show the IdP logo.
Take the following steps to log in as an SSO user:
- On the Actions Pro login screen, click the Single Sign-On button.
- On the IdP-provided login page that appears, enter your SSO username and password.
Take the following steps to log in as an Actions Pro user (such as admin):
- On the Actions Pro login screen, enter your Actions Pro username and password.
- Click the Login button.
SiteMinder SSO
Actions Pro can integrate with Symantec SiteMinder to use its SSO capabilities. Setting up SSO with SiteMinder involves making configurations on both the SiteMinder and the Actions Pro sides.
Configuring SiteMinder
Use the following information to configure SiteMinder Web Agent on Tomcat servers running RSVie:
- All SiteMinder users who will have to log in to Actions Pro must be members of one or more groups that map to Actions Pro groups. See the Configuring Actions Pro for SiteMinder SSO section to learn how to map groups.
Take note of the exact SiteMinder group names as you will need them when configuring Actions Pro.
Example:Actions Pro SSO Users - Protected resource URLs are all URLs under root ("/").
- Protected resource exception URLs for static resources are as follows:
/.jsp, /jsp/.jsp
favicon.ico
/script/csrfguard.js
/js/*
/css/*
/actiontask/*
/catalog/*
/client/*
/csrfguard/*
/customtable/*
/actiontask/*
/font/*
/formbuilder/*
/gateway/*
/images/*
/impex/*
/incident/*
/license/*
/locale/*
/login/*
/mcp/*
/metric/*
/resolutionrouting/*
/search/*
/social/*
/socialadmin/*
/sysadmin/*
/syslog/*
/tag/*
/user/*
/wiki/*
/worksheet/*
Configuring Actions Pro for SiteMinder SSO
Setting up Actions Pro to support SSO through SiteMinder involves these steps:
- Creating a SiteMinder SSO group
- Configuring system properties
Creating a SiteMinder SSO Group
You need to create one or more Actions Pro groups for the SiteMinder users who will be logging in through SSO. These groups map to the Siteminder groups that you created for users who will be logging in to Actions Pro through SiteMinder SSO.
Take the following steps to create a group for SiteMinder SSO. Repeat the procedure for each SiteMinder group of users who will have SSO access to Actions Pro.
- From the Actions Pro main menu, click User Administration > Groups.
- Click New.
- Fill in the following details:
- Name—Enter the exact name of the SiteMinder group that contains the SiteMinder users who will have access to Actions Pro through SSO.
Example:Actions Pro SSO Users - Link to external group—Ensure that the box is checked.
- Roles—Ensure that
resolve_useris added. - Users—Do not add any users.
- Name—Enter the exact name of the SiteMinder group that contains the SiteMinder users who will have access to Actions Pro through SSO.
- At the top of the screen, click Save.
Configuring System Properties
Use the following procedure to set the Actions Pro system properties listed below the procedure.
- From the Actions Pro main menu, click System Administration > System Properties.
- Find the property name and set its value.
Set the following properties:
| System Property | Description |
|---|---|
| siteminder.userid.http.header | The name of the SiteMinder header containing the user ID. Actions Pro creates/updates the user specified in the HTTP header value. All requests to protected Actions Pro resources must contain this header for authentication and authorization to work and to automatically login the SiteMinder user. Specify exactly one value for this system property. Example: SM_USERID |
| siteminder.group.http.header | Required only if siteminder.group.required is set to true.The name of the SiteMinder header containing the user group. SiteMinder sets the group that the user belongs to. You can specify multiple groups by repeating the same header with different group names. You need to create these groups in Actions Pro and set them as Link to external group as described above. Example: SM_GROUP |
| siteminder.mock | Optional. Enables SiteMinder Mock mode. SiteMinder Mock mode allows testing without installing SiteMinder Web Agent. The default value is false. To test SiteMinder SSO in Mock mode, ensure that the initial HTTP request to Actions Pro contains parameters with the same name and values that would would usually be received from SiteMinder as HTTP headers if WebAgent is present and configured. Possible values: true, false |
| siteminder.relogin.button.label | Optional. Sets the label of the "Re-Login" button. When a SiteMinder-authenticated and -authorized user logs out from Actions Pro, a Re-Login prompt is displayed containing a single button allowing the user to easily re-log in to Actions Pro. If this property is not set, the label defaults to SiteMinder Resolve Re-Login. |
| siteminder.group.required | Determines whether to use the authorization information to create/update the Actions Pro user. An example for authorization information is groups that the SiteMinder-authenticated and -authorized user is a member of. The default is false. See also: siteminder.group.http.header |
| siteminder.defaultdomain | Sets the default domain for users whose SiteMinder userid does not contain a domain part. Users created in Actions Pro will have their domain set to the value of this property.Example: example.com |