Disaster Recovery
Disaster Recovery Overview
To increase the availability of your Resolve Actions Pro deployment, you can have a primary and a secondary (or DR) Actions Pro sites that you can manually switch between. You can rely on the ability to switch between these sites in the event of a disaster for Disaster Recovery (DR) or in a more controlled manner, such as during upgrades to maximize availability.
Actions Pro does automated replication of its internal Elasticsearch database between sites with the help of the RSSync component. This greatly simplifies the process of switching from one site to another. In conjunction with other supporting processes, you can switch over and do failover/failback between sites quickly.
This guide provides details on how to set up and maintain the sites, how to perform switchover or failover/failback, and how to upgrade Actions Pro so as to minimize downtime. It assumes that you have an Actions Pro deployment up and running that will become the primary site.
The following diagram shows the main components and component relations of a highly-available Actions Pro deployment.
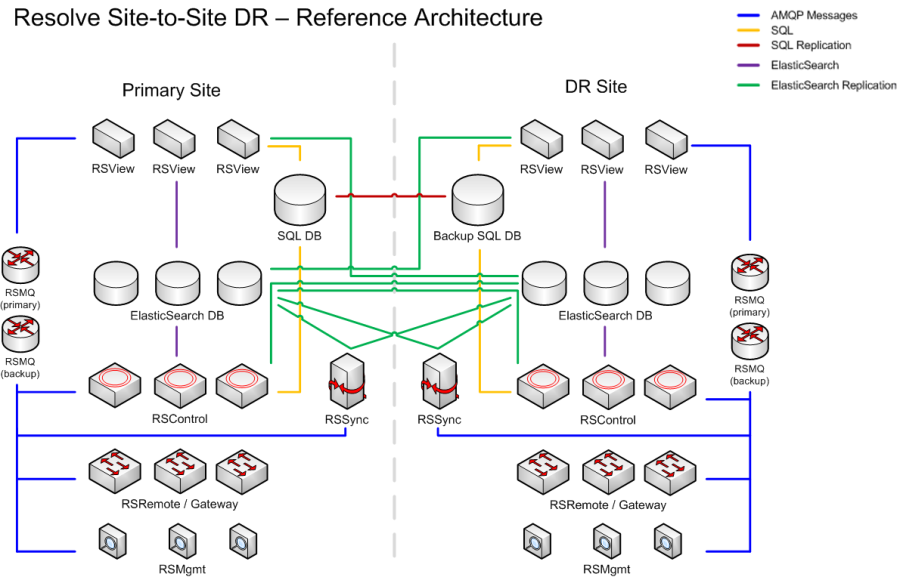
You can keep your Actions Pro sites in both an Active-Cold and an Active-Warm high-availability mode.
- Active-Cold means that all services at the DR site are down except for RSSearch, RSMQ, and RSSync while the primary site is fully up and accepts all requests. This state has the benefit of using less compute resources but also means that failover is a multi-minute process at minimum as you need to bring all the other DR components up before you can switch over.
- Active-Warm means that you can keep your DR site in a semi-active state in which manual Automation execution will work but automated execution from Scheduled Jobs or Gateways will not. The benefit of this mode is that failover can be done very quickly, in a matter of seconds. This mode requires an Active-Active Actions Pro DB replication.
Terms Used in This Guide
The following DR terms are used throughout this guide:
- Primary cluster—Refers to the Actions Pro cluster that runs at your primary site. This Actions Pro deployment is designed to handle the user load under normal conditions.
- DR cluster—Refers to the Actions Pro cluster that runs at your secondary, or DR, site. This Actions Pro deployment is designed to take the user load when the primary cluster is experiencing issues.
- Switchover—Refers to a planned cut-over from the primary Actions Pro cluster to the DR Actions Pro cluster when both clusters are in optimal health. You can choose to switch over to prepare the primary cluster for tasks such as a scheduled hardware upgrade or as a DR drill.
- Failover—Refers to an emergency cut-over to the DR Actions Pro cluster in the event of the primary Actions Pro cluster experiencing deterioration.
- Failback—Refers to the switching back to the original primary cluster from the original DR cluster as the result of failover.
Setting Up DR
A DR deployment requires two Actions Pro sites: primary and DR. This writing assumes that you already have an Actions Pro deployment up and running at the primary site that you plan on using as primary.
The DR deployment is a duplicate of your entire primary environment. It is highly recommended that you deploy it in a different geographical location.
Deploying a DR Cluster
The first step toward running a DR site is to deploy Actions Pro. Follow the instructions in the Clustered Installation guide to make a second Actions Pro deployment, ensuring the following:
- Set up the deployment identically to the primary, with the complete resources it needs to be fully functional, including:
- Its own license
- SQL database
- Elasticsearch database
- Set the number of shards on RSSearch (Elastsicsearch) to match that in the primary cluster.
- Preferably, set up instances of any third-party dependencies that you might have for maximum availability.
- At the end of the installation, ensure that the DR deployment is running, but not taking user requests.
Setting Up SQL Replication
After you deploy Actions Pro at the DR site, including creating an SQL database (SQL DB), you need to set up replication between the primary and DR SQL DB instances. Ensure that you set up DB replication as follows:
- For Active-Cold DR mode, use unidirectional replication—from the primary to the DR cluster.
- For Active-Warm DR mode, use bidirectional replication.
The instructions for setting up replication depend on the database management system that you use and are outside the scope of this document.
Synchronizing Other Resources
It is up to you to manually synchronize other data that must be kept in sync between the sites. This can include gateway configuration in the Blueprint file or TLS certificates for the Tomcat server.
Creating Elasticsearch Repositories
A major part of setting up DR is copying RSSearch (Elasticsearch) data from the primary to the DR site, which is done through Elasticsearch snapshots. Before you can take and restore Elasticsearch snapshots however, you need to create snapshot repositories at both sites. It is highly recommended to create them before you start the site connection procedure to minimize downtime.
A related task is copying the data snapshot from the primary to the DR site after it is ready. While NFS is a popular way of doing that, you can use any other method that allows you to copy a large file between the sites. Make sure that you set this method up before starting the site connection procedure.
At both sites, take these steps to create Elasticsearch repositories:
- On each RESearch node in the cluster, set up a repository directory:
- Log in to the site's RSSearch node as the resolve user.
- Create a directory for the repository.
For example:If you are using NFS, ensure the following:mkdir -p /mnt/es-repo- The NFS export that you crated on your NFS server is mounted in this directory.
- The same export is mounted at both sites.
- The export is of read-write type.
- The export has
no_root_squashset so that you can change the local directory's permissions.
- Ensure that the resolve user can read and write in the directory.
You might have to run this command as root if you don’t have sudo configured for the resolve user.If you have mounted an NFS share in the directory and you get a "Permission denied" error, try re-exporting the share with the# all commands should run without errors
sudo chown resolve:resolve /mnt/es-repo
sudo chmod 775 /mnt/es-repo
touch /mnt/es-repo/testfile.txtno_root_squashoption. - Allow the directory in the Elasticsearch configuration:
- Open
<actions-home>/elasticsearch/config/elasticsearch.ymlfor editing. - Add the directory path to the
path.repoproperty.
For example:path.repo: ["/opt/resolve","/mnt/es-repo"] - Save the file.
- Restart Elasticsearch:
<actions-home>/elasticsearch/bin/stop.sh
<actions-home>/elasticsearch/bin/run.sh
- Open
- On one of the cluster's RSSearch nodes, run the following to create the repository:where:
curl -u curl -u <username>:<pass> -XPUT -H "Content-Type: application/json" 'https://<rssearch-hostname>:9200/_snapshot/<repo-name>' -d '{ "type": "fs", "settings": { "location": "<repo-dir>", "compress": true } }'<username>:<pass>are the Elasticsearch username and password that you have set during Actions Pro installation.<rssearch-hostname>is the hostname or the IP address of the RSSearch node.<repo-name>is how you are naming the repository, for example,backup.<_repo-dir_>is the full path to the directory that you created for the repository, for example,/mnt/es-repo.
For more information on Elasticsearch snapshot repositories, see Managing Snapshot Repositories or check the official Elasticsearch documentation.
Connecting the Sites
After you have both the primary and the DR sites deployed, it is time to let them learn about each other.
The procedure to connect the sites involves downtime on the primary Actions Pro deployment. Plan accordingly.
Follow the steps below to connect the primary and the DR sites.
Each step marks the site where you need to perform it:
- (Primary) - take the step on the primary Actions Pro site.
- (DR) - take the step on the DR Actions Pro site.
- (DR) Ensure that the Actions Pro services in the DR cluster are not running:
# stop all services
<actions-home>/bin/stop.sh all
# verify all services are stopped
<actions-home>/bin/status.sh all - (Primary) On each cluster node, set the cluster name:
- Open
blueprint.propertiesfor editing. - Set
CLUSTERNAMEto a unique name that properly identifies the cluster, such asPROD-Primary. - Apply the configuration changes:
<actions-home>/bin/config.sh - Restart Actions Pro:
# stop all services
<actions-home>/bin/stop.sh all
# verify all services are stopped
<actions-home>/bin/status.sh all
# start all services
<actions-home>/bin/run.sh all - Verify that all services are up:
<actions-home>/bin/status.sh all - Optionally, run tests to verify that the primary cluster is fully functional.
- Open
- (DR) On each cluster node, set the DR and primary cluster names:
- Open
blueprint.propertiesfor editing. - Set
CLUSTERNAMEto a unique name that properly identifies the DR cluster, such asPROD-DR. - Set
RSSEARCH_SYNC_CLUSTERNAMEto the value of theCLUSTERNAMEproperty in the primary cluster.
For example, if you have named the primary clusterPROD-Primary, setRSSEARCH_SYNC_CLUSTERNAMEtoPROD-Primary. - Set
RSSEARCH_SYNC_NODESto the IP address of the RSSearch (Elasticsearch) node in the primary cluster.
- Open
- (DR) Set up RSSearch replication in the respective
blueprint.properties:- On each cluster node, set
rssearch.synctotrue. - On the RSSync cluster node, set the following properties:
resolve.rssynctotrue.cautionOnly one node in a cluster can have this property set.
rsview.search.synctasktotrue.cautionOnly one RSView node in a cluster can have this property set.
- On all cluster nodes, apply the configuration changes:
<actions-home>/bin/config.shcautionDo not start Actions Pro.
- On each cluster node, set
- (Primary) Deactivate the primary cluster.
This ensures that any scheduled tasks on the primary cluster are not running and will not be starting during the maintenance window. Cluster deactivation does not prevent the cluster from accepting and carrying out requests.- Log in to any Actions Pro node as the resolve user that you created during Actions Pro installation.
- Start RSConsole:
<actions-home>/rsconsole/bin/run.sh - Log in as
admin. - Connect to BROADCAST:
connect BROADCAST - Deactivate the cluster:
cluster/DeactivateCluster
- (Primary) Shut down the primary cluster:
# stop all services
<actions-home>/bin/stop.sh all
# verify all services are stopped
<actions-home>/bin/status.sh all - (Primary) On each cluster node, set the RSSearch sync cluster name:
- Open
blueprint.propertiesfor editing. - Set
RSSEARCH_SYNC_CLUSTERNAMEto the value of theCLUSTERNAMEproperty in the DR cluster.
For example, if you named the DR clusterPROD-DR, setRSSEARCH_SYNC_CLUSTERNAMEtoPROD-DR.
- Open
- (Primary) Partially set up RSSearch replication in the respective
blueprint.properties:- On each cluster node, set
rssearch.synctotrue. - On the RSSync cluster node, set
resolve.rssynctotrue.cautionNever set this property on multiple cluster nodes.
- On each cluster node, set
RSSEARCH_SYNC_NODESto a dummy IP address like1.1.1.1.
This instructs the primary cluster to save a log of all Elasticsearch records changed but does not copy data to the DR cluster. - On all cluster nodes, apply the configuration changes:
<actions-home>/bin/config.sh
- On each cluster node, set
- (Primary) Start RSSearch:
<actions-home>/bin/run.sh rssearch
# verify that only RSSearch is UP
<actions-home>/bin/status.sh all - Copy Elasticsearch data from the primary cluster to the DR cluster.
The following steps assume that you have Elasticsearch snapshot repositories created.- (Primary) Create a snapshot from the primary cluster:where:
curl -u <username>:<pass> -XPUT 'https://<rssearch-hostname>:9200/_snapshot/<repo-name>/<snapsho-name>?wait_for_completion=true'where:<username>:<pass>are the Elasticsearch username and password that you have set during Actions Pro installation.<rssearch-hostname>is the hostname or the IP address of the RSSearch node.<repo-name>is how you are naming the repository, for example,backup.<snapshot-name>is how you want to name the snapshot. Preferably, include the date in the name, such as insnapshot-20211231.
- (Primary) Verify the snapshot.where:
curl -u <username>:<pass> 'https://<rssearch-hostname>:9200/_snapshot/<repo-name>/<snapsho-name>/_status?pretty'<username>:<pass>are the Elasticsearch username and password that you have set during Actions Pro installation.<rssearch-hostname>is the hostname or the IP address of the RSSearch node.<repo-name>is the repository name.<snapshot-name>is the snapshot name.
- (Primary) Start the primary cluster:
# start all services
<actions-home>/bin/run.sh all
# verify all services are UP
<actions-home>/bin/status.sh all - (DR) Start RSSearch on the DR cluster:
# start the service
<actions-home>/bin/run.sh rssearch
# verify that only rssearch is UP
<actions-home>/bin/status.sh all - (DR) Restore the snapshot on the DR cluster:
- Copy the snapshot from the primary cluster.
If using NFS, the snapshot appears automatically in the shared NSF export. - Close all Actions Pro indices (except for RSSearch) in preparation for restoring a snapshot:where:
curl -u <username>:<pass> -XPOST 'https://<rssearch-hostname>:9200/_all/_close'<username>:<pass>are the Elasticsearch username and password that you have set during Actions Pro installation.<rssearch-hostname>is the hostname or the IP address of the RSSearch node.
- Restore all indices from the snapshot together with the cluster state:where:
curl -u <username>:<pass> –XPOST 'https://<rssearch-hostname>:9200/_snapshot/<repo-name>/<snapshot-name>/_restore'<username>:<pass>are the Elasticsearch username and password that you have set during Actions Pro installation.<rssearch-hostname>is the hostname or the IP address of the RSSearch node.<repo-name>is the repository name.<snapshot-name>is the snapshot name.
- Open all index back for use:where:
curl -u <username>:<pass> -XPOST 'https://<rssearch-hostname>:9200/_all/_open'<username>:<pass>are the Elasticsearch username and password that you have set during Actions Pro installation.<rssearch-hostname>is the hostname or the IP address of the RSSearch node.
- Copy the snapshot from the primary cluster.
- (DR) Purge the data from selected indices. Run the following command for each index to be purged:where index name is an item on the following list:
curl -u <username>:<pass> -XDELETE 'https://<rssearch-hostname>:9200/<index-name>/'synclog_miscsynclog_processrequestsynclog_socialpostsynclog_systempostsynclog_tagsynclog_taskresultsynclog_worksheet
- (Primary) Create a snapshot from the primary cluster:
- Enable Elasticsearch replication.
Replication allows any Elasticsearch change not captured in the snapshot to be copied to the DR cluster.- (Primary) On each cluster node, set the following
blueprint.propertiesproperties as follows:- Set
rssearch.synctotrue. - Set
RSSEARCH_SYNC_NODESto the address of the RSSearch node in the DR cluster.
- Set
- (Primary) On the RSSearch cluster node, set the following properties:
- Set
resolve.rssynctotrue.cautionNever set this property on multiple cluster nodes.
- Set
rsview.search.synctasktotrue.cautionNever set this property on multiple cluster nodes.
- Set
- (Primary) On all cluster nodes, apply the configuration changes:
<actions-home>/bin/config.sh
- (Primary) On each cluster node, set the following
- Start RSSearch replication:
- (Primary) Start the primary cluster:
# start all services
<actions-home>/bin/run.sh all
# verify all services are UP
<actions-home>/bin/status.sh all - (DR) Start RSSync on the DR cluster:
# start the service
<actions-home>/bin/run.sh rssync
# verify that rssync is UP
<actions-home>/bin/status.sh all - Check the RSSync log file for sync errors:
/rssync/log/rssync.log.
- (Primary) Start the primary cluster:
- (Primary) Activate the primary cluster.
- Log in to any Actions Pro node as the resolve user that you created during Actions Pro installation.
- Start RSConsole:
<actions-home>/rsconsole/bin/run.sh - Log in as
admin. - Connect to BROADCAST:
connect BROADCAST - Deactivate the cluster:
cluster/ActivateCluster
- For Active-Warm DR only (DR) Start the rest of the DR cluster services:
# start all services
<actions-home>/bin/run.sh all
# verify all services are UP
<actions-home>/bin/status.sh all - Do a planned switchover to test your DR setup.
See the Planned Switchover section for details.
Keeping the DR Cluster Synchronized
During the normal course of operating Actions Pro, assets such as Automations, Wikis, and Worksheets might be updated. Additionally, changes to the Blueprint file need to be deployed to both the primary and the secondary sites with appropriate values.
The following table describes how assets are synchronized and whether a restart is required. There could be other files required for Actions Pro to run properly that are not included in this list. Make sure that all required files are properly set up and any change to these files—properly updated in both clusters.
| Asset Type | Synchronization Method | Restart Required to Take Effect? |
|---|---|---|
| ActionTask | SQL replication. ActionTask becomes searchable after Elasticsearch indexing is completed. | No |
| ActionTask Namespace | SQL replication | No |
| ActionTask Property | SQL replication | No |
| Automation Builder | SQL replication | No |
| Runbook | SQL replication | No |
| Custom Table | SQL replication | Yes. Restart the DR site for any new or imported SQL tables to be initialized. |
| Form | SQL replication | Yes, if the Form contains Custom Table. Restart DR only. |
| Wiki Template | SQL replication | No |
| Gateway Filters | SQL replication | Use the ${CLUSTERNAME}.CLUSTERMODE system property to control deployment or un-deployment of Gateway filters. |
| Menu Definition | SQL replication | No |
| Menu Item | SQL replication | No |
| Menu Set | SQL replication | No |
| System - Business Rule | SQL replication | No |
| System - Custom DB | SQL replication | No |
| System - Scheduler | SQL replication | Use the ${CLUSTERNAME}.CLUSTERMODE system property to control deployment or un-deployment of scheduled jobs. |
| System - System Property | SQL replication | Yes, only DR |
| System - System Script | SQL replication | No |
| System - Tag | SQL replication | No |
| User - Group | SQL replication | No |
| User - Role | SQL replication | No |
| User - User | SQL replication | No |
| Wiki - Catalog | SQL replication | No |
| Wiki - Wiki | SQL replication | No |
| Wiki - Wiki Lookup | SQL replication | No |
| Wiki - Wiki Namespace | SQL replication | No |
| Wiki - Wiki Template | SQL replication | No |
| Blueprint | File system, managed by customers. It is likely that configuration files for primary and DR clusters will be different. | Yes, only DR |
| Log.cfg | File system | Yes, or use RSConsole command to update setting. Restart Primary and DR. |
| Certificate | File system | Yes, Primary and DR |
| Any other configuration files, such as Tomcat Configuration | File system, managed by customers. It is likely that configuration files for primary and DR clusters will be different. | Yes, Primary and DR |
| Worksheet | Elasticsearch replication | No |
| Search - History | Elasticsearch replication | No |
Planned Switchover
Switchover refers to a planned cut-over from the primary cluster to the DR cluster when both clusters are in optimal health. You can choose to switch over to prepare the primary cluster for tasks such as a scheduled hardware upgrade or as a DR drill.
While there is a downtime period during switchover, it is very short and all data is preserved during the process.
In case your primary cluster is deteriorating and you need to cut over to the DR cluster, use the Failover procedure.
Preparing for Switchover
Before starting the switchover procedure, verify that the DR cluster is functioning properly. Verify the following:
- Both clusters are running the same version of Actions Pro.
- All Actions Pro components continue to function properly, with no error messages shown in the log.
- Network connectivity and firewall rules are still adequate for Actions Pro to be fully functional.
- Third-party software that integrates with Actions Pro is functioning properly.
- Servers do not show sign of stress, such as high load or high memory utilization, as reported either by the Actions Pro admin reports or by other monitoring tools.
- The Blueprint files on all cluster nodes are up to date and restart has been done so that the configuration changes have taken effect.
- SQL database replication is properly configured and functioning.
- RSSync has been installed and configured properly and there is no backlog of unsynchronized assets.
- No new content such as wiki or Automations is being deployed. Previously deployed content is accessible in the DR cluster.
Performing Switchover
After verifying that the DR cluster is stable and ready to take the load, you are ready to do the switchover. During the switchover process, there is a very short interruption to the workflow during the time that a user stops work on the primary cluster and resumes work on the DR cluster. If a user continues to work through the period of execution of switchover, their work would be interrupted but not lost. They can resume their work on the DR cluster after it is ready.
Each step marks the cluster where you need to perform it:
- (Primary) - take the step on the primary Actions Pro cluster.
- (DR) - take the step on the DR Actions Pro cluster.
- (Primary) Deactivate the primary cluster.
This ensures that any scheduled tasks on the primary cluster are not running and will not be starting during the maintenance window.- Log in to any Actions Pro node as the resolve user that you created during Actions Pro installation.
- Start RSConsole:
<actions-home>/rsconsole/bin/run.sh - Log in as
admin. - Connect to BROADCAST:
connect BROADCAST - Deactivate the cluster:
cluster/DeactivateCluster
- (DR) Activate the DR cluster.
- Log in to any Actions Pro node as the resolve user that you created during Actions Pro installation.
- Start RSConsole:
<actions-home>/rsconsole/bin/run.sh - Log in as
admin. - Connect to BROADCAST:
connect BROADCAST - Activate the cluster:
cluster/ActivateCluster - Test the DR cluster to ensure that it is fully functional.
- Instruct the users to stop work on the primary cluster.
- On your load balancer, reroute the load to the DR cluster.
- Instruct users to resume work.
Users may need to relogin. The user workspace may not be able to restore to its previous state. - If you are running unidirectional SQL database replication, switch the direction of replication.
Restarting Actions Pro might be required, depending on the exact nature of the replication mechanism that you are using.
Testing and Validating Switchover
Perform the following:
- After the load has been cut over, continue to monitor the Actions Pro instances on the DR cluster, and watch to determine if:
- Actions Pro is picking up events or tickets
- Decision trees and Automations are running
- Users have any login issues or have issue finding an incident or a Worksheet
- Check for activity in the primary cluster to ensure no work in being performed, including user activities and system activities, such as scheduled tasks or Automations.
Rolling Back a Switchover
If unforeseen issues occur after the switchover, or the switchover is meant to be an exercise of Disaster Recovery, the process of rolling back to the primary cluster is similar to the switchover process.
If the Actions Pro instance on the primary cluster need to be shut down for hardware upgrade or other matters, only do so after the need of rolling back is eliminated.
The rollback consists of the following steps:
- (DR) Deactivate the DR cluster:
This ensures that any scheduled tasks on the DR cluster are not running and will not be starting during the maintenance window.- Log in to any Actions Pro node as the resolve user that you created during Actions Pro installation.
- Start RSConsole:
<actions-home>/rsconsole/bin/run.sh - Log in as
admin. - Connect to BROADCAST:
connect BROADCAST - Deactivate the cluster:
cluster/DeactivateCluster
- (Primary) Activate the primary cluster:
- Log in to any Actions Pro node as the resolve user that you created during Actions Pro installation.
- Start RSConsole:
<actions-home>/rsconsole/bin/run.sh - Log in as
admin. - Connect to BROADCAST:
connect BROADCAST - Activate the cluster:
cluster/ActivateCluster - Test the primary cluster to ensure that it is fully functional.
- (DR) Instruct the users to stop work on the DR cluster.
- On your load balancer, reroute the load to the primary cluster.
- Instruct users to resume work.
Users may need relogin. The user workspace may not be able to restore to its previous state. - If you are running unidirectional SQL database replication, switch the direction of replication.
Restarting Actions Pro might be required, depending on the exact nature of the replication mechanism that you are using.
Unplanned Failover
In situations requiring failover, a disaster has occurred on the primary cluster that renders the primary cluster unoperational, such as a disk failure or a power outage. In such cases, the speedy cut-over to the DR cluster is critical to maintaining business productivity. The process of failover is similar to switchover, but with certain steps eliminated because the service is already down and may not be fully responsive.
Failback refers to the switching back from the original DR to the original primary cluster after its issues have been rectified.
Follow the steps below to perform a failover.
Preparing for Failover
Before failing over, ensure that DR cluster is fully functional:
- Actions Pro instances running in both sites have the same version.
- All components of Actions Pro continue to function properly, with no error messages shown in the log.
- Network connectivity and firewall rules are still adequate for Actions Pro to be fully functional.
- Third-party software that integrates with Actions Pro is functioning properly.
- Servers do not show sign of stress, such as high load or high memory utilization, as reported either by the Actions Pro admin reports or by other monitoring tools.
- Blueprint file is up to date and necessary restart has been done so that the configuration change has taken effect.
Compared to the check list for switchover, this failover checklist is shorter. However, it is still important to ensure that the DR cluster is in a healthy and functioning state before cutting over. If there is any problem with the DR cluster, it is better to fix the problems before inviting additional user and system activities.
Performing Failover
Perform the following steps to failover:
- (Primary) Deactivate the primary cluster.
This ensures that any scheduled tasks on the primary cluster are not running and will not be starting during the maintenance window. Cluster deactivation does not prevent the cluster from accepting and carrying out requests.- Log in to any Actions Pro node as the resolve user that you created during Actions Pro installation.
- Start RSConsole:
<actions-home>/rsconsole/bin/run.sh - Log in as
admin. - Connect to BROADCAST:
connect BROADCAST - Deactivate the cluster:
cluster/DeactivateCluster - If the primary cluster does not respond to the deactivation command due to its state of stress, take these steps:
- Log in to Actions Pro as an administrator.
You can also do that on the DR environment if your DR SQL DB can still successfully replicate to the primary environment's DB. - From the main menu, go to System Administration > System Properties.
- Double check that
<clustername>.clusterModeis set toinactive.
- Log in to Actions Pro as an administrator.
- (DR) Activate the primary cluster.
- Log in to any Actions Pro node as the resolve user that you created during Actions Pro installation.
- Start RSConsole:
<actions-home>/rsconsole/bin/run.sh - Log in as
admin. - Connect to BROADCAST:
connect BROADCAST - Deactivate the cluster:
cluster/ActivateCluster
- On your load balancer, reroute the load to the DR cluster.
- If you are running unidirectional SQL database replication, switch the direction of replication.
Restarting Actions Pro might be required, depending on the exact nature of the replication mechanism that you are using. - Instruct users to resume work.
Users may need relogin. The user workspace may not be able to restore to its previous state.
Testing and Validating after Failover
After you complete the failover, continue to monitor Actions Pro for:
- Whether Actions Pro is picking up events or tickets through gateways.
- Whether Decision Trees and Automations are running.
- Whether users have any login issues or have issue finding an incident or a Worksheet.
- Whether Scheduled tasks are run on schedule.
In addition, check for activity on the primary cluster to ensure work is not being done anymore, including user activities and system activities such as scheduled tasks or Automations. Even though the primary cluster suffers from an emergency, there might still be components that are running actively.
In the case of failover, rolling back to the primary cluster before the issues in it are resolved is not recommended. After stabilizing the primary cluster, refer to the Failing Back to Primary Cluster section for how to switch back to the primary cluster.
Failing Back to Primary Cluster
Failback refers to the switching back to the original primary cluster from the original DR cluster as the result of failover, except that the original primary cluster becomes the target DR cluster, and the other way around. Follow the same procedure as Planned Switchover for failback.
Back Up and Restore RSSearch
Actions Pro uses Elasticsearch (RSSearch) to store, search, and document indices and Worksheet execution results. It is recommended to back up the Elasticsearch indices on a regular basis as part of your DR procedure.
This guide uses the Elasticsearch snapshot and restore module to create manual snapshots of individual indices or an entire cluster into a remote repository. You will need to to that during DR setup when copying Elasticsearch data between the Primary and the DR cluster.
The commands in this section assume that you are running RSSearch with valid TLS certificates. If you are running it with self-signed certificates, include the -k option to the curl command to skip the certificate check.
curl -k -u <username>:<pass> ...
Managing Snapshot Repositories
Before you save any backups, you need to define a snapshot repository in Elasticsearch. Elasticsearch has two general repository types: a file system repository or a read-only URL repository. When using the file system repository type, you can share the repository data between sites using a common NFS export mounted on both the primary and the DR instance of RSSearch.
Creating a Repository
Use curl to run a query to Elasticsearch for repository creation. Use the query's parameters to specify the repository type as well as other options.
Before you create a repository in your file system, you need to allow the path in the Elasticsearch configuration. Add the path to the <actions-home>/elasticsearch/config/elasticsearch.yml in the path.repo property and restart Elasticsearch.
path.repo: ["/opt/resolve","/tmp/my_repo"]
The following example registers a shared file system repository with the name my_repo using the /tmp/my_repo file system location. After running the command, you are prompted to acknowledge and confirm it to create the repository.
curl –XPUT 'https://<rssearch-hostname>:9200/_snapshot/my_repo' –d '{
  "type": "fs",
  "settings": {
    "location": "/tmp/my_repo",
    "compress": true
  }
}'
On successful repository creation, you get a confirmation message:
{
  "acknowledged" : true
}
Use the following query parameters to control how the repository is created.
Parameter | Description |
| Specifies the repository type:
|
| Only for fs repository type File system location to store snapshots. The path points to the same shared filesystem location on all nodes. |
| Only for url repository type URL where the snapshots will be accessible. The following protocols are available:
|
| Optional Turns on compression of the snapshot files. Compression is applied only to metadata files (index mapping and settings). Data files are not compressed. Default: |
| Optional Specify chunk size for big files to be broken down into. Specify the chunk size in bytes or use size value notation, i.e. 1g, 10m, 5k. Default: |
| Optional Verify repository upon creation. Default: |
| Optional Throttles the restore rate per node. Default: |
| Optional Throttles the snapshotting rate per node. Default: |
See the official Elasticsearch documentation for more information on creating snapshot repositories.
Verifying a Repository
Unless you disable verification when you create the repository, it will be verified on the primary and DR nodes to make sure it is functional there. You can also start the verification process afterwords at any time by running the following curl command. Substitute your repository name for my_repo.
curl -u <username>:<pass> –XPOST 'https://<rssearch-hostname>:9200/_snapshot/my_repo/_verify'
It returns a list of nodes where the repository was successfully verified or an error message if the verification failed.
Getting Repository Information
After the repository is registered, you can obtain information about it using the following curl command. Substitute your repository name for my_repo. The pretty parameter is optional. It formats the repository information in a presentable and reader-friendly way.
curl -u <username>:<pass> 'https://<rssearch-hostname>:9200/_snapshot/my_repo?pretty'
If you omit the repository name or use _all, then RSSearch returns information about all repositories currently registered in the cluster.
curl -u <username>:<pass> 'https://<rssearch-hostname>:9200/_snapshot'
curl -u <username>:<pass> 'https://<rssearch-hostname>:9200/_snapshot/_all'
Deleting a Repository
When you delete a repository, only the location reference to the repository storing the snapshots is removed. The snapshots themselves are actually untouched and in place. In the following command, remember to substitute your repository name for my_repo.
curl -u <username>:<pass> –XDELETE 'https://<rssearch-hostname>:9200/_snapshot/my_repo'
Managing Snapshots
A repository can contain multiple backup snapshots of the same cluster, with each snapshot identified by a unique name (including the date into the snapshot name is recommended). The index snapshotting process is incremental. When making the index snapshot, only files that were created or changed since the last snapshot are copied. All indexing and searching operations can continue while an index is being snapshot; however, any new records added to that index after the snapshot process had started are not added. Only one snapshot process can be executed in the cluster at any time.
Creating a Snapshot
To create a snapshot, you need to specify the snapshot name (snapshot_20211225 in this example) and the repository name (my_repo). The optional wait_for_completion parameter specifies whether the request returns immediately after snapshot initialization (default) or wait for snapshot completion.
curl -u <username>:<pass> –XPUT 'https://<rssearch-hostname>:9200/_snapshot/my_repo/snapshot_20211225?wait_for_completion=true'
On successful snapshot creation, you will get an output resembling the following:
{"snapshot":{"snapshot":"snapshot_20211225","version_id":1070399,"version":"1.7.3","indices":["metricrunbook","wikidocument","socialpost","synclog_tag","worksheet_20180516","userquery","taskresult_20180522","synclog_systempost","taskresult_20180521","processrequest_20180516","metricjmsqueue","executionsummary_20180522","globalquery","synclog_socialpost","worksheet_20180520","metricjvm","worksheetdata","synclog_worksheet","synclog_taskresult","worksheet_20180519","searchquery","dictionary","executionsummary_20180523","taskresult_20180516","metrictimer","taskresult_20180523","processrequest_20180521","taskresult_20180517","processrequest_20180517","processrequest_20180523","actiontask","metriccpu","worksheet_20180521","executionsummary_20180517","metricusers","executionsummary_20180521","worksheet_20180518","synclog_processrequest","metrictransaction","metriclatency","systempost","worksheet_20180517","worksheet_20180522","executionsummary_20180516","executestate","metricdb","synclog_misc","worksheet_20180523","processrequest_20180522","tag"],"state":"SUCCESS","start_time":"2018-06-11T19:40:04.848Z","start_time_in_millis":1528746004848,"end_time":"2018-06-11T19:40:11.007Z","end_time_in_millis":1528746011007,"duration_in_millis":6159,"failures":[],"shards":{"total":250,"failed":0,"successful":250}}}
Keep the following in mind when running a snapshot:
- During snapshot initialization, information about all previous snapshots is loaded into the memory, which means the command may take a few minutes with very large repositories to return, even if the
wait_for_completionparameter is set tofalse. - Because only one snapshot operation can be run at a time, you can terminate a snapshotting operation by using the delete snapshot operation.
The snapshot will include all open and started indices in the cluster by default. To back up only particular indices, specify them in a list in the body of the snapshot request.
curl -u <username>:<pass> –XPUT 'https://<rssearch-hostname>:9200/_snapshot/my_repo/snapshot_20211225' –d '{
  "indices": "index_1,index_2",
  "ignore unavailable": "true",
  "include_global_state": false
}'
The following query parameters are supported for snapshot creation:
| Parameter | Description |
|---|---|
indices | Comma-separated list of specific indices to include in the snapshot request. By default, the snapshot includes all open and started indices in the cluster. |
ignore unavailable | If true, causes indices that do not exist to be ignored.By default, the snapshot request fails if you have specified an index that does not exist. |
include_global_state | If false, prevents the cluster global state from being stored in the snapshot.By default, the entire snapshot fails if one or more indices participating in the snapshot do not have all primary shards available. |
Getting Snapshot Information and Status
After the snapshot is created, you can obtain information about it with the following command:
curl -u <username>:<pass> 'https://<rssearch-hostname>:9200/_snapshot/my_repo/snapshot_20141225'
To obtain information about all snapshots currently stored in the repository, use _all as the snapshot name.
curl -u <username>:<pass> 'https://<rssearch-hostname>:9200/_snapshot/my_repo/_all'
At the end of the basic information display, the list of total, failed, and successful blocks backed up is displayed. Of them, the total and successful numbers should match, with none failed.
You can use this operation to monitor the progress of the snapshot while it is running. It supports the wait_for_completion parameter that waits until the snapshot is complete.
The snapshot information operation uses the same resources and thread pool as snapshot creation. Because only one snapshotting operation can be run at a time, executing the snapshot information operation while large shards are being snapshot can cause the snapshot information operation to wait for available resources before returning any results. On very large shards, the wait time can be significant.
While the snapshot information operation returns only basic information about the snapshot in progress, the snapshot status command returns a complete breakdown of the current state for each shard participating in the snapshot. A list of all currently running snapshots with their detailed status information can be obtained using the following command:
curl -u <username>:<pass> 'https://<rssearch-hostname>:9200/_snapshot/_status'
To return information about snapshots in a particular repository, specify the repository name:
curl -u <username>:<pass> 'https://<rssearch-hostname>:9200/_snapshot/my_repo/_status'
To return detailed status information for a given snapshot or multiple snapshots, even if none are currently running, specify both repository and snapshot names:
curl -u <username>:<pass> 'https://<rssearch-hostname>:9200/_snapshot/my_repo/snapshot_20141225/_status'
curl -u <username>:<pass> 'https://<rssearch-hostname>:9200/_snapshot/my_repo/snapshot_20141225, snapshot_20150101/_status'
Deleting Snapshots
You can delete a snapshot from the repository using the command below. It deletes all files associated with the specified snapshot, and not used by any other snapshot.
curl -u <username>:<pass> -XDELETE 'https://<rssearch-hostname>:9200/_snapshot/my_repo/snapshot_20141225'
If you run the deletion while the snapshot is being created, then the snapshotting process aborts and all files created as part of the snapshotting process are cleared. You can therefore use the delete snapshot operation to cancel snapshot operations that were executed by mistake or that are running unusually long.
Restoring Snapshots
You can take the restore operation only on a functioning cluster. If the snapshot file was created in a different cluster, copy the file over to the cluster that you want to restore.
An existing index can be only restored if it is in a closed state. To close all Actions Pro indices (except for RSSearch itself) in preparation for restoring a snapshot, use the following command:
curl -u <username>:<pass> -XPOST 'https://<rssearch-hostname>:9200/_all/_close'
After you restore a snapshot, remember to open the index back for use:
curl -u <username>:<pass> -XPOST 'https://<rssearch-hostname>:9200/_all/_open'
After you close the indices, you can choose how to restore the indices and the cluster state. The restore operation automatically opens restored indices if they are closed, and creates new indices if they did not exist in the cluster.
To restore all indices from a snapshot (snapshot_20211225 in the following example, located in the my_repo repository) together with the cluster state, use the command below.
curl -u <username>:<pass> –XPOST 'https://<rssearch-hostname>:9200/_snapshot/my_repo/snapshot_20211225/_restore'
To restore specific indices, list them using the indices query parameter. You can also set include_global_state to false to prevent the global cluster state from being restored, as shown below:
curl -u <username>:<pass> –XPOST 'https://<rssearch-hostname>:9200/_snapshot/my_repo/snapshot_20211225/_restore' –d '{
  "indices": "index_1,index_2",
  "ignore_unavailable": "true",
  "include_global_state": false,
  "rename_pattern": "index_(.+)",
  "rename_replacement": "restored_index_$1"
}'
The following settings are supported for the restore snapshot operation:
| Parameter | Description |
|---|---|
indices | Comma-separated list of specific indices to restore. By default, all indices in the snapshot are restored. |
partial | Set to true to allow restoring indices that lack snapshots of some shards (which might have failed to snapshot). Any missing shards are re-created empty.By default, the entire restore operation fails if any index is missing shards. |
include_global_state | If false, prevents the global state of the cluster from being restored. |
include_aliases | Set to false to prevent aliases from being restored together with associated indices. |
rename_pattern | Selects the indices that you want to rename as you restore them. Write a regular expression to match the indices stored in the snapshot. Use groups in the regular expression to be able to reference parts of the original name in the replacement name. Works together with rename_replacement. |
rename_replacement | Specifies the new naming pattern for the indices that you selected with rename_pattern. Write a regular expression to specify the pattern. Reference groups from rename_pattern to use parts of the original index naming in the replacement. |
Stopping Currently Running Restore Operations
The restore operation uses the standard shard recovery mechanism. Any currently running restore operation can be cancelled by deleting indices that are being restored. Note that data for all deleted indices will be removed from the cluster as a result of this operation.
Upgrading Actions Pro with DR Site for Maximum Availability
To reduce the downtime caused by upgrading Actions Pro to a new version, you can take advantage of your DR site and switch over to it before applying the upgrade.
Upgrading Actions Pro could introduce new data schema or data sources, which will render the RSSearch replication inoperable between new and old schema or data. RSSearch replication will become operable again when both clusters have the same schemas. In the meantime, it is important for each cluster to keep its own record of non-replicated data. This way, the data can be replicated after both clusters have the same schema.
Use these steps to switch over for the DR cluster for an Actions Pro version upgrade:
- (Primary and DR) Set up the clusters to stop replicating data:
- Open each cluster and on each cluster node, open
blueprint.propertiesfor editing. - Set
RSSEARCH_SYNC_NODESto a dummy IP address, like1.1.1.1.
This prevents the clusters from replicating data across the network, but they still maintain a record of changed data. - Make a rolling restart of Actions Pro for the change to take effect.
- Open each cluster and on each cluster node, open
- Switch over from the primary cluster to the DR cluster.
Use the switchover procedure to do that. - (DR) Ensure that the DR cluster is fully functional and that there is no need to roll back.
- (Primary) Upgrade Actions Pro on the primary cluster and test it to ensure it functions properly.
- Switch over from the DR cluster to the primary cluster.
Use the switchover procedure to do that. - (DR) Upgrade Actions Pro on the DR cluster and test it to ensure it functions properly.
- (Primary and DR) Enable RSSearch replication:
- Open each cluster and on each cluster node, open
blueprint.propertiesfor editing. - Set
RSSEARCH_SYNC_NODESto the actual IP address of the RSSearch node running in the opposing cluster. - Make a rolling restart of Actions Pro for the change to take effect.
- Open each cluster and on each cluster node, open
At this point, RSSearch replication resumes. While the data is being copied over, some worksheet data and Wiki Pages or Automations might be missing. Give the replication enough time to complete if you are running into missing content.
Troubleshooting
Known troubleshooting information can help you diagnose and fix issues that you might hit.
I don't see Elasticsearch data being synchronized.
Cause
Multiple issues can prevent RSSearch to synchronize data between clusters.
Solution
Try each of the following solutions until you see RSSearch data start synchronizing.
- Ensure that you followed the steps in Setting Up DR closely.
- Ensure that the network connections between the sites function properly.
- Ensure that SQL database replication is set up properly and running.
- Ensure that there is no backlog of synchronization activities.