Email - Office 365 Module
The Email - Office 365 module provides a bidirectional communication channel (sending and reading emails) between an Office 365 mailbox and Resolve Actions Express by using a Web Services API. After you add and configure the module, Actions Express pulls new emails, translate them into incidents, and displays them in the Actions Express LIVE Dashboard.
Prerequisites
The following provisions must be made before configuring the module.
Authentication
Actions Express supports OAuth authentication for Office 365. It requires:
- Creating an application within an Azure instance with the following minimum rights for the sign-in user account: read, write, send.
- A User name, Password, Application Client ID, and Application Tenant ID for the sign-in user account.
In case you're still using basic authentication (username and password) for some of your tenants, we recommend transitioning to OAuth as soon as possible, as basic authentication for Office 365 has been deprecated since October 2022.
Currently, multi-factor authentication (MFA) is not supported for Actions Express.
Connectivity
Office 365 is a SaaS solution. The Email - Office 365 module requires Internet access on any Actions Express server running an instance of it.
See a list of Office 365 URLs and IP address ranges provided by Microsoft, in case you need to configure them in your firewall.
Initially, the module will attempt to access port 443 (HTTPS). If unsuccessful, it will try port 80 (HTTP).
Make sure that the mailbox license is set to Office 365 E1, as other license types don't support connections from external applications.
Setting Up Azure
Before you start using the Email - Office 365 module, you need to register a client application and an application (client) ID in Azure. To do that, take the following steps:
- In the Azure portal, log in with the Azure administrator account.
- Click All services.
- In the search box, search for “App registrations”.
- Click New registration.
- In the Name field, give the application an indicative name.
- Click Register.
- In the panel on the left, click Authentication.
- Under Advanced settings > Treat application as public client, select Yes.
- In the panel on the left, click API permissions.
- Click Add a permission.
- Select Microsoft Graph.
- Select Application permissions.
- Add required permissions to the app (minimum requirements):
- Mail.Send
- Mail.ReadWrite
- Click Add permissions.
- Click Grant admin consent.
- Again in the navigation on the left, click Certificates & secrets and then New client secret.
- Type in a Description.
- In Expires, specify when you want the secret to expire.
- Click Add to generate the new client secret and then immediately take note of the Value that will be used in the Connection Parameters section of the module instance configuration described below.caution
This is the only time this value will be shown in clear text. If you fail to take note of it, you will have to generate a new client secret.
- On the application's Overview page, take note of the Application (client) ID and Directory (tenant) ID that will be used in step 10 of the Connection Parameters section of the module instance configuration described below.
Installing the Module
Use the Actions Express installer to add the module. You can add it during a fresh installation, or later as an update.
It is possible to use the Email - Office 365 integration without deleting emails after Actions Express has processed them. This is not set by default.
To set it, edit the SQL database directly. In the Modules table, in the Params column of the relevant module row, add deletemessages=false.
After that, restart the Comm Server and the Email module.
Contact your Resolve representative if you want this option set.
Fresh Installation
Choose whether to install the module on the same machine as the main Actions Express services or on a separate machine.
Integrated Module Installation
Take these steps to install the module on the same machine as the main Actions Express application.
- Run the Actions Express installer and click Next.
- Accept the license agreement and click Next.
- Select an installation location and click Next.
- Select the installation type (Single Tenant or Multi Tenant) and click Next.
If you select Multi Tenant, you are prompted for an additional multi-tenant installation key. - On the Choose Installation type screen, select Create new Actions Express environment/Upgrade after uninstalling and click Next.
- On the Custom Setup screen, ensure that Integration Packs > Actions Express Email is marked for installation on the local hard drive.
- Click Next and complete the installation as usual.
Standalone Module Installation
Take these steps to install the module on a machine separate from the main Actions Express application.
- Run the Actions Express installer and click Next.
- Accept the license agreement and click Next.
- Select an installation location and click Next.
- Select the installation type (Single Tenant or Multi Tenant) and click Next.
If you select Multi Tenant, you are prompted for an additional multi-tenant installation key. - On the Choose Installation type screen, select Install standalone components and click Next.
- On the Custom Setup screen, ensure that all components are deselected except Integration Packs > Actions Express Email and then click Next.
- On the next screen, click Install and wait for the installation to complete.
- Click Finish to close the installation wizard.
Existing Installation
If you are already running Actions Express and you want to add the module, take the following steps:
- Run the Actions Express installer and click Next.
- On the Program Maintenance screen, click Modify and click Next.
- On the Custom Setup screen, expand Integration Packs and ensure that Actions Express Email is marked for installation on the local hard drive.
- Click Next.
- On the next screen, click Install and wait for the installation to complete.
- Click Finish to close the installation wizard.
Advanced Module Settings
Some module settings that are common between all modules and are rarely used can only be changed directly in the Resolve DB. See a subset of these settings.
Creating the Module Instance
You need to configure a module instance for each Office 365 mailbox that you want to integrate with.
- Go to Main Menu > Configuration > Modules.
- From the top right corner of Integrations, click +.
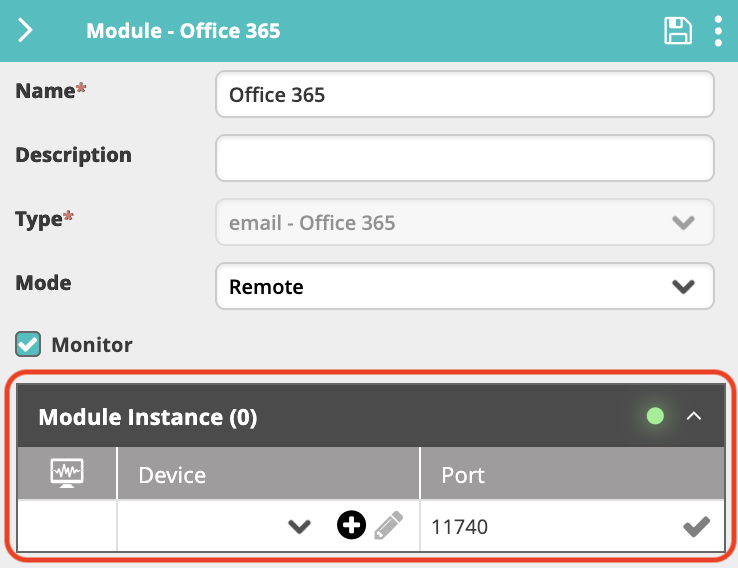
The module properties screen appears. - In the Name field, enter a name for the new module instance.
It is a good practice to provide a descriptive name to let you distinguish between multiple module instances of the same type. - (optional) In the Description field, enter a description for the module instance.
- From the Type field, select email - Office 365.
- In Mode, select where you want the module instance to run:
- Local—The module instance will run in your local deployment of Actions Express. This option is suitable for integration with services that run in the same network or cloud services that are accessible from the network.
- Remote—The module instance will run on the server where you installed the remote executor (installing a remote executor is needed when the server does not have access to the SQL DB). This option is suitable for integration with services that run in a separate network and are normally not accessible from the main network where Actions Express runs.
- Check Monitor if you want Actions Express to monitor the module instance.
By selecting this option, a new incident is created when the instance is down. - When you have one or more email - Office 365 modules installed on remote machines, you can select to which remote email - Office 365 module you want to connect. Select the device where the module instance is installed from Module Instance > Device, as well as the Port through which it will communicate.
- If you haven't predefined a Device within Incident Configuration, you can click the plus icon to add a new Device directly from this screen. Enter a Name and an IP Address within the configuration, where the Name must be resolvable within DNS (FQDN) or IP Address.
- Click Save to create the module.
- In the Connection Parameters section, specify the Email - Office 365 server connection details:
- For Auth Type, select the OAuth type you will be using (OAuth or OAuth2).
- For OAuth:
- Under Account information > Name field, enter the name or the email address for the Office 365 user account.
- Under Logon information:
- For User name, enter the name or the email address for the Office 365 user account.
- For Password, enter the password for the Office 365 user account.
- For Application ClientID, enter the Application (client) ID assigned in the application client registration in Azure.
- For OAuth2:
- Under Account information > Email Address field, enter the email address for the Office 365 user account.
- Under Logon information:
- For Secret Key, enter the secret key from the application client registration in Azure.
- For Application ClientID, enter the Application (client) ID assigned in the application client registration in Azure.
- For Application TenantID, enter the Tenant ID from the application client registration in Azure.
- For OAuth:
- Click Test Connection to verify your connection with the server.
A valid connection is indicated with a green tick icon.
- For Auth Type, select the OAuth type you will be using (OAuth or OAuth2).
- Click Save again to complete this section of the configuration.
- In the Configuration Options section, specify additional generic module instance options:
- Log Level—Select how verbose you want the module-related log messages to be. Level 1 is the least verbose.
The log file is located in the module's installation folder (
C:\Program Files\Resolve\Actions Express Emailby default).
- Log Level—Select how verbose you want the module-related log messages to be. Level 1 is the least verbose.
The log file is located in the module's installation folder (
- Click Save.
Related Activities
To use the Actions Express Email activities, open the Workflow Designer in the Main Menu Builder section. Search, browse, or click the + in the canvas area to find the desired activity and add it to the workflow.
Currently, one Email activity is available: