Building Your Workflow
Basic Concepts
A workflow is a sequence of activities performed according to a logical flow. In most cases, a workflow represents a series of events carried out in response to a specific event or incident. When you design a workflow, build it according to how you would normally handle the incident in your organization, and select the activities that best match your policies and procedures.
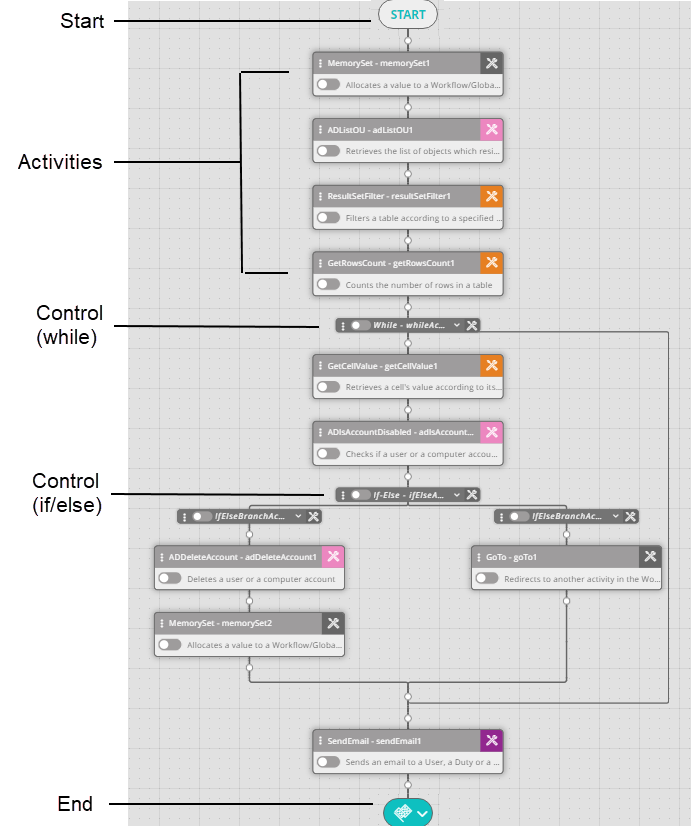
On the canvas of the Workflow Designer, a workflow is made up of all the components between the Start and End elements. These components fall into two categories:
- Activities: Operative actions that are the building blocks of the workflow process. Every activity returns a value (i.e., integer, string or ResultSet). For example, a Get Disk Space activity returns an integer. An activity's returned value is generally used to determine the next step(s) in the workflow. For example, if Get Disk Space returns a low value, you may want to clear some disk space.
- Controls: Special types of activities that are usually (but not always) logic functions or decisions that determine how the workflow will proceed. For more information and examples, refer to Understanding Common Controls.
The diagram below shows the typical structure of a workflow. Activities are distinguished by a description and a color-coded symbol corresponding to the color of the relevant activity category in the Activities Tree. Controls are not color coded, and those that have no configurable settings lack a description.
Note that the structure of a workflow is linear, with the exception of If/Else controls that send the workflow in one of two or more paths.
The following sections present more detailed information on how to build your workflow:
- Adding Activities
- Understanding Common Controls
- Editing Activities
- Performing Actions on Activities
- Building Workflows: Best Practices
Adding Activities
Where to Find Activities
Adding activities is an intrinsic part of creating workflows. You can add an activity to your workflow using any of the following methods:
- Adding an Activity from the Activities Tree
- Pasting a copied activity into the workflow
- Choosing an activity from the Suggested Activities list
- Adding Activities Using the Search Tool
After adding an activity, make sure to define settings for it, so your workflow will run as expected. For more information, refer to Editing Activities.
Adding an Activity from the Activities Tree
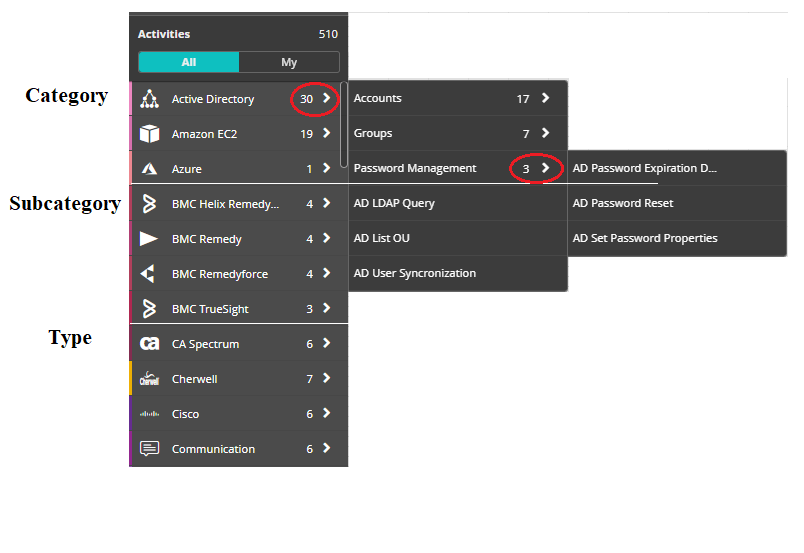
The Activities tree, in the upper-left corner of the Workflow Designer, lists all the categories of activities, in alphabetical order. The number of activity types in the category is displayed to the right of each category name.
Each category is represented by a unique icon, which is displayed to the left of the category name. In addition, each category has its own color code (shown to the left of the icon). When an activity is added to a workflow, the relevant color appears in the upper right corner of the activity element on the canvas, helping you to easily identify the activity's category.
Most categories contain several subcategories. Subcategories aid in managing categories with large numbers of activities by organizing the activities according to type. Activity types that are similar are grouped together into a specific subcategory.
In the example below, the Active Directory category, which contains 30 activity types, is divided into several subcategories. The Password Management subcategory contains three activity types, all of which involve password operations.
Adding an activity from the Activities tree involves expanding the relevant category, and then adding the desired activity type by dragging and dropping it onto the canvas.
To add an activity from the Activities tree:
- From the Activities tree, expand the relevant category (and subcategory, if relevant), until the required activity type is shown.
- Position the mouse pointer over the activity type until a cross-hair appears. Then, hold the mouse button down and drag the activity type to the appropriate position in the workflow. Target positions are indicated by crosshair nodes
 .
.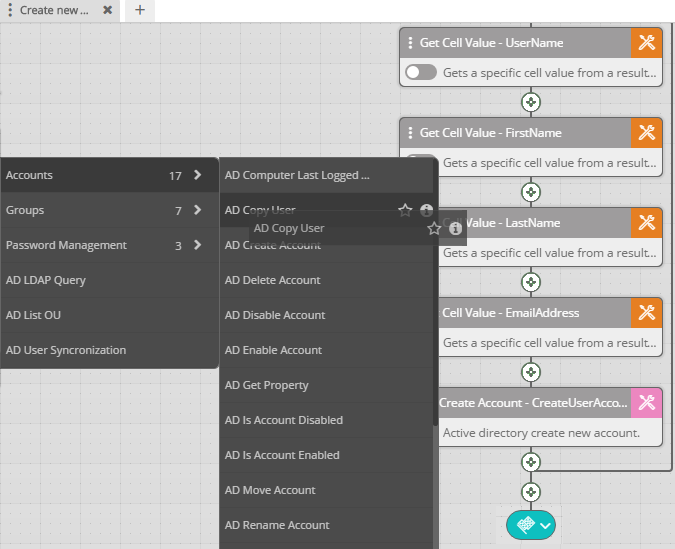
The selected activity type is added to the workflow.noteIf you inadvertently add the activity to the wrong place in the workflow, you may move it to the correct position by dragging and dropping.
- Define settings for the new activity. For details, refer to Editing Activities.
Pasting Copied Activities
The Paste option lets you easily insert a duplicate of an activity or group of activities to your workflow. The activity can be copied from the same workflow or a different workflow. For details about how to copy activities, refer to Performing Actions on Activities.
To paste an activity into a workflow:
- Copy the required activity or group of activities.
- Position the mouse pointer over the white node at the point in the workflow where you want to add the activity.
The white node becomes a cross-hair.
- Click the crosshair.
A placeholder for a new activity type is added to the workflow.
- Click Paste.
The copied activity or group of activities is added to the workflow.
Adding a Suggested Activity
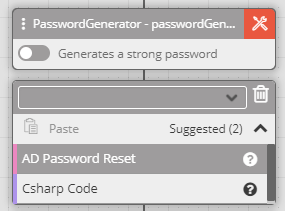
The Suggested Activities list displays recommended activity types to add to your workflow. Suggested Activities are context-sensitive, so the activity types that are shown vary according to the activity that the new activity will follow. The list contains up to six activity types that most commonly follow the previous activity in the workflow.
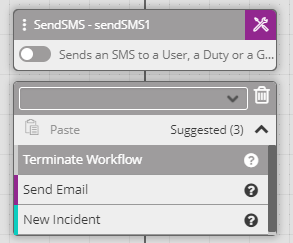
The following example shows how suggested activities change according to the previous activity.
Password Generator offers two suggested activities:
Send SMS offers three suggested actions:
To add a suggested activity:
- Position the mouse pointer over the white node at the point in the workflow where you want to add the activity.
The white node becomes a crosshair. - Click the crosshair.
A placeholder for a new activity type is added to the workflow. - Click Suggested.
The Suggested Activities list opens.
- Select the activity that you want to add, for example, Send Email.
The selected activity is added to the workflow.
Adding Activities Using the Search Tool
The Search tool returns a list of activities that match a provided search term. Both categories and types of activities that contain the search term are included in the search results.
You can then select an activity from the search results list and add it to your workflow.
To add an activity using the Search tool:
- Position the mouse pointer over the white node at the point in the workflow where you want to add the activity.
The white node becomes a crosshair. - Click the crosshair.
A placeholder for a new activity type is added to the workflow. - In the Search field at the top of the placeholder, enter a search term.
As you type, categories and activity types matching the search term are listed below the Search field.
- Select the activity that you want to add to the workflow.
The selected activity is added.
Importing an Activity from Resolve Automation Exchange
The Resolve Automation Exchange platform offers a browsable, searchable, web-based library of pre-built automations and integrations that make it quick and easy to jumpstart and scale automation initiatives with no scripting or coding required. You can download and import them by following these steps:
- In a browser, open the Resolve Automation Exchange.
- Click the Resolve Actions Express button.
- Locate the desired activity in the list or by searching for it in the Search Automation Exchange box.
- Download it by either:
- Clicking the Download icon in the Actions column left of the activity name;
- Clicking on the activity name and then the Download button in the package detail window that appears.
- Import the activity into Actions Express.
- Add it to your workflow as usual.
Understanding Common Controls
Common Controls
Controls are activities that influence or determine the progression of a workflow by means of conditions, logic functions, or navigation instructions. The list of available controls is displayed on the left side of the Workflow Designer, under the Activities tree. You can add controls to your workflow using most of the methods used to add activities. For more information, refer to Adding Activities.

The following topics explain how to use and create common controls:
- If/Else: Defines two or more conditions which are evaluated to determine the activity sequence that will take place next.
- While: Designates one or more activities to be part of a loop.
- Parallel: Defines two or more activities (or sets of activities) that are executed simultaneously.
- Run Workflow: Inserts a nested (child) workflow into the main workflow.
- Goto: Designates a shortcut to a selected activity in the workflow.
If/Else: Evaluating Multiple Conditions
An If/Else control is made up of two or more branches, each of which defines a condition. When the workflow is run, each condition is evaluated, and the workflow then continues according to the sequence of activities specified by the matching branch.
In the following example, an If/Else control follows a ping command activity. If the ping is successful, the system sends an email with the message Server Up. If the ping fails, the system sends an email with the message Server Down. Please Check.

When workflows are executed, If/Else branches are checked sequentially, from left to right. As soon as a matching condition is found, the workflow progresses according to that branch, and the remaining branches are left unchecked. One branch, usually the right-most branch, is always designated as a default. If none of the conditions match, the workflow continues by executing the activities within the default branch.
If/Else Branch Types
You can create three types of If/Else branches in the Workflow Designer. The branches differ from one another in the nature of the conditions they define. The branch types are:
- Predefined: This type lets you choose from a list of common yes/no values, such as True, False, Response, No Response, and so on.
- User Defined: This type lets you select a condition category (Equals, Contains, etc.) and then define your own value. The value can be hard-coded or it can be a variable defined by another activity.
- Condition: This type lets you select from a list of predefined system conditions, or create a new system condition.
To create an If/Else control:
- From the list of controls on the left side of the Workflow Designer, select the If/Else control and drag it to the desired position in the workflow. For more details, refer to Adding Activities.
The control is added to the canvas containing two branches.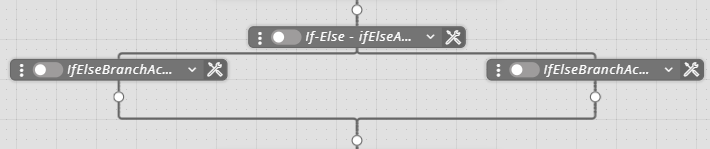
- From the upper right corner of one of the branches, click the Settings icon
 .
The Settings dialog box appears.
.
The Settings dialog box appears. - From the Type drop-down, select the required type.
- In the Value and/or Condition field(s), specify the required value or condition, according to the selected type.
- Click Save.
The Settings dialog closes. - Repeat steps 2-5 to define settings for the second branch of the control.
- To add another branch to the control, on the left side of the control, click the three-dot menu and then select Add Branch.
- Define the settings for the new branch.
- To reorder the branches, on the left side of a branch, click the three-dot menu and then select Move Left or Move Right, as required.
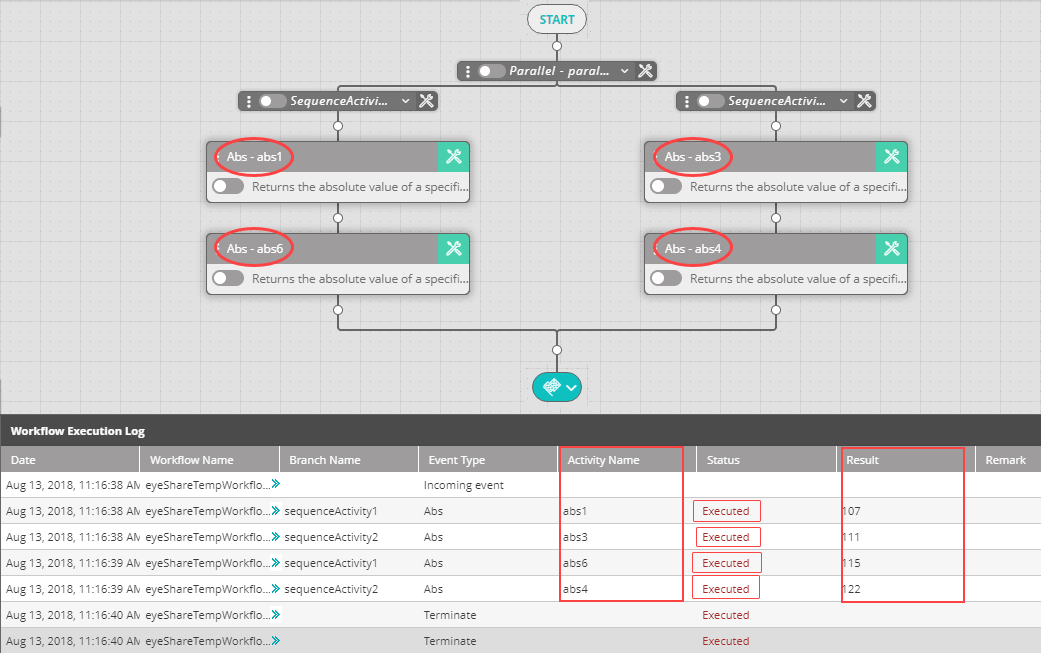
Executing Activities in Parallel
Like an If/Else control, a Parallel control is made up of two or more branches. However, the controls differ in two fundamental ways:
- The branches of a Parallel control are usually made up of sequences of activities. They do not normally evaluate conditions.
- Unlike an If/Else control, whose branches run sequentially from left to right, all branches of a Parallel control run simultaneously (in parallel). A Parallel control is therefore a useful time saver when the order of performing multiple activities is not significant (e.g., checking the status of devices).
The following example shows a Parallel control whose branches return the values of numbers. Note that when the workflow runs, each activity within a branch runs in sequence. However, the branches all run at the same time.
To create a Parallel control:
- From the list of controls on the left side of the Workflow Designer, select the Parallel control and drag it to the required position in the workflow. For more details, refer to Adding Activities.
The control is added to the canvas together with two branches.
- Build the activity sequence of the first branch by adding the relevant activities to the canvas and defining their settings. An activity sequence can be as short or as long as necessary (i.e., from one activity to many activities).
- Repeat Step 2 to build the activity sequence of the second branch.
- If necessary, add more branches to the Parallel control:
On the left side of the control, click the three-dot menu and then select Add Branch.
Then, build the activity sequence(s) of the additional branch(es).
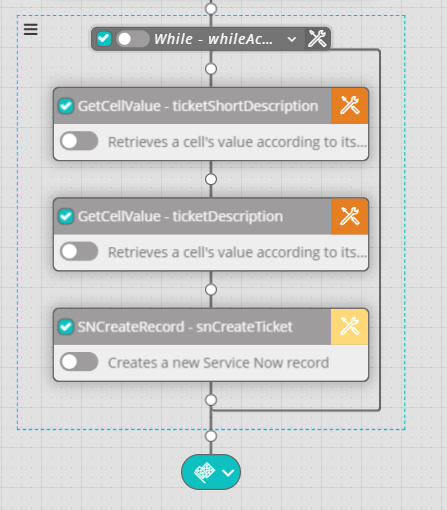
While: Inserting a Loop in Your Workflow
A While control starts a loop in the workflow. The loop can be as short or as long as necessary (i.e., from one activity to many activities). The following example shows a loop that is made up of five activities.

The counter for the loop, which determines how many times the loop runs, is defined in the settings for the While control.
To create a While control:
- From the list of controls on the left side of the Workflow Designer, select the While control and drag it to the required position in the workflow. For more details, refer to Adding Activities.
The control is added to the canvas, together with a line that represents the exit point of the loop (indicated by the arrow in the figure below). Activities added above this line are included in the loop. Activities added below the line are not part of the loop.
- Build the activity sequence of the loop by adding the relevant activities to the canvas and defining their settings.
- On the right side of the While control, click the Settings icon .
The Settings dialog box appears.
- In the Counter field, enter the value of the counter.
The value can be hard-coded or it can be a variable defined by another activity. For example: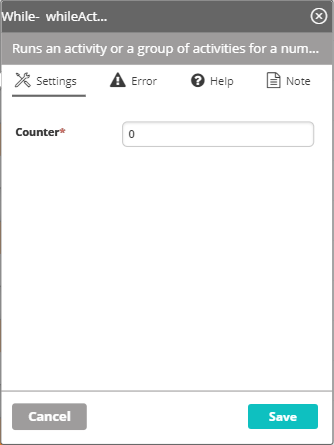
- Click Save.
Changes are saved in the system.
Calling a Nested Workflow
The Run Workflow control inserts a nested (child) workflow into the workflow. This control is useful for quickly and easily incorporating frequently used processes into your main workflows. In addition, you can run the nested (child) workflow with variables, which is ideal when the variable in the parent workflow is dynamic – as is the case when running a loop – and those changes need to be captured and used in the child workflow as it runs in the background.
To create a Run Workflow control:
From the list of controls on the left side of the Workflow Designer, select the Run Workflow control and drag it to the required position in the workflow. For more details, refer to Adding Activities.
The control is added to the canvas.

From the upper-right corner of the control, click the Settings icon
.
The Settings dialog box appears.
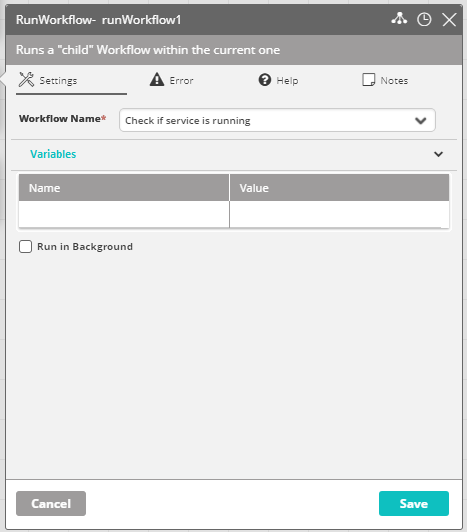
Click in the Workflow Name field, and select the required child workflow.
If you want to run the child workflow with variables, enter the variables under the Variables.
- The Name is the variable's name to be referenced (the name must differ from the activity's name and must start with a letter and contain only the A-Z, a-z, 0-9 characters).
- The Value is the variable's value - a constant value or another variable (variable names must follow the convention
%Variable%). Note that it is not possible to send both text and a variable in the same field (i.e.,getrowscount(%tablename%)).
noteThe variable passed to the child workflow is a copy of the variable in the parent workflow, meaning that changes made to the variable in the child workflow will not be reflected in the parent workflow.
If you want to run the child workflow asynchronously (i.e., the main workflow continues while the child flow is running), select the Run in Background checkbox.
Click Save.
Settings are saved in the system.
Goto: Setting a Navigation Shortcut
The Goto control interrupts the normal linear progression of a workflow by redirecting the flow to a specific activity elsewhere in the workflow. Once that activity is completed, the flow does not return to the point of interruption, but progresses linearly from the activity to which it was redirected.
The activity to which the flow is redirected may be at any location in the workflow. If the activity is located before the point of redirection, a portion of the workflow is repeated. If it is located after the point of redirection, a portion of the workflow is skipped.
To create a Goto control:
- From the list of controls on the left side of the Workflow Designer, select the Goto control and drag it to the required position in the workflow. For more details, refer to Adding Activities.
The control is added to the canvas.
- From the upper right corner of the control, click the Settings icon .
The Settings dialog box appears.
- Click in the Go to Activity field, and select the activity to which the flow should redirect.
- Click Save.
Settings are saved in the system.
Defining and Editing Activity Parameters
About Activity Parameters
Clicking the color-coded icon in the upper-right corner of an activity on the Workflow Designer canvas opens a Details dialog for the activity.

The Details dialog allows you to define and update various parameters for the activity, such as implementation settings, timeouts, and error handling. Features of the dialog are described below the diagram.

- Activity type—Displays the name of the activity type.
- Activity instance name—The user-defined name of the activity instance, referred to as Activity Name throughout Actions Express and this documentation.
- Activity instance name editor—Allows you to change the name of the activity instance. For details, refer to Updating the Activity Instance Name.
- Executor Module selection—Allows you to select the Executor module with which the activity interfaces. See Selecting an Executor Module.
- Timeout setting—Allows you to define the period of time after which the activity will automatically abort. For more information, refer to Setting the Activity Timeout.
- Close—Closes the Details dialog without saving changes.
- Settings—Allows you to configure implementation directions for the activity. Settings are displayed by default when the Activity Details dialog opens. For more information, refer to Configuring Activity Implementation Settings.
- Error—Allows you to select error handling directions for the activity. For more information, refer to Defining Error Handling.
- Help—Displays more detailed information about the purpose of the activity and how to use it.
- Note—Enables you to compose free text comments about the activity. For details, refer to Adding Notes.
- Cancel—Closes the Details dialog without saving changes.
- Save—Saves changes and closes the Details dialog.
Updating the Activity Instance Name
The strip at the top of the Details dialog contains the activity type (on the left) and the user-defined name of the activity instance (on the right).
When hovering over them, a tooltip displays the full activity type and instance name, and an Edit icon appears. Clicking it makes the activity instance name editable. Update the name as required, and then, at the bottom of the Details dialog, click Save.

Selecting an Executor Module
Executors help workflow performance and scalability by providing load balancing among the servers. An executor can be made up of Resolve Actions Express servers, third party servers, or both.
Clicking the branch-out icon ![]() at the top of the Activity Details dialog opens a list of all defined executors. If you would like the activity to interface with a specific executor, select the executor from the list, and then click Save.
at the top of the Activity Details dialog opens a list of all defined executors. If you would like the activity to interface with a specific executor, select the executor from the list, and then click Save.

Selecting an executor is not mandatory. If no executor is selected for an activity, a default configuration is used.
Setting the Activity Timeout
Every activity has a timeout setting. If the activity is not executed within the defined timeout period, it automatically aborts. The default timeout setting is one minute.
Clicking the clock icon ![]() at the top of the Activity Details dialog displays the currently configured timeout value in hours:minutes:seconds. When necessary, update the value as required, and then, at the bottom of the Details dialog, click Save.
at the top of the Activity Details dialog displays the currently configured timeout value in hours:minutes:seconds. When necessary, update the value as required, and then, at the bottom of the Details dialog, click Save.

Configuring Activity Implementation Settings
Activity settings contain values, parameters and/or instructions that determine how the activity is carried out. Settings can vary greatly, depending on which activity type is involved. For example, Copy File activity settings include the source and destination path of the file. Settings for an Active Directory Reset Password activity, however, contain the relevant username, previous password and new password.
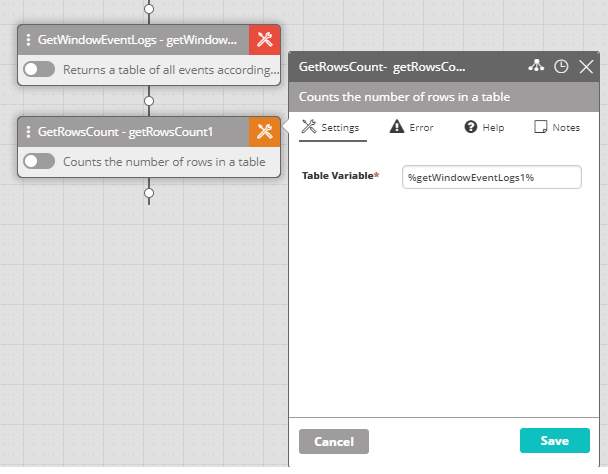
The following figure shows an example of an activity that retrieves the number of rows in a table. Its settings include only a single value that specifies the relevant table. In this case, the table is the one returned by the previous activity.
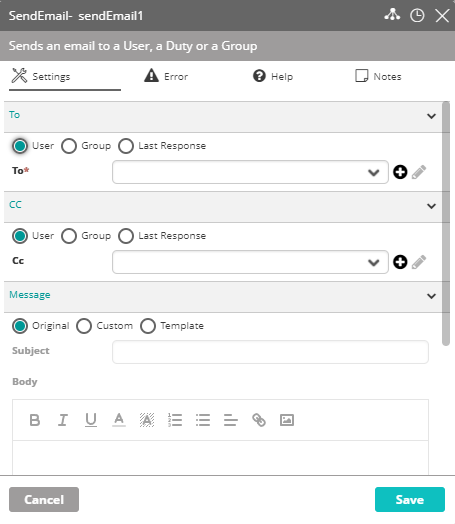
In contrast, the next example shows an activity (Send Email) that has multiple and more complex settings. These settings define the recipients of the email, the text of the email, attachments, and more.
It is recommended to always define implementation settings immediately after adding an activity to the workflow. If settings are not defined, or not configured properly, your workflow will not run as expected.
Hiding Activity Results in Execution Logs
In Actions Express, you can mask activity results in the Workflow Execution Log of the Workflow Designer and in the Activity Log of the Audit Trail while simultaneously being able to use them in the next activities of the workflow. Masking helps you prevent disclosing sensitive information in case a wider audience has access to the logs. It can also help keep performance high when you expect the activity results to be large.
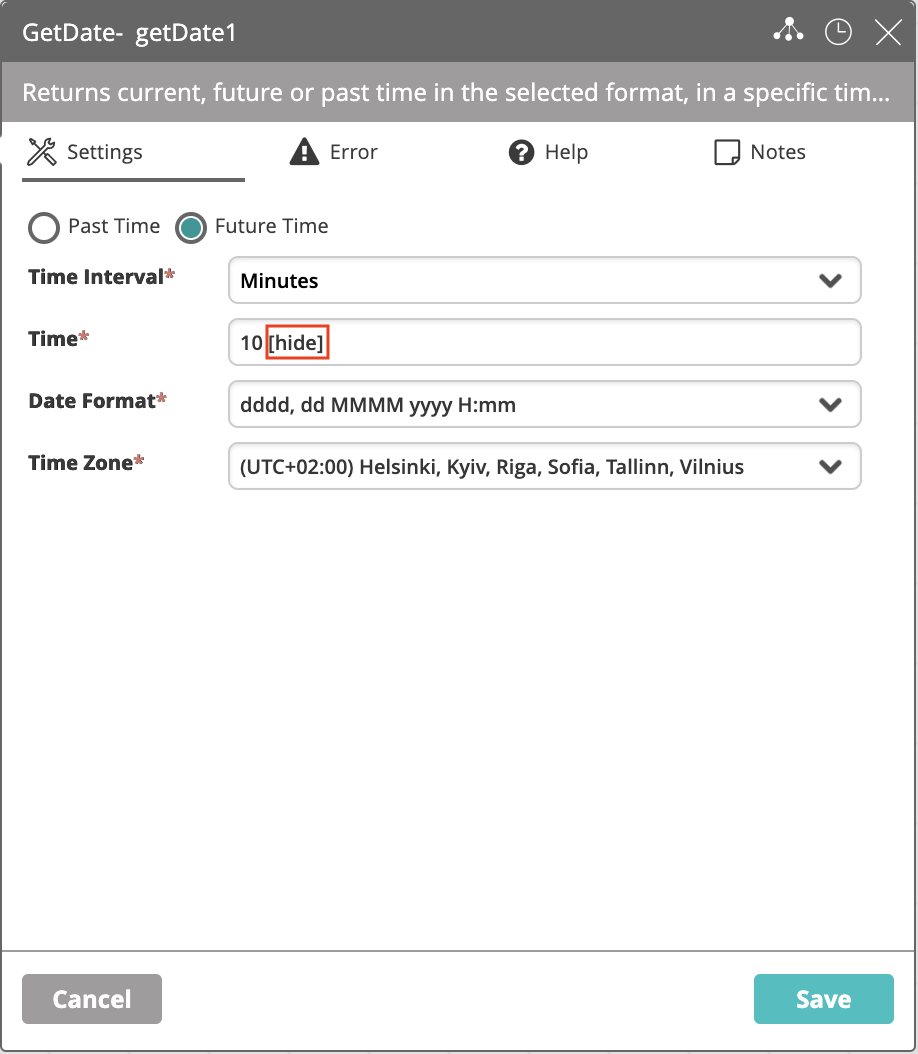
To mask the activity result, add the [hide] text in any of the editable fields of the activity settings before or after the input value, separated by space.
Let's take the following example with the Get Date activity, here showing future time in the selected format and time zone.
The result in the Workflow Execution Log and in the Audit Trail will be masked using asterisks:

Defining Error Handling
The Error tab of the Activity Details dialog enables you to specify actions that are taken in the event that the activity fails to be executed. The Workflow Designer supports four general error handling categories, which you can select from a dropdown list on the Error tab. The actual error handling methods are configured elsewhere in Actions Express.

To define multiple error handling categories, re-open the dropdown list and select an additional option. Error handling is carried out in the order of the selected options. For example:

It is recommended to specify an error handling method for every activity, and particularly for activities that occur before critical junctures in your workflow. For more information and guidelines about error handling, refer to Building Workflows: Best Practices.
Adding Notes
The Notes tab of the Activity Details dialog lets you write comments about the activity. It is recommended that notes be entered about each activity. Notes can contain a description of the activity, a summary of its logical place in the workflow, and any other relevant information that would be valuable to share.
To create or update a note, enter the text in the field, and then click Save.
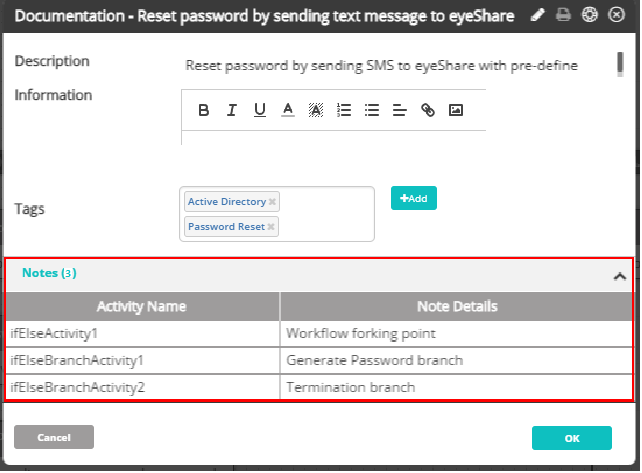
All notes created for a workflow are displayed at the bottom of the Documentation dialog for that workflow. For more information about the Documentation dialog, refer to Reviewing Workflow Metadata.

Performing Actions on Activities
About Actions on Activities
The Workflow Designer provides several activity management actions to help you easily build and control your workflow. The options include:
This article explains how to perform actions on individual activities. For information about working with multiple activities simultaneously, refer to Working with Selection Mode and Groups.
Disabling Activities
By default, all activities in the workflow are enabled, meaning that they are active and they run when the workflow is executed. During workflow design, you might want to prevent one or more activities from running, so you can test specific portions of the workflow. Disabling an activity blocks it from running during execution.
To disable and enable an activity:
- On the left side of the activity that you want to disable, ensure that the toggle is pointing to the right.
A red dot appears in the toggle and the activity is disabled. - To re-enable the activity, ensure that the toggle is pointing to the left.
The red dot disappears, and the activity is enabled.
Pasting Activities
The time-saving Paste action lets you transfer an activity to another portion of the same workflow, or to a different workflow. You can move an activity to a different place by cutting the activity and pasting it in the new location. Alternatively, you may copy an activity, and then place the duplicate activity in another location.
To paste an activity:
- In the upper left corner of the activity you want to paste, click the tree-dot menu and select Copy (to create a duplicate of the activity) or Cut (to transfer the original activity).
- Transfer the activity to the required location using one of the following methods:
- In the upper left corner of the activity above the location where you want to paste the activity, click the three-dot menu and select Paste.
- Click the node at the point in the workflow where you want to paste the activity. Then, from the activity placeholder that appears, click Paste. For more details, refer to Pasting Copied Activities.
The activity is transferred to the selected location.
Deleting Activities
The Delete action lets you remove activities that are no longer needed in the workflow.
To delete an activity:
- In the upper left corner of the activity that you want to remove, click the three-dot menu and select Delete.
The activity is removed from the workflow.
Working with Selection Mode and Groups
About Selection Mode and Groups
To maximize efficiency, the Workflow Designer is equipped with the following features that allow you to consolidate actions and divide your workflow into logical sections:
- Selection mode: Lets you select one or more activities in a workflow. Selection mode enables you to perform actions on multiple activities simultaneously. You can also designate a set of consecutive selected activities as a Group.
- Groups: Sets of consecutive activities on which you can perform collective operations and write notes. A group can also have its own set of error handling rules. For more information, refer to Working with Groups.
Using Selection Mode
The Workflow Designer's Selection mode allows you to perform actions on multiple consecutive activities simultaneously. Working in Selection mode is useful when you need to disable, copy or delete a portion of your workflow.
To select activities:
- In the upper left corner of the activity that you want to select, click the three-dot menu and select Select.
The Workflow Designer enters Selection mode. The three-dot menu of all activities in the workflow are replaced by checkboxes. A dashed teal border appears around the selected activity, and its checkbox is teal and selected.
- To select additional activities, check the boxes of the relevant activities.
Performing Actions on Selected Activities
The hamburger menu ![]() to the left of a selected activity contains a list of actions that you can perform on the activity. For details about performing actions, refer to Performing Actions on Activities.
to the left of a selected activity contains a list of actions that you can perform on the activity. For details about performing actions, refer to Performing Actions on Activities.
When working in Selection mode, you may perform actions on selected activities only.
When two or more consecutive activities are selected, a dashed teal border surrounds all the activities, and the activities share a common hamburger menu. Any action you perform affects all the activities in that set.
Working with Groups
A group is a designated set of consecutive activities within a workflow. Groups are independent entities that have their own names and for which you can write notes and define error handling rules. Unlike a set of selected activities, where all performed actions affect every activity in the set, in a group you may perform either collective actions or actions on an individual activity within the group.
The Workflow Designer has several predefined group types, such as If/Else controls, Parallel controls and While controls. You can also create your own groups using any relevant set of consecutive activities. It is recommended to divide your workflow into logical groups to enhance manageability.
Every group has a title bar from which you can perform operations on the group. The name of the group is displayed in the center of the title bar. User-defined groups are surrounded by a solid teal border.
To create a group:
- Enter Selection mode, and select all the activities that you want to include in the group. The activities must be in consecutive order within the workflow.
- In the upper left corner of the first activity in the set, click the hamburger menu and select Group.
The group is created.
Performing Operations on a Group
The icons in the title bar of the group allow you to perform operations on the group. To perform these operations on an individual activity within the group, click the corresponding icon in the relevant activity.
| Icon | Description |
|---|---|
| Three-dot menu: opens a list of actions that can be performed on the group. | |
| Toggling this icon disables/enables all activities in the group. | |
| Toggling this icon hides/displays the activities in the group. | |
| Opens the Group Details dialog, from which you can select error handling rules for the group and add notes about the group. |
Creating a Data Flow
As activities run one after the other, they produce data. It can be a simple "success" or "failure" indication, or something more substantial such as a file content, a database record, or a user account name.
In most cases, you will want to pass this data from activity to activity down the workflow to do extra processing, to display it, to store it, or to send it out. In Actions Express, passing data between activities is done using variables. In the case of the Run Workflow activity, variables also allow you to pass data from the parent workflow to the child and back.
The types of variables that you can use in your workflows include:
Workflow Variables
Workflow variables are variables that exist only within the scope of the current workflow. Two flavors of workflow variables exist:
- Activity result variables
- User-defined variables
Activity Result Variables
You use an activity result variable to reference the result of an activity execution from other activities.
A workflow variable is automatically created for every activity instance that you add to the workflow. The activity instance name becomes the name of that variable. You can reference the workflow variable of an activity from any other activity that follows it in the workflow execution order.
The scope of workflow variables is local—they only exist within the scope of a single workflow execution. They are not persisted after the execution and cannot be accessed from within other workflows that run at the same time. You use them to pass data from one activity to another within the bounds of a workflow.
Workflow activities can be referenced from parent and child workflows with some specifics. See KB: Using variables from a parent workflow in a child workflow and vice-versa for details.
To reference an activity result variable, use the following syntax:
%activityInstanceName%
If you type just the percentage sign and wait a second, the autocomplete will offer a list of all the workflow variables found inside the workflow for you to quick-select.
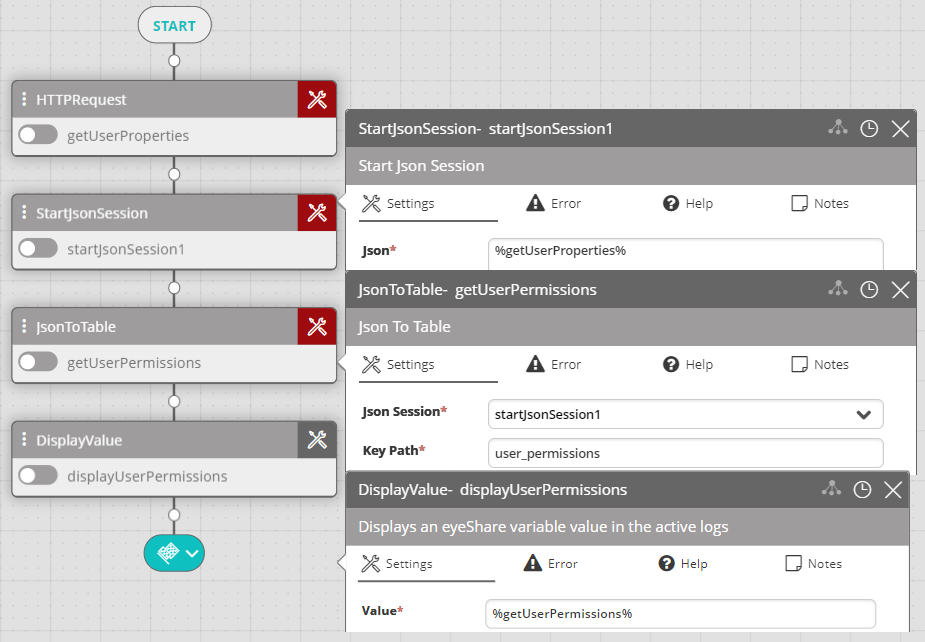
Assume you have added the HTTP Request activity that received an automatic, locally-unique (within the workflow) instance name to the likes of httpRequest1. As a skilled developer, you rename it to getUserProperties to reflect it making a REST call to get user information.
Now assume you want to extract a single data field from the REST call's response, which is in JSON format. You could add the Start Json Session activity to capture the JSON response from the REST call and then the Json To Table activity to extract a single key from the JSON structure.
The image below shows each of the activities' settings. The instance name of the Start Json Session activity has been left unchanged from the auto-generated default (startJsonSession1). The instance name of the Json To Table activity has been changed to getUserPermissions and the activity has been set to extract the value of the user_permissions JSON key. Finally, we use the DisplayValue activity to write the value produced by getUserPermissions to the execution log.
User-Defined Workflow Variables
The user-defined variable is a type of workflow variable that you can set during the workflow execution. These are subject to the same use rules as activity result variables. User-defined variables are suitable for these purposes, among others:
- Constructing data from other variables
- Appending in-memory lists with activity results
- Storing the result of an activity to check multiple times in an If-else statement using a While loop
- Simulating event data as input
To create a user-defined variable, type its name, enclosing it in percentage signs, in a text field of an activity:
%userDefinedVariable%
One use of user-defined variables is to simulate passing event data during workflow testing. When using them like this, remember to set them before running the workflow. See Setting Variables in Workflows for details.
After testing the workflow, be sure to replace the user-defined variables with global variables or module variables that you have set up to provide actual input data from incoming events.
Assume that you want to build a URL on the fly and include in it a piece of data that you extract from Active Directory (AD).
You would start by using one of the AD activities to get the data. Let's say you named it getUserFolder.
To construct the URL, you will need the Memory Set activity. In it, first provide a name for the variable that you are creating in Variable Name—userVaultPath for example. In Variable Value, construct the URL, referencing the %getUserFolder% activity result:
http://www.example.com/vault?userpath=%getUserFolder%
After you construct the URL, you can refer to it from other activities using the user-defined variable name (%userVaultPath% in this case). Note that, unlike other activities, you don't use the Memory Set activity's instance name to refer to its result.
Global Variables
Global variables are available to all workflows in your Actions Express instance and are managed from Main Menu > Repository > General > Variables. This type of variables can only be referenced in workflows and trigger conditions.
- Built-in global variables—Also known as Standard Objects. A set of incident-related variables that come with Actions Express and cannot be deleted. Examples include
Classification,Device,Description, andIncident(see Variables for the full list). Their names are reserved words in Actions Express. Because of that, any parameters with the same names that might be incoming from integration modules are automatically prefixed with an underscore (_Device). You can choose to map such a parameter to a user-defined global variable (for example,JiraDevice) or address it directly with the underscored notation. - User-defined global variables—Any number of variables that you can create for data that you want to be accessible to all your workflows. Several data types are supported; see Variables for the list.
A global variable can be created in any of the following modes, which determine how it gets its value:
- Set Variable's Value Only When Incident is Created—The variable is set only once during the incident's lifecycle—to the data received with the event responsible for the incident's creation. Any updated values incoming with other events considered to be part of the same incident, are ignored.
- Set Variable's Value on Every Incident Update—The variable updates its value every time a new event is received, where one of the pre-parsed properties has the same name.
- Read-Only Mode—The variable is a constant that cannot be changed.
- Read-Write Mode—The variable can be modified during a workflow run.
Because global variables are available to all workflows, pay special attention when using them. Ensure that you design your logic such that a global variable shared by two or more workflows is not inadvertently modified midway through the workflow execution by another workflow.
To reference a global variable in an activity, type its name enclosed in percentage signs (%). Another option is to enter the opening percentage sign (%) and, after the autocomplete window appears, to click its Global tab and select the variable to use.
%globalVariableName%
One application of global variables is to capture data from incoming events. In this case, you need to:
- Create the global variable with the same name as the event parameter that you want to capture. note
Matching is case-insensitive.
- Create the global variable with either of these modes (subject to your use case; see Incident Caching for context):
- Set Variable's Value Only When Incident is Created
- Set Variable's Value on Every Incident Update
When set up this way, the global variable will be set as soon as Actions Express receives an event containing a parameter that matches it, regardless of whether the event classifies as an incident or not. The event must be coming from an integration module.
If the variable's mode is Set Variable's Value on Every Incident Update, it will update on every matching event. If the mode is Set Variable's Value on Every Incident Update, and the event classifies as an incident, any further value updates are skipped while the incident is in Down state.
When working with events from modules with extended Forms, Filters, and Mapping settings, you have the option to map an integration parameter to a global variable. This gives you the option to use an alternative name for that parameter in your workflow.
Module Variables
Module variables are a way to access data from your integrations. A module variable will be automatically created by Actions Express for every data field in every form that you set in the module settings.
Module variables only exist for the types of modules that have extended Forms, Filters, and Mapping settings.
For example, in the Jira module, each form represents a Jira project. All Jira project fields will be auto-mapped to Actions Express module variables for you to use in workflows. Optionally, you can map as many of them to global variables on the Mapping tab, if you want to give those Jira fields alternative or more unique names.
When auto-mapping module variables, Actions Express tries to preserve the original integration name if possible:
%integrationPropertyName%
For example, Approver groups will be mapped as %Approver groups%.
Only integration property names that match reserved words in Actions Express are not kept. These are automatically prefixed with an underscore (_). Examples include properties like Severity and Source, which are displayed in Actions Express as _Severity and _Source respectively and referenced as %_Severity% and %_Source%.
To make referencing variables easier, Actions Express provides a helper variable picker. To see the full list of module variables at the time of building the workflow, start by typing the percentage sign (%) in an activity text field. After the autocomplete window appears, click its Modules tab. On the tab, each list entry represents a module that you have configured, and the number next to the module name is the number of forms available to the module. After expanding a module and a form, you see the list of module variables.
Note that this picker only serves as a helper. You are free to reference another variable if you know it is going to be part of the event's payload. Similarly, a field that you pick from the helper might not be part of the event's payload. At the end of the day, the requirement for successfully executing the workflow is for the variable to be part of the event's payload come execution time.
Scope Precedence
Actions Express allows you to have same-named variables in the global and the workflow scope. To avoid unexpected outcomes, Actions Express puts precedence on the workflow variable when it finds a reference to such a variable name in an activity.
Assume you have a global variable named StudiedAnimal set to rabbit. If you create a simple workflow with just the DisplayValue activity and reference it, it will print out rabbit in the execution log.
Now let's add a MemorySet activity in front of DisplayValue and set it to create a workflow variable with the same name and set it to hare:
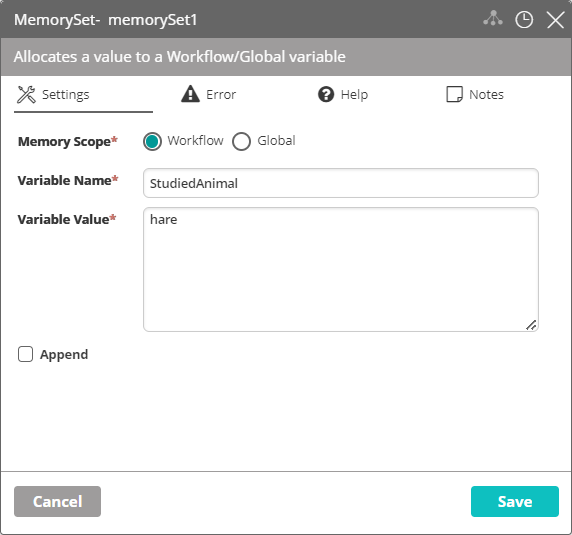
After you execute the updated workflow, DisplayValue will print out hare instead of rabbit as the local variable takes precedence over the global.
Building Workflows: Best Practices
Making the right design decisions can have a positive effect on your workflow's performance and usability. Below, you can find a collection of design best practices to apply in the Workflow Designer.
- Limit workflows to 100 activities or fewer. When use cases require more than 100 activities, split actions into child workflows through the Run Workflow activity.
- Before migrating the workflow to production, eliminate unnecessary activities used in testing and logging (such as the Display Value activity).
- The Display Value activity is intended for debugging or writing results to the audit trail and must never be used as a variable where it is referenced as an input for another activity.
- Identify any repeating sections of the workflow design, take them out as child workflows, and reuse them.
- Use get cell value formulas when working with a large result set outputs instead of using multiple Get Cell Value activities.
- Update activity instance names to provide the context of the generated output.
- Include If-Else branches at critical points for visual error handling.
- Include notes into activity settings and/or within the workflow document describing the actions taken.
- Limit workflows to no more than five parallel branches.
- Group workflow sections for ease of navigation (you can collapse and expand them) and add notes to describe the function of the group.
- When you expect the activity results to be large, use the [hide] feature to eliminate logging raw result output into the database.
- Define the appropriate timeout setting for activities with external or time-sensitive actions (SSH activities, the various database query types and statements, Executor, Read File, and so on) by clicking the clock icon in the title bar. The default timeout is one minute. Based on the type or size of the result, it may require increasing the value.